Windows 7 disk partitions. How to partition a hard drive into partitions using a Windows utility and special programs? Sharing a new disk
Why is it necessary to partition a hard drive in Windows? First of all, for the security of your personal data. When a hard disk has only one partition, then all the files that are on this disk: programs, documents, photos, files of the Windows OS itself - are stored in one place.
Now imagine that the system crashes. All your personal files (photos, documents) will most likely be lost. It is much more correct when system files and user files are stored separately from each other.
Physically, they will still remain on the same hard drive, but will be on its different partitions. There may be several sections. One, as a rule, is assigned to the operating system and programs (system partition), the other (or others) - to the user's files.
One of the easiest and most affordable ways is to partition your hard drive when installing Windows. How to do this, we have analyzed in great detail and using a specific example in. What to do if the system is already installed and there are user files in it, how to partition the disk in such cases?
How to partition a disk with an installed Windows system without losing data
Today we will analyze how to divide a hard drive into two or more partitions with an already installed OS. It doesn't matter what edition of Windows you are using. This method will be relevant for any version, be it Windows 7 or Windows 10. In addition, if you already have two partitions, but you want to create a third one, both methods described below will also work.
In fact, our task is to “pinch off” from a large partition (and in our case this is the only partition - the system drive C) some part, say 200 GB, and make a separate partition out of it.
This can be done in several ways, including using the Windows operating system itself, which has a special Disk Management tool (Disk Management). This method requires a minimum of effort and in most cases solves the problem without third-party software. Let's start with him.
Before proceeding with the partition of a hard drive with Windows installed, you need to take some precautions. If there are important files in the system, copy them to external media (flash drive, external hard drive) in advance.
How to divide a hard drive into two or more partitions? Method 1 - Windows system tools
Let's use the Disk Management tool. In Windows 10, just right-click on the icon My computer, select item Control - Disk Management.
In other versions of Windows, this tool can be found using a regular search or using a hotkey combination Win+R, and enter the diskmgmt.msc command.

Before us is the Disk Management window, which displays the user's disk, which in this case has a size of 465.76 GB (Disk 0). Almost all HDD space is allocated to one partition - Disk C. There is also a partition (500 MB), which is reserved by the operating system at the stage of its installation.

In our case, 465 GB (the entire hard drive) for one system disk is not an affordable luxury, so we will “pinch off” the maximum possible (as the system allows) number of GB from it and make a new partition out of this free space.
As a rule, about 100-150 GB are allocated for the system disk. It all depends on the specific user. 100 GB is enough if Windows and the most necessary software are installed on the system disk. If, in addition to the system and software, it is planned to install modern games, then the size of 100 GB will not be enough.
Before performing any operation with a specific hard disk partition, do not forget to select it. It is enough to click on it with the left mouse button and the section will be selected. Only then proceed to the operation.
Let's move on to practice. Select the partition from which you want to "pin off" the space. On the selected section, right-click and select the command Shrink Volume.

All sizes are in megabytes, be careful. In a specific example, the maximum amount of MB that the system "allows" to compress is 237.656 MB (232.09 GB). This means that after compression, we will get Disk C with a size of 232 GB and Disk D - 238782 MB (233 GB). Not the best option. If it does not suit you, and you need to “pinch off” more than the system offers, then you will have to use third-party software, but more on that later.
![]()
When all calculations are completed, and the sizes of future sections are set, click OK(or click Enter). We have a new unrecognized partition (200 GB). Do not rush to exit Disk Management. The procedure for dividing the disk into two partitions has not yet ended. Select a new partition (200 GB), and right-click, select the item Create a simple volume.

run Create Simple Volume Wizard. In principle, everything is simple, just follow the instructions of the master himself. Check out the screenshots. You are required to give the future partition a letter (in my case it is D) and the file system - NFTS.


Let's see what happened. We have one hard drive and divided it into two partitions: the system Disk C (265 GB) and the New Volume D (200 GB) for storing personal data. By the way, the new volume is now displayed in Windows Explorer as well.

Now you know how to partition a hard drive into two or more partitions using Windows. If this method suits you, and it coped with your task, then you can stop there. However, if you are looking for a better option, and, for example, you need to “pinch off” a larger size than the system itself offers, we use third-party software. True, first we need to return the original state of the hard drive.
Let's delete the created partition and return it to the system disk. We allocate New volume and right click the item Delete volume.

Read the warning and click OK. We get 200 GB, which are not distributed.


We carefully check all the numbers and click Further.

We have returned to the original state, when the system has one hard drive and it is almost completely reserved for one partition (system).
How to divide a hard drive into two or more partitions? Method 2 - Partition Master Free
It's time to switch to third-party software. Here the choice is great. There are paid and free options. I recommend staying at . Why? Time-tested, intuitive interface, free. Unlike the Disk Management tool that Windows offers, Partition Master allows you to shrink a disk partition for as long as it is physically possible.

The official website of the program is www.partition-tool.com. Go to the site, and select the section Products - Partition Master Free - in the top menu - Download.
Since the program is free, it will prompt you to install additional unwanted programs during its installation. Many free products work great and do their job perfectly, but since they are free, developers try to somehow make money on them. Be careful and uncheck the checkboxes with the offer of promotional products in time.
1. We start the installation of the downloaded program. Choose a language English and press OK.
2. In the next window, we agree that we will use this software only for our family, check the box and click OK.
3. In the next window (at our discretion), we leave only one checkmark - Create a desktop icon(create an icon on the desktop) and click NEXT.
Installing Partition Master Free in screenshots. Click


5. In the next window, enter your Name and Email. You can enter fictitious data.
6. After installation, click Finish.
The program should start. The interface is completely in English, but it is quite simple and with the help of this instruction it will not be difficult to partition a disk in Partition Master Free.
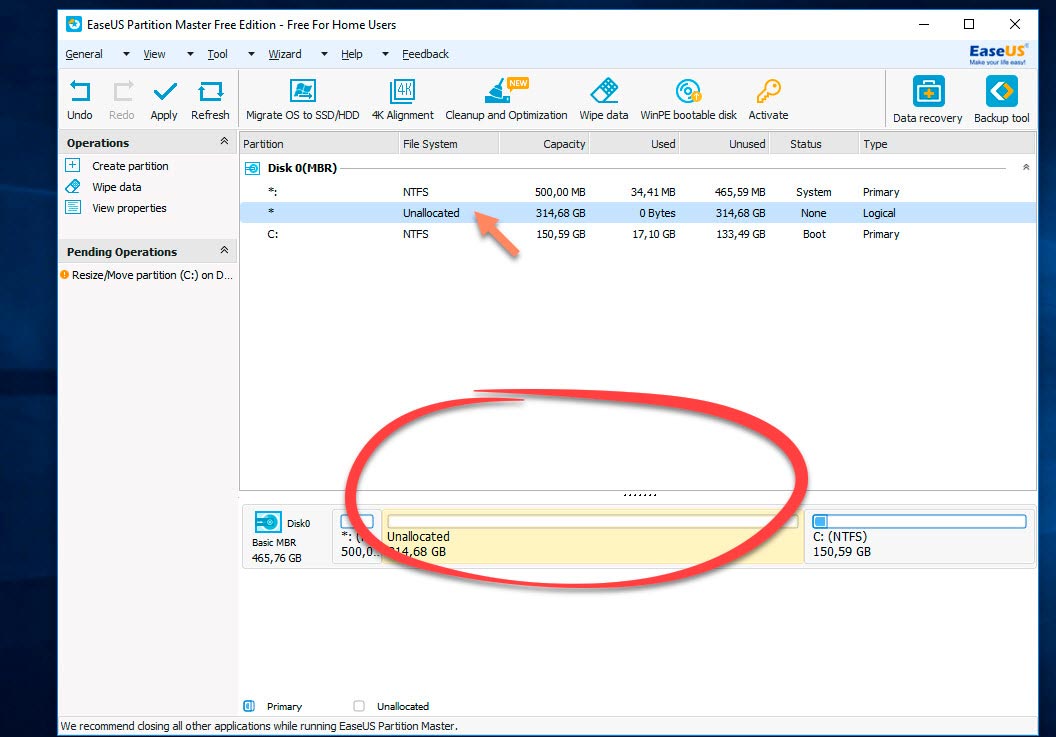
The main window of the program displays Disk C, which you want to split. Its main information is also presented here: file system (NFTS), size - actual (465.27 GB) and used (17.10 GB). Pay attention to the graphic disk scale, which is located at the bottom of the window. You can work and execute commands using both options. With a graphical scale to make it a little easier and clearer.

Select the section (left click) that you want to split (from which you want to pinch off a place), and in the drop-down list of commands, select the item (Resize).

In the window that appears, grab and move the special slider. It is responsible for the size of the future partition being set. We indicate how many GB we need to pinch off. In this case, 322.242 MB (or 314.69 GB) is selected for the new partition.
Pay attention to the bottom of the window. While moving the slider, you see in real time how your C Drive will change after compression, and how much will be allocated for the new partition.
I set the size of the new partition to 314 GB, and the size of Drive C will become 150 GB. After that we press OK.

An unrecognized partition appeared (314 GB). Now we need to make a partition out of this unrecognized space.
We click on it with the mouse and select the command (Create section) in the drop-down menu.

In a new window, I am prompted to enter a partition label, give it a name (Partition Label). Let's say I call it Multimedia. Next, you need to specify the partition letter (Drive Letter). Don't forget the item Optimizefor SSD, but only if you have an SSD drive. If you are using a regular hard drive, then this item is not checked. File system (File Systems) - NFTS. click OK.

Let's see what happened. System Drive C under which we took about 150 GB and a partition for storing files (Multimedia). This is not the final result yet, but rather a sketch. For the program to perform all operations, you need to click on the button apply in the top menu.

A pop-up window will appear containing information about the operations that will now be performed. Click YES and the program will start executing them. The computer will restart and start in download mode. Wait for the end of the operation.

After the end of the process, a window will appear with information that the two operations were successfully completed. If you open the explorer, you can see the created new section.

Now system files and user files will be stored separately. The assigned task has been completed. As you can see, both methods described are working and allow you to partition the disk without losing data. Which one to choose - everyone decides for himself. I hope this article was useful and helped you finally understand this issue.
If you are building a computer and looking for the best prices for components, then the number one option is computeruniverse.com. Time-tested German store. Coupon for 5% euro discount — FWXENXI. Happy assembly!
Partitioning a hard drive using Windows 7
 Partitioning drive C:\ in Win7
When buying a new computer or laptop with a pre-installed Windows 7 operating system, many users are faced with the problem of dividing a hard drive into several partitions.
Partitioning a hard drive into several partitions is important both in terms of ease of use of the system interface and the ability to save data after reinstalling or restoring the operating system.

Main partition C:\
As you know, when you reinstall the operating system, all data located on the C:\ drive is lost, while the data on the remaining sections of the hard drive remains intact. All important files can be easily used even after system recovery.
Partitioning a hard disk is also convenient because programs and applications are installed on the C:\ system partition. If the C:\ drive is the only one, then when all kinds of files and folders are added to it, confusion arises between system files and regular folders added by the user. In this case, it is easy to get confused in the files and inadvertently delete some important system file. Therefore, partitioning the hard disk is necessary.
In order to partition a hard drive in Windows 7 into several partitions (logical drives), many use specialized programs like Partition Magic and the like. With the help of such programs, you can split the disk into several partitions. But Windows 7 provides the ability to split it using system utilities. In this case, the need for third-party programs is completely eliminated.
To partition a hard drive in Windows 7, you need to go to the computer control panel.
You can do this in two ways:

It is clear that the first way is easier.
In the "Disk Management" tab, you can view all the information on our HDD and its partitions. In addition to the main C:\ partition, it is possible to find a hidden recovery partition.

Primary C:\ and Hidden Recovery Partition
The recovery partition is used to store information to restore the operating system in the event of a serious failure when the system does not boot. It is not marked with a letter. It is worth noting that the amount of memory used for recovery files can reach several gigabytes (usually about 15GB). Also, besides it, there is a partition on the disk System Reserved , 100 megabytes. These sections are official, since they are not used by the user in any way and serve for the normal functioning of the operating system.
So, let's turn our attention to the C:\ drive, which is to be partitioned into sections - additional logical drives.
In order to split it, we click on the conditional image of the disk with the right mouse button. In the drop-down menu, select " Shrink Volume…”.

Item "Shrink Volume..."

After the request is completed, a window will appear in which the compression parameters will be specified. If the disk has not been partitioned before, then by default the utility will offer to split it approximately in half. If the original HDD had a memory capacity, for example, 1.8 Terabytes, then after splitting, two partitions are formed with a volume of approximately 900 GB each.
The window that appears shows the size of the C:\ volume before compression (in megabytes) and the size of the space to be compressed. The size of the compressible space is the amount of memory of the new partition that will be created. The total size after shrinking is the size of the C:\ volume after shrinking. It will be slightly larger than the newly created one. As already mentioned, the system will offer to divide the available memory approximately in half.

If there is a desire and self-confidence, then you can indicate your numbers and divide the disk according to your needs. In any case, it will be possible to carry out the reverse procedure - volume expansion and return everything to its original state.
After reviewing the splitting options, click the “Compress” button. After a short process, another partition will appear on the HDD with the inscription “Unallocated”.

Item "Create a simple volume..."

The "Create a Simple Volume Wizard" will start. Click "Next". The “Specify volume size” window will appear - click “Next” again. In the next window, select the letter of the new volume in the item “ Assign drive letter". You can choose any letter you like.

Assigning a letter to a new partition
We confirm the choice and in a new window we specify the file system. In step " Format this volume as follows:” specify the file system NTFS , leave the cluster size as default. Put a tick in the checkbox " Quick Format” and click “Next”. A window will appear with all the specified parameters. If everything is correct, then click the “Finish” button.

If you are not satisfied with the default settings set by the system, then, of course, you can set your own. But in most cases this is not required.
After a few seconds, the new HDD partition will be formatted, it will be given a letter, and “Healthy (Logical Disk)” will appear in the legend field. Now the C:\ drive will be divided into two.

New HDD Partition - New Volume (E:)
If you wish, you can change the name of the new section, and instead of “ New volume”, give another. You can do this in several ways:
1 .In the computer control panel in the disk management window, select the one whose name we want to change. Right-click and select " Properties". In the name field, enter a new name and confirm by clicking OK.
If you have a solid-state drive (SSD) instead of an HDD in your system, then the partitioning technique is similar.
Hello readers of the ComService company blog (Naberezhnye Chelny). The topic of the article is how to partition a Windows 7 hard drive. To my shame, I confess that I learned about this feature a few months ago. In order to consolidate this knowledge, you need to naturally - try. And preferably not on your own). Up to this point, I tried to break at . If any partition needed to be changed or another one created, then special utilities were used. It was necessary to boot from it. And all you need to cut off is 50 GB from the end to install the second operating system. You will learn how to partition a disk using the operating system in this article.
Article structure

Our HDD is broken by means of Windows. Everything is ready to go. On one physical one, you can create no more than 4 main partitions. If you need more, create one additional partition and split it into as many as you need. The limit of 2000 sections I hope is enough.
2. What to do if the disk in Windows 7 does not break
I tried to partition the hard drive using another . Three of the 4 partitions are broken normally (it is possible to compress the disk), but the largest one is not. At the very end of this disk there are files (hidden and system) and they could not be removed from there.

In this case, you will have to use third-party utilities. For example Akronis or Paragon. If there is one more option. Boot from a boot disk with any operating system and defragment a non-compressible partition. If anyone has tried this, please post in the comments. Thank you.
Conclusion
In the article how to partition a Windows 7 hard drive, we divided the partition into two parts. Naturally, this can be done with administrator rights or at least archive operator on computer. Windows tools allow you to shrink a volume to non-removable files. It can either be shadow copy files. If you have it enabled. In most cases, in order to break it, it is enough to disable system protection on the selected partition and move the paging file to another disk. Shrink the volume and put everything back in place. If all else fails, then you need to turn to the help of third-party programs. An excellent alternative is Acronis or another equivalent.
Write questions in the comments. Let's try to figure it out together.
Video - How to partition a hard drive in Windows 7 Thanks for sharing the article on social media. All the best!
It would seem then that there is nothing complicated, formatted "C", if you want to split it into sections, but if you want to put the system on the whole. But this is "C", but what about "D"? You can’t create a partition without formatting, but I’m not going to format it either, I have data collected on it for almost a whole year.
Yes, in general, why did he give up this section? I began to search the Internet for information on how I can partition the "D" drive without losing data. Sea of articles - format and split. Or split without formatting using such, such, and such a program. In general, everything is as usual.
I will not load you with unnecessary information, but I will describe in detail, with pictures how to partition windows 7 hard drive into partitions without formatting it.
Go to the Start menu and type "Computer Management" in the search bar. Select the "Computer Management" tab. A window will open in which you need to click on the "Disk Management" item.

In the window that opens, right-click on the disk you want to partition. In the pop-up window, click on the line "Compress volume".

Scanning for free space will begin.

A window with settings will open, that is, you will see how much space you can take away from the disk (most likely "D", you will not compress the volume on disk "C", where the operating system is located) under the disk you are creating. You can safely set the maximum value (without going beyond the limits suggested to you), if compression is not possible, then reduce the volume for compressing the partition. Do not be afraid - on the partitioned disk, in addition to your files, after these actions there will also be a lot of free space. Click the "Squeeze" button.

You will see that there is free space. Right-clicking on it, in the "Create a simple volume" window that opens. The Create Simple Volume Wizard opens. We press "Next".

Here, set the proposed maximum value that you have chosen. Click Next.

Here you will be prompted to assign a drive letter. Select a partition letter and click Next.

After choosing a letter, you need to format the created partition. All this "Master ..." will do himself. It remains to click "Finish".

We restart the computer. Everything! You have a new partition (new volume). . If you do not like the name of the partition you created - "New Volume", then right-click on it and click "Rename". Just remove the inscription "New Volume". After that, the computer itself will call it “Local Disk” by adding the letter you assigned.

Well, that's all, now you know how to partition windows 7 hard drive simply and easily. Good luck to all!!!
Partitioning a hard drive using Windows 7
Lyrics...
When buying a new computer or laptop with a pre-installed Windows 7 operating system, many users are faced with the problem of dividing a hard drive into several partitions.
Primary hard disk partition
Partitioning a hard disk into several partitions is important both in terms of ease of use of the system interface and the ability to save data on the disk after reinstalling or restoring the operating system. As you know, when you reinstall the operating system, all data located on the C: / drive is lost, while data remains intact on the remaining drives (hard drive partitions). All important files can be easily used even after system recovery.
Partitioning a hard drive is also convenient because programs and applications are installed on the C: / system drive. If the C:/ drive is the only one, then when all kinds of files and folders are added to the hard drive, confusion arises between system files and regular folders added by the user. In this case, it is easy to get confused in the files and inadvertently delete some important system file. Therefore, partitioning the hard disk is necessary.
In order to partition a hard drive in Windows 7 into several partitions (logical drives), many use specialized programs like Partition Magic and the like. With the help of such programs, you can split the disk into several partitions. But Windows 7 provides the ability to partition a disk using system utilities. In this case, the need for third-party programs is eliminated.
To partition a hard drive in Windows 7, you need to go to the computer control panel.
You can do this in two ways:
1.Right-click on the "My Computer" icon, which is located on the desktop - select "Manage". Next, the "Computer Management" window will open. In it we find the subsection - "Disk Management".
2. Click on the “Start” icon in the lower left corner, then select “Control Panel”. Next, go along the path: “System and Security” - “Administration”. Then select the submenu - "Create and format hard disk partitions". The Disk Management window will open.
In the "Disk Management" tab, you can view all information on the hard disk and its partitions. On the hard drive, in addition to the main C: / partition, there is a hidden recovery partition.
The main partition of the C:/ drive and the hidden recovery partition
The recovery partition is used to store information for restoring the operating system if necessary. It is worth noting that the amount of memory occupied by recovery files can reach several gigabytes. This section is not identified by a letter. Also, in addition to the recovery partition, the disk has a System Reserved partition with a capacity of 100 megabytes. These sections are service ones, since they are not used by the user in any way and serve for the normal functioning of the operating system.
So, let's turn our attention to the C: / drive, which is to be partitioned into sections - additional logical drives.
In order to split the C: / drive, right-click on the conditional image of the drive. In the drop-down menu, select the item "Compress volume ...".
 Item Shrink Volume
 Space Request for Compression
After the request is completed, a window will appear in which the compression parameters will be specified. If the disk has not been previously divided into partitions, then by default the utility will offer to split the hard disk approximately in half. If the original disk had a memory capacity, for example, 1.8 Terabytes, then after splitting, two partitions are formed with a volume of approximately 900 GB each.
In the window that appears, the size of the C:/ volume before compression (in megabytes) and the size of the compressed space are indicated. The size of the compressible space is the amount of memory of the new partition that will be created. The total size after shrinking is the size of volume C:/ after shrinking. It will be slightly larger than the created disk partition. As already mentioned, the system will offer to divide the hard disk memory approximately in half.

If there is a desire and self-confidence, then you can indicate your numbers and divide the disk according to your needs. In any case, it will be possible to carry out the reverse procedure - expanding the volume and returning everything to its previous state.
After reviewing the splitting options, click the “Compress” button. After a short process, another partition will appear on the hard disk with the inscription “Unallocated”.
Item "Create a simple volume..."
Create Simple Volume Wizard
The "Create a Simple Volume Wizard" will start. Click "Next". The “Specify volume size” window will appear - click “Next” again. In the next window, select the letter of the new volume in the "Assign drive letter" item. You can choose any drive letter you like.
 Assigning a new disk (partition) letter We confirm the choice and in a new window we specify the file system. In the “Format this volume as follows:” item, specify the NTFS file system, leave the default cluster size. Put a tick in the checkbox "Quick Format" and click "Next". A window will appear with all the specified parameters. If everything is correct, then click the “Finish” button.

If you are not satisfied with the default settings set by the system, then, of course, you can set your own. But in most cases this is not required.
After a few seconds, the new disk partition will be formatted, it will be given a letter, and “Healthy (Logical Disk)” will appear in the legend field. Now the C:/ drive will be divided into two.
 New hard disk partition - New volume (E:)
If you wish, you can change the name of the new section, and instead of "New volume", give another one. You can do this in several ways:
1. In the computer control panel in the disk management window, select the disk whose name we want to change. Right-click and select "Properties". Enter a new name in the name field and confirm by clicking OK.
How to partition a hard drive using Acronis
Acronis Disk Director 11 Home. For Windows 7 and Windows 8, it is advisable to choose exactly the eleventh version of the program and not lower. You can download it on the Internet through some kind of torrent, just type in the Yandex search line - "Acronis Disk Director 11 Home".
Consider the example of an already installed operating system.
So we have downloaded and installed HDD partitioning software.
Start Acronis from the desktop or from the Start menu
The program is running. In the program interface, we see two disks. One "Reserved by the system" and the second "Local volume (C :)" - this is where Windows is installed. First we need to reduce the size of the "C" drive to make room for the second drive. To do this, select the left mouse button "local volume (C:)" and then in the left pane of Acronisa click on "Resize Volume"
In the resizing window, you need to drag the brown ball to reduce the size of the disk. Or, in the "Volume Partition" form, enter the size of the disk in numbers. Thus, we will divide the hard drive into two components.
For Windows 7, the optimal size is about 100 gigabytes, so I set it to 100 GB. The rest of the space will be occupied by the second "D" drive. Click the "Ok" button.
So the size of the first disk is reduced, now you need to create a new volume i.e. dis "D". To do this, select the left button below the free section as shown in the figure below "Not busy", and then in the left panel of the program click on the inscription "Create Volume"
After that, we get into the Volume Creation Wizard. On the left, select "Basic" and press the button "Further"
There is nothing to do here, click the button "Further"
In these settings, select everything as shown in the picture below.
We leave the file system "NTFS".
Assign a drive letter to be created. For example, I chose the letter "E", but it is better to choose the letter "D"
In the "Volume Label" form, enter the name of the disk being created, always in English. (Although you can not write anything).
Finally, click the "Finish" button
So we have completed all the steps to partition and create a hard disk, it remains only to apply all these steps for them to take effect. To do this, click on the "Apply Pending Actions" button. I got three of them, you can get two or three or four
Confirm the operation by clicking on the "Continue" button
Once again confirm the operation of restarting the computer by clicking "Ok"
During the disk partitioning process, the computer will restart. At the time of rebooting the computer, in general, then actions are taken to divide the HDD
After the reboot, go to "My Computer" and see two disks.
Now store all your "savings" on an additional local drive "D".
Only in this case, after a crash and reinstallation of the system, all your photos and videos will remain intact.


")


- What was taught to women who became guards in concentration camps Torture used by the Nazis
- Singer Alex Malinovsky: biography, career, personal life, photo Let's start the story again
- Do I need to shave the testicles and how to do it right at home How to shave the eggs
- Chinese girls with small breasts
- Famous girls with small breasts
- Shoulder girdle: why you can’t sympathize with Russian truckers
- How to clean your computer from junk and speed up its work
- Wedding predictions for guests: funny and funny ideas Comic fortune-telling of a gypsy in prose
- Business on coffee grounds or how to open a mobile coffee shop on wheels?
- Congratulation of a gypsy on a woman's anniversary
- Define the concepts: choir, vocal ensemble, trio, duet, solo
- Guy's Room Design: Ideas and Examples
- General rules for drawing up a foundation plan House foundation drawings
- modern art deco bedroom small art deco bedroom
- Pansies: characteristics and photos of flowers
- Making an art deco bedroom: the choice of materials Beige art deco bedroom
- Bedroom interiors in art deco style Bedroom art deco style beige
- Young: planting and care in the open field Young planting and care in the open
- Varieties for open ground
- Pansies: cultivation and care in the open field