Installing a new hard drive. Installing an optional hard drive
With a desktop computer, things are much easier than with a laptop, so let's start with it. So, you already know what characteristics to rely on when buying, so we will leave this topic outside the scope of today's article.
- First of all, even before buying, you should have figured out what free drive connectors are on your motherboard - the old IDE or one of the SATA varieties (I, II or III).
- And secondly, what free power connectors are available on.
Modern hard drives, motherboards and PSUs work with SATA connectors. However, if they are all already taken on the power supply, then take care to also purchase a Molex-to-SATA adapter to connect your second drive to a Molex-type power supply.
If you want to use the second hard drive with a connection to an “IDE” type motherboard, and the latter is new and no longer has such an input, then we buy an adapter from IDE to SATA.
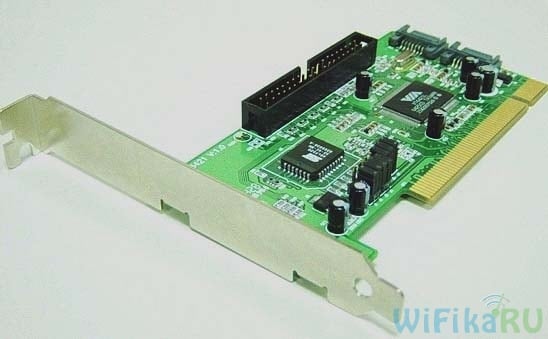
Another option to connect a hard drive to a computer that does not have a corresponding connector for it is to use a special IDE-SATA PCI controller. Its plus is that with it you can both connect an old IDE drive to a new board, and a new SATA drive to an old motherboard. It looks like an expansion card that is inserted into the PCI slot on the motherboard and adds support for working with IDE devices. Let me remind you that two disks or a floppy drive can be connected to a standard cable at once.
Suppose you have already figured out all your nuances, purchased a second hard drive and, if necessary, adapters, and now you need to install it in the case and connect it to the motherboard and power supply. First, we fix the hard drive in a special basket in the case, or we insert it along the guides and fix it with special fasteners or ordinary screws - depending on.

After that, we connect the “small” SATA to the corresponding connectors on the back of the disk and on the motherboard, and insert either an adapter connected to the cable from the power supply or directly the PSU cable with a SATA plug into a larger SATA socket (for power). We do this carefully so as not to break the socket on the hard drive, since there is no limiter below and you can easily break off a piece of the board with the contacts of this connector.
In the screenshot below, the green arrows indicate the wide SATA that connects the second hard drive to the power supply, and the red arrows indicate the narrow ones that go to the motherboard.

Yes, do not forget that all connections must be made with the PSU disconnected from the outlet, or with the power switch turned off, if there is one. As you can see, there is nothing complicated.
How to install a second hard drive in a laptop?
Is that even possible? Yes, today you can also increase the amount of space not only on a stationary PC, but also on a laptop. And for this it is not at all necessary to replace the standard hard drive that is already in the laptop, and therefore you will not have to face all the associated problems, such as transferring files and reinstalling Windows and all programs on a new hard drive.
The second hard drive in a laptop (let me remind you, 2.5 inches in size) is connected using a special adapter, which is installed instead of a laptop DVD drive - you must admit, almost no one uses this device now. And if you need to view discs, you can always use an external, connected via USB.
This is how this adapter, invented (or copied?) by the Chinese, looks like:

In online stores, it can be found under the name "2nd SSD HDD HD Hard Disk Driver Caddy SATA for 12.7mm CD / DVD-ROM Optical Bay". Inside and outside this adapter there is a connector for connecting a disk and for connecting the adapter itself to the laptop board.
So, we insert the hard drive into the adapter. You may also have to screw the mount to the back of the adapter yourself, for which it will be screwed to the laptop case.


And in its place we insert the adapter and fix it in the same way with the same screw. After that, a new hard drive will appear in the "Computer" menu, which, after formatting, can be fully used.
How to install a small hard drive in a computer 2?
Speaking about connecting a hard drive, one cannot but mention the problem that users sometimes encounter when there is a need to install a 2.5″ hard drive or SSD in a computer, in the case of which there are mounts only for standard 3.5″ drives. In this case, there are also special adapters in which such a hard can be fixed and inserted into a regular place for larger diameter disks.

BIOS does not see the second hard drive
Another common problem that can be encountered with 2 hard drives installed is that the computer simply does not see one of them. First of all, if you are using an adapter, then it may be the case. use known-good adapters.
If you didn’t use it or your adapter is working, then the whole thing is in the BIOS settings, namely, the operating mode of the hard disk controller is incorrectly set.
We reboot the computer, go into the BIOS and look for the “SATA Controller” item (or SATA ATA / IDE / Raid Config, Mass Storage Controll or something else like that to set the HDD operating mode). If you connected a disk with a SATA cable to the motherboard and a modern operating system (Windows Vista, 7, 8 and higher) is installed on the computer, then the AHCI, IDE, Native or Enchansed position can be activated in this item. Wherein
only in AHCI mode will the maximum data transfer rate from the disk be achieved.
If the older Windows, or if the hard drive was connected, then only IDE, Native or Enchansed.
The disk controllers themselves must also be enabled. Here are a couple of screenshots from different BIOSes with these settings:

If your computer has 2 hard drives (or a drive + DVD drive) and both of them are connected via IDE cables, then the problem may lie in their incorrect configuration with each other. If you have just such a connection and in the BIOS you see the following picture:
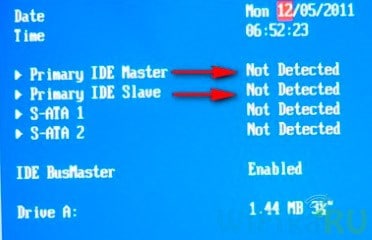
then this is your case. In this configuration (when both are connected via IDE), one disk must be Master, that is, the main one on which Windows is installed, and the other Slave, that is, secondary.
This priority is configured using a special jumper (jumper) installed on the contacts on the back of the case.

All possible positions of this jumper and their modes are usually described on a sticker on the disk case. They may vary from manufacturer to manufacturer.

From our table, we see that if Windows is installed on the disk and it will be our main (Master), or if it is used alone, then we put a jumper on the first 2 vertical contacts. If it is secondary (Slave), then we remove the jumper altogether.
We do this with our hard drives and go into the BIOS again. Now they are automatically determined by the motherboard and the following picture should be drawn:

Instruction
Related videos
Sources:
The more you work on your computer and download files and data from the Internet, the more space you need and the faster your hard drive fills up. Sooner or later, you will be faced with the need to expand the free space on your computer, which means that you will need to purchase and install a second hard drive. In this article, we will look at the rules for installing an additional SATA hard drive, which is supported by all modern motherboards.
Instruction
The hard drive or motherboard should have been supplied with Molex-SATA power cables and special SATA cables with an L-shaped connector. You will need one power cable and one cable - matching the two connectors you will see on the end of the hard drive that is available in the slot.
Connect the power cable with one end to the desired connector on the motherboard, and the other end to the wide connector of the hard drive.
Then connect the cable with the L-shaped connector to the hard drive, and the straight connector to the right place on the motherboard. Depending on which hard disk the operating system will be located on, install the new disk in Master or Slave. If the disk will only store files, install it as Slave.
Motherboard supports SATA disk connection;
The motherboard does not support connecting a SATA disk.

Motherboard with support for connecting a SATA drive. In this case, connecting the disk will not take much and will not cause additional problems, because. SATA connectors are integrated into the motherboard.
Open the 2 side covers of the system unit. If you want to change the hard drive, then unscrew the screws securing the hard drive and remove it. Install the new one and secure it with screws. Connect 2 connectors : one to the other to the block . After that, close the side covers of the system unit.

The motherboard does not support connecting a SATA disk. In this case, you will have to use additional adapters to connect the hard drive. A good alternative is the universal SATA-IDE board. It allows you to connect SATA- to IDE and vice versa. Such a board is more expensive than simple adapters, but it wins in terms of data exchange speed.
Related videos
Sooner or later, every computer user faces the question of increasing the memory in the computer, the amount of hard disk memory. Indeed, when buying a computer, few people pay attention to the size of the hard drive - at that moment it is better to invest in RAM or a video card. But in the process of mastering the capabilities of the computer, the amount of accumulated information on the hard disk increases, and the only way to save it is to purchase another hard disk.

You will need
- Phillips and flat-blade screwdrivers
Instruction
But do not rush to the nearest store to buy a hard drive. First you need to find out what kind of hard drive you need. It may have been more than a year since you purchased your computer, and standards for connecting internal and external peripherals may have changed during this time. This is exactly what happened with hard drives, the old IDE standard was replaced by the modern Serial ATA - SATA for short, it provides information transfer at a faster speed.

Where can you see which hard drive you have? Option one: find the instructions for your motherboard. If this is difficult to do, because all the boxes from after were thrown out as unnecessary, but, most likely, lay there, then let's go the second way. You despaired early, because you still have the motherboard itself, it stands in and is the basis for everything else (processor, RAM, hard drive, etc.).

To access the motherboard, remove the system unit or install it so that you have good access inside it. It is better to see the available connectors on the motherboard on the left side of the system unit. There is the front side of the motherboard, and on the right side of the system unit is the back of the motherboard. It has no connectors. See what cable your hard drive is connected to. If it is a wide cable (about 5 cm), then this is a legacy IDE connector, if it is narrow (about 1 cm), then SATA.

With your hard drive sorted out, now look at the place where the cable is connected on the motherboard. As a rule, two IDE connectors were made on the motherboard, but due to the possibility of connecting two devices in parallel to one data-IDE cable, four devices can be connected. These are optical drives (CD and DVD) and hard drives. If there are two such connectors, and one and one hard drive is installed, then at least two more hard drives can be connected.

But with the advent of the new standard connectors, the old one has not sunk into oblivion, on transitional motherboards there are both IDE and SATA connectors. On modern boards, one IDE connector remains, but SATA connectors have significantly increased (up to 6-8 pieces), you can connect one device to one SATA connector, look for them on the motherboard. If they are, then your new hard drive will communicate faster with other devices, which will increase overall. Now you can go to the store for a hard drive.

To install it, connect the data-IDE cable or SATA cable to the motherboard. Locate the wire with the power connector for the hard drive. They are also different, depending on the type of hard drive. Connect the connectors to the hard drive, and install the drive itself in a free space on the “shelf” under the main hard drive. Fasten the hard drive with screws or mount it on latches, depending on the type of fastening on the "whatnot" of your system unit. Install the system unit in place and enjoy the ability to store at least a whole data library on yours.

note
When working with the system unit, turn off the computer and unplug it to avoid electric shock.
When connecting the data-IDE cable, do not bend the pin connector on the drive and the motherboard, it will be difficult to align them.
Helpful advice
When buying a new drive, purchase a wire to connect it. This applies more to SATA drives.
When connecting a disk, set the jumper on the disk on which the system is installed to the “master” position, and on the additional disk to the “slave” position, this will allow the computer to boot from the desired disk.
Usually new hard discs connect in order to increase the capabilities of your PC, in particular, to increase the storage space of information. In order to connect an additional hard drive, it is not at all necessary to call the wizard - this can be done on your own.

You will need
- a new hard drive and a few simple working tools.
Instruction
Assemble a computer.
Related videos
note
It will be good if you put on an antistatic wrist strap before working on the computer. These bracelets are sold in electronics stores.
Helpful advice
Once you've installed the new female drive and checked that the PC works well, you can format the old drive. Thus, you will remove unnecessary data and free up space for storing new files.
Second hard disk most often put to increase the capabilities of the computer, in particular, so that there is more space for storing information. You can connect a second hard drive on your own disk, it does not require special technical education. This is done in the following sequence.

You will need
- To do this, you will need a second hard drive and a few simple working tools.
Instruction
Decide where you will put the second hard disk. Usually a free space is next to the first disk ohm.
Put jumpers on the hard disk e.
Check all new connections.
Close your computer.
Related videos
note
After installing the second hard drive, you can format the first hard drive. With this action, you will erase unnecessary, obsolete data and make room for new ones.
Helpful advice
Wear an anti-static wrist strap before installing the second drive.
Sources:
- PCwork.ru, computer systems
Sooner or later, every computer user has a problem: one installed hard drive will no longer contain all the information that needs to be saved. And, in the end, a second, and maybe even a third disk appears in the system unit of the computer. One of the main difficulties that arise when connecting 2 hard drives at the same time is the correct determination by the motherboard of each of them, as well as the priority or boot order.

Instruction
In essence, cases where you need to connect 2 hard drives come down to two possibilities:
one disk is already there and you need an additional one;
Select which of the hard drives will be the main one, that is, the active one from which the operating system will be loaded. Determine the order by setting the small jumpers to the appropriate positions in accordance with the diagrams depicted directly on each hard drive.
Turn on your computer and go to BIOS settings. If the hard drives are not detected automatically, manually identify them using the appropriate command. Then save the changes and exit the BIOS.
Related videos
Sources:
- how to install a second hard drive
- How to connect a second hard drive
Hard or hard drive - the main storage of information in a computer. The operating system is loaded from it, and numerous music, video and photo archives of users are stored on it. The safety of the recorded information depends on the correct installation of the hard disk. Therefore, before starting work, you must properly connect the hard drive.

Instruction

After you connect the hard disk into the USB port, the operating system will immediately detect it as new disk new drive and Windows will have a new one disk. The LED on the converter will flash, indicating that the data transfer is in progress.
If you are using a version of Windows earlier than XP, such as 98 or 2000, you may need to disk with drivers. It comes with a set.
After installing a hard disk and in the system you can perform all standard operations with it, namely: formatting, partitioning, copying, deleting, etc. You can also boot the operating system from an external HDD, just keep in mind that in this case the BIOS must support this function .
Helpful advice
An external hard drive, although more expensive than an internal one, is noticeably more reliable, as it was specially designed as a mobile device for transferring information. In addition, it is much easier to connect, which is also important for a novice user.
It should be noted that the connection of 3.5-inch devices is the same, only you need to use an adapter and connect the drive's external power supply.
To increase the amount of permanent memory on your computer, you need to connect an additional hard drive. Naturally, this equipment must be correctly selected and connected.

Instruction
First, find out the type of hard drives that can be connected to your computer's motherboard. To do this, it is better to use the visual method of identifying connectors. Open the system block and examine its contents.
If two small cables are connected to the hard drive, then you will need a new hard drive with a SATA connector. If the hard drive is connected to the motherboard via a wide cable and a small four-wire cable, then you need an IDE hard drive.
Some motherboards have both hard drive ports. Typically, DVD drives are connected via IDE connectors. In this situation, you can use both types of hard drives. Get the right hard drive for you.
Connect the purchased device to the selected cable. Connect the power cord to it. Pay attention to the fact that if you plan to use this hard drive as a system hard drive in the future, then you should not connect it to the same cable with a DVD drive.
Turn on the computer and hold down the Del key. This is required to enter the BIOS menu. Now go to the Boot Device menu. Find Boot Device Priority and open it. Make sure your primary hard drive is still first on the list. Otherwise, specify the hard drive from which you want to start Windows.
Now press the F10 key or select Save & Exit and press the Enter key. Wait for the operating system to finish loading. Wait while the system detects the new hard drive and installs drivers for it.
If you have connected a brand new hard drive, please format it before use. Press the Start and E keys to go to the My Computer menu.
Select the new hard drive and right click on it. Go to "Format". Specify the cluster size (default) and disk file system type. Uncheck the "Quick (clear table of contents)" feature and click the "Get Started" button. Wait until the disk is formatted.
Related videos
Hard drives, IDE CD-ROM drives and CD-ROM drives are now available in much smaller quantities than they used to be. In new system units, it is difficult to find a place to accommodate such devices. However, you can still find computers that use this type of connector. When connecting it, you need to take into account some features.

Instruction
Find the IDE cable connector on your CD/DVD drive - it looks like a rectangle with two rows of short pins, 40 in total. Strictly speaking, IDE is not a very accurate name, and just in case, remember the other names of this interface: PATA, EIDE, Parallel ATA. This will help you choose and purchase the desired cable in the store.
Turn off your computer and unplug the power cable. Before covering the system unit cover, touch the radiator to remove static electricity - it can damage the electronic components of the computer. Remove the side cover of the system unit.
First, find the IDE connector on the motherboard you want to connect the cable to. On different models, the IDE connection block may be located in a different place, sometimes this connector is brought to the side.
Take your IDE cable. You will see three connectors on it, with one of them at a greater distance from the other two. It is he who needs to be plugged into the place for connection on the motherboard. If there are not one, but two connectors on the board, you can use any of your choice.
Connect the IDE cable connector to the motherboard. Note that the pad that surrounds the pins has a small notch. And exactly the same protrusion is on the plastic part of the cable. Turn the cable to the correct side and insert. You don't need to apply much force - if you overdo it, you can break the motherboard.
Now connect the device that has an IDE connection. Unlike newer drives and hard drives, which are connected with a thin SATA cable and cannot be connected incorrectly, IDE-type connectors require care. Near the place for the cable there is a group of contacts in the form of six pins. They are usually labeled CS/MA/SL. If you look closely, two contacts can be closed by a plastic jumper - it is called a "jumper".
If your cable will connect only one device, remove the jumper and connect the cable with any of the free connectors to your floppy drive or hard drive. If you have multiple drives and the one you want doesn't work, try a different connector.
Related videos
The capacity of the hard disk drive (HDD) is not always enough to meet all the needs of PC users. Over time, there are more and more files on the computer, and there is nowhere to save new ones. In this case, it is logical to connect a second hard drive.

Instruction
Turn off your computer and unplug it from the network. After that, remove the side cover of the system unit. As a rule, it is attached to the rear wall with a few bolts. Take a screwdriver and unscrew these bolts, after which you can remove the cover.
Check for the presence of a hard drive bay and drives inside the computer's system unit. Determine the free space where the HDD will be installed. If the bay is removable, take it outward, this will help secure the drive more securely.
If you are connecting an IDE hard drive, set the jumper on it correctly. On the sticker of the hard drive there are corresponding designations. Since you are connecting a second hard drive, select the Slave mode.
Insert the hard drive into the appropriate slot in the bay. Secure it with bolts or special locks, depending on the configuration. If you removed the drive bay, put it back in and secure.
Now you need to connect the hard drive to the computer motherboard. To do this, connect an appropriate free cable of IDE or SATA type to the hard drive and to the motherboard connector. After that, connect the cable from the power supply. If there are difficulties in determining the correct type of cable, look at the connector of the connected hard drive, a cable of the wrong type simply cannot approach it.
Check the connection and close the side cover, tighten the bolts. Connect your computer to the network and turn it on. After booting, the system will automatically detect a new device, and it will be ready to go.
If the device was detected, but no new local disk appeared in My Computer, use the system utility. Select "Start" - "Control Panel" - "Administrative Tools", then "Computer Management". Open the "Storage Devices" - "Disk Management" subsection. Right-click on the unallocated area of the mapped drive and select "Create Volume".
Related videos
To run various applications distributed on optical disks(CD or DVD) often use emulator programs. They are able to create for the operating system the illusion of reading data from an optical drive, while in fact reading comes from a special file called the "image" of the simulated disk. Sometimes it becomes necessary to mount two such images at the same time.

Instruction
Install any emulator program that allows you to work simultaneously with several virtual optical drives. If your system does not yet have such a program, then you can download the Daemon Tools Lite application from the manufacturer's website - this is a free version of the emulator, which, nevertheless, can mount up to four disk images at the same time. This program works well and has a simple and clear language interface. Direct link to the download page of the Russian version - http://daemon-tools.cc/rus/products/dtLite.
Right-click the Daemon Tools Lite icon in the taskbar (tray) notification area after the application is installed and running. In the context menu that opens after this click, go to the section called Virtual CD / DVD-ROM. The default settings tell the emulator to create only one virtual optical media reader, so there will be only two subsections called "Drive 0: no data" and "Set the number of drives" - select the second one. In this subsection, click on the item "2 drives" and the emulator will create a second virtual reader. This will take a few seconds, during which the program will display a picture on the screen with the inscription "Updating virtual images". Its disappearance will mean that you can start mounting disk images.
Right-click the program icon again and again expand the Virtual CD/DVD-ROM section in the context menu. Go to the "Drive 0: No Data" subsection and select "Mount Image" to launch a file search dialog box with the desired drive image. By pressing the "Open" button, you will start the procedure. Then repeat this step for the second disk image, using the subsection called "Drive 1: No Data" in the context menu.
Related videos
The problem of lack of hard disk space is a headache for many personal computer users. Especially now, when there is a tendency to improve the quality of media files and the speed of the Internet allows you to download them in large quantities. Even with large disks, it is often impossible to get by with just one medium. The way out of this situation is to purchase and install an additional winchester.

Instruction
Choose the model that suits you winchester- be guided by the capacity, the level of noise emitted by them, the connection method, the speed of recording information, the reputation of the manufacturer and, of course, the reviews of the owners.
Shut down the computer, unplug it from the power source. Unscrew all the bolts holding the side walls of the system unit. Open the case and examine its contents carefully.
Pay special attention to connecting cables to an existing hard drive. Choose a location for the new drive - it should be such that the wires leading to it do not break and do not touch the motherboard. Also make sure (when the hard drive is working hard enough) that the air coming from the fan gets on the new hard drive. If you do not have an additional hard drive cooler, it is better to get one.
Fix the new hard drive in the selected position with the fasteners you have. If they were not supplied with the drive, it is better not to use the first bolts that fit the size, do not be lazy and go to the store - there you can buy special screws designed for mounting hard drives. Try to screw the hard drive to the computer case as tightly as possible.
Connect the cable from the motherboard to the hard drive - it comes with the hard drive. Also connect the wires coming from the power supply. Be careful when connecting cables - nothing should interfere with them and they should not be pulled.
Turn on your computer. At first, the presence of a new winchester not detected by the system, there is nothing to worry about. Open the "Start" menu or on the "Desktop" right-click on the "My Computer" icon. Select "Mount new local disk".
In the window that opens, you will see on the right all the disks and partitions found by the system. Select among them "Disk X" (x is a serial number that may vary depending on the configuration of the computer), opposite which is written Unallocated. Right-click in the gray box opposite it and select the "Install" menu item.
Decide on the partition sizes and the number of volumes of the new hard disk, enter your chosen parameters in the future configuration dialog box that appears. Select the file system for formatting, NTFS is best. Specify a name for the hard disk or its partitions. Start the process by clicking next.
Restart your computer, check the working condition of the new hardware.
Related videos
note
Be careful when buying drives with SATA connectivity - make sure the motherboard has an additional connector. Do not buy SATA hard drives if you own a computer with an outdated motherboard model based on SiS and VIA chipsets.
Before we figure out how to install a hard drive (hard drive), let's remember that we have already touched on this topic in an article on a computer. Remind yourself? Fine! Then we understand further how to install the hard drive.
Installing a hard drive is not a difficult procedure. First of all, it should be remembered that, like other computer components, hard drives of different generations have different physical connection standards. Various connectors.
The most common now are the "IDE" standards (outdated, but still widely used) and the "SATA" standard (its different versions). Each of these types of hard drives has its own specific outputs and special cables ("loopbacks") for data transfer.
Let's see how to install a "SATA" hard drive. The photo below shows a typical representative of this family of hard drives. Circled in the image are the power connectors (larger) and the data cable connector (smaller).
The data cable itself for this type of device looks like this:

For hard drives of the IDE standard, the data cables and power connectors of the hard drive itself look different. Look at the picture below. Data cable connector - (larger) and power - (smaller).

Accordingly, the data cable ("loop") for this type of hard drives will look like this:

When installing an "IDE" disk, pay attention to the position of the "keys" (they are indicated in the screenshot above) on the "loop" and the motherboard. These protrusions on the cable serve to ensure that it cannot be connected incorrectly. So connect carefully! Doesn't go? - Do not press harder, but once again make sure that you connect the cable with the correct side and then the installation of the hard drive will pass without bent contact pins and wasted nerve cells :)
Now let's see how to install the hard drive from the side of the motherboard itself. Old standard hard drives are connected to the appropriate connectors ("IDE" channels). One "channel" cannot have more than two "IDE" devices connected (for example: two hard drives or one and a DVD-ROM).
In the figure below we see these very "IDE" channels (controllers) on the motherboard: primary- "blue" and secondary- "black". They are also called " Primary" and " secondary". Pay attention to the holes in the middle of both connectors. They fit exactly into the "key" protrusions on the data cable and ensure the correct connection of the device.

As we already know, SATA hard drives are connected using their own data cable.
The disk is connected to an arbitrary SATA connector on the controller on the motherboard.  It should be noted that there are several SATA standards: "SATA1" "SATA2" and "SATA3". They differ in data transfer speed, but are fully compatible with each other logically and at the level of physical connection.
Power for both "IDE" and "SATA" drives is supplied directly from the computer's power supply. It enters IDE disks through the so-called Molex connectors (in the photo below they are on the right), and for the SATA standard there is a connector (in the photo on the left).

Please note that "SATA" power may initially be present in the set of connectors directly on the computer's power supply, or it may be connected to it through a special "IDE" - "SATA" power adapter (in the figure above - on the left). It all depends on the design of the power supply.
The hard drive is installed in a specially designated place for it in the case. Here, for example, is how the DVD-ROM, drive and hard drive are located in the system. Hard drive - at the very bottom :)

In the photo, the screws for fastening the devices are circled. It is highly desirable that the mounting screws are located on both sides of the device (for this, of course, you will have to remove the side cover also from the opposite side of the system unit).
Reliable fastening, first of all, prevents the vibration of the hard drive itself during its operation (vibration for a working hard drive with its moving mechanical elements inside is VERY undesirable!). Also, when the disk is in close contact with the case walls, the latter act as an additional radiator, removing the heat generated by the hard drive.
The photo above also shows that the hard drive and DVD-ROM are connected to one "IDE" channel data transmission (connected in series with one "loop" "IDE") and are powered by "Molex" power supply connectors.
In conclusion, I want to say a few words about a question that often worries beginners and sounds something like this: hard drive keeps flashing or - " hard drive light" :) Well, let's start with the fact that it's not a flashing light, but an LED located on the front panel of the system unit and connected to the motherboard using a cable labeled "HDD LED" connector.

"LED" stands for LED. Its blinking itself indicates that the hard drive is being accessed (it is busy with reading, moving or deleting information), in general, the computer has not hung up and is working :) By the intensity and frequency of blinking, you can indirectly determine the degree of utilization of your hard drive.
There are situations (especially on older computers) when the indicator on the front panel does not just flash periodically and glows for a relatively short time, but "burns" almost constantly for a long period of time. In this case, any user action is accompanied by serious "brakes" from the operating system. This is a sure sign that the computer does not have enough RAM to solve the task and it is forced to "dump" some of the information from it onto the hard drive into the so-called "swap file" or - " paging file".
But this is already a completely different story, and does not directly relate to the question of how to install a hard drive :)
In the age of information in which we live, the area for storing this very information is almost a critical component. In this regard, many are faced with the need to get more free space on their laptop or computer. There are questions like “Do I need an additional hard drive? How to install it? We will try to answer these and other questions in this article.
How to install an additional hard drive on a computer?
PC or laptop
When installing a brand new hard drive, the first (and main) question will be the type of device whose memory is to be expanded. If you have a PC, the procedure will be a little faster and easier, but do not despair if you are the owner of a laptop: for laptops, things are not as bad as it might seem at first glance.
PC
If you have a full size PC and don't know how to install an additional hard drive on your computer, the following guide will help you:
- Determine the type of power your power supply supports. They come in 2 types: SATA (looks like a narrow flat cord, usually red, with an l-shaped connector) or MOLEX (has a massive 4-pin connector). Most likely you have SATA, since MOLEX is technically and morally obsolete. In any case, there are a great many adapters, and if necessary, you can use them.
- Determine the type of connection to your computer's motherboard. It can also be a SATA connector (similar to power, but has a different width) or IDE (a very wide and thin cable). The latter is also obsolete, but still found.
- Decide on the type of memory and amount you need. It can be HDD or SSD. The key difference lies in the speed of work, volume and price. So, HDDs are cheaper and much more capacious, while SSDs are an order of magnitude faster. The best companies for HDD are Seagate and Western Digital, among SSDs are Samsung and Intel.
- Install a fresh purchase in a special connector on your computer, fasten it with screws that are usually included in the kit, and connect the necessary connectors. Of course, all manipulations must be performed with the power supply disconnected from the network.
After performing these manipulations, simply boot the computer as usual, format the additional hard drive (via My Computer) and use it like a regular hard drive.
A laptop
In case you want to know how to install an additional hard drive not on a PC, but on a laptop, you have to do the following:
- Choose and buy the storage device that suits you according to step 3 of the previous section. Please note that the hard drive of mobile computers has a smaller form factor.
- Buy a drive-to-hard drive adapter, they are sold at any computer store. Typically, these adapters have a standard size.
- Unscrew the screw securing the drive, carefully remove it from the laptop case. Then insert a brand new HDD (or SSD) into the adapter, aligning the power and interface connectors, insert the adapter and secure with a fixing screw.
- Turn on your PC, format the secondary hard drive and use it as intended
If the new hard drive does not appear
In the case when a new device could not be installed, that is, Windows simply “does not see” it, you must first of all check whether the device itself is enabled in the BIOS settings. Also, in the BIOS, the memory configuration settings may be incorrectly set (should be AHCI). Correct your settings and try again. It is also possible that the root of the problem is poor cable connections. Check all joints, including adapters. In the presence of dirt and traces of corrosion, wipe the contacts with an eraser and connect again. If after the additional hard drive does not work, then most likely you are out of luck and you bought a marriage. Feel free to carry the purchase back to the store or to the service center, they will help you.
How to take care of your memory
As with any thing, memory needs care. To avoid an early breakdown of a new device, it is recommended to regularly clean up temporary files and carry out no less regular defragmentation. Utilities for these actions, including free ones, are easy to find on the Internet. By giving your drive 10-30 minutes a month, you can extend its "life" for months and years.
When the first computers appeared, all programs, games and other files took up almost no disk space. Now things are quite different, and often you have to install an additional storage medium. Therefore, each user must know how to connect a second hard drive to a computer. In fact, this is not difficult to do, you just need to follow a simple instruction.
First, the device must be purchased in the store. Please note that the hard drive has several connection interfaces. After purchasing the purchase, you can proceed to install the device.
Preparing for installation
- How many hard drives are already connected to the motherboard? Most often, a computer has only one hard drive, so installing a second drive is not difficult. In most cases, the HDD is located directly under the DVD-ROM, so finding it is not difficult;
- Is there extra space to install a second hard drive? In the event that it is not possible to install a second or third disk, then you will have to purchase a USB drive;
- What type of cable is used to connect a hard drive to a computer? If the purchased device does not have the same interface as on a PC, it will be difficult to install it.
Please note that you will need a 3.5-inch hard drive. Small drives designed for laptops do not need to be bought.
Physical drive connection
If the system unit has not yet been disassembled, disassemble it. Now it is recommended to get rid of static electricity. This is done by any means known to you. If desired, you can purchase a special grounding bracelet in the store.

After a little manipulation, the hard drive will be fixed in the case, now all that remains is to connect the hard drive. Before turning on the power cable and cable, it should be noted that the procedure is slightly different for the IDE and SATA interface.
IDE Interface
When connecting a disk with an IDE interface, it is recommended to pay attention to such a nuance as setting the operating mode:
- Master (main).
- Slave (subordinate).
If an additional hard drive is installed, then the Slave mode must be enabled. To do this, you need to use a jumper (jumper), which is installed in second place. The first row includes Master mode. It is important to note that on modern computers, the jumper can be completely removed. The system will automatically determine which is the hard master.

At the next step, you need to connect the second or third hard drive to the "mother". To do this, the IDE interface is connected to a loop (wide, thin wire). The second end of the cable is connected to the IDE 1 Secondary socket (the main drive is connected to the zero socket).

The final stage of the connection is the power supply. To do this, a white chip with four wires is connected to the appropriate connector. The wires come directly from the power supply (box with wires and fan).
SATA interface
Unlike IDE, a SATA drive has two L-shaped connectors. One is for the power connection and the other is for the data cable. It should be noted that such a hard drive does not have a jumper.

The data cable is connected to a narrow connector. The other end is connected to a special connector. Most often, there are 4 such ports on the motherboard, but there are an exception and there are only 2 ports. One of the slots may be occupied by a DVD drive.
There are cases when a disk with a SATA interface was purchased, but no such connectors were found on the motherboard. In this case, it is recommended to additionally purchase a SATA controller, which is installed in the PCI slot.
The next step is to connect the power. L-shaped wide cable is connected to the appropriate connector. If the drive has an additional power connector (IDE interface), just use one of the connectors. This completes the physical connection of the hard drive.
BIOS setup
When all the manipulations with the hard drive are completed, you should turn on the computer, and then enter the BIOS. It is important to note that the launch of the BIOS on each computer is carried out in its own way. To do this, use the key:
- delete;

After entering the BIOS, you need to go to the configuration settings. It is important to designate the boot from the disk on which the operating system is installed. If the priority is set incorrectly, the system simply will not boot.
In the event that one of the disks is not displayed in the BIOS, it means that the hard drive was not connected correctly or the cable was damaged. It is recommended to inspect all wires and reconnect (do not forget to turn off the computer).
Once the BIOS setup is completed, you can boot with the operating system. After that, it remains only to assign a drive letter.
Final stage
Since connecting a hard drive to a computer is not enough, you need to make the final configuration directly from under Windows. On some computers, this procedure is carried out automatically. To check this, you should open "My Computer" and then see if a new disk has appeared.
If nothing happened, you need to start the control panel. Then select "Administration". As soon as a new window opens, you will need to select "Computer Management". In the left column, you need to find the "Disk Management" tab (on some computers, "Disk Manager").

- In the lower part of the window, select disk 1 (if more than 2 hard drives are connected, select the disk with the highest number). This will be the new hard drive;
- You must assign a letter to the logical volume. To do this, right-click on the disk, and then select "Assign letter";
- Once the drive has been assigned a new letter, it must be formatted. The procedure can take a long time, it all depends on the size of the hard drive. When formatting, it is important to choose the NTFS file system.
When the formatting process is complete, a new disk will appear in the root directory of "My Computer". If for some reason it is not possible to connect the HDD using the built-in manager, it is recommended to use third-party programs.
An excellent tool for working with hard drives is Partition Manager. In addition, such a utility allows you to split a disk into several logical volumes.
Conclusion
Connecting a hard drive takes no more than 15 minutes. If you follow the instructions, there should be no difficulties. Modern computers do not need additional BIOS settings, of course, if the disks are not installed in a completely new computer. Also, do not forget that it depends on the operating system how voluminous the connected hard drive can be.
Video review: connecting a hard drive


")


- What was taught to women who became guards in concentration camps Torture used by the Nazis
- Singer Alex Malinovsky: biography, career, personal life, photo Let's start the story again
- Do I need to shave the testicles and how to do it right at home How to shave the eggs
- Chinese girls with small breasts
- Famous girls with small breasts
- Shoulder girdle: why you can’t sympathize with Russian truckers
- How to clean your computer from junk and speed up its work
- Wedding predictions for guests: funny and funny ideas Comic fortune-telling of a gypsy in prose
- Business on coffee grounds or how to open a mobile coffee shop on wheels?
- Congratulation of a gypsy on a woman's anniversary
- Define the concepts: choir, vocal ensemble, trio, duet, solo
- Guy's Room Design: Ideas and Examples
- General rules for drawing up a foundation plan House foundation drawings
- modern art deco bedroom small art deco bedroom
- Pansies: characteristics and photos of flowers
- Making an art deco bedroom: the choice of materials Beige art deco bedroom
- Bedroom interiors in art deco style Bedroom art deco style beige
- Young: planting and care in the open field Young planting and care in the open
- Varieties for open ground
- Pansies: cultivation and care in the open field