Fastening metal columns to reinforced concrete columns. Organization and technology of work performance. "technological map development"
The installation of glass-type foundations and, in general, the construction of structures of the underground part of the building are classified as zero-cycle works and are carried out by an independent assembly stream. The above-ground part of the building is usually mounted by a mixed method, when columns are mounted and wall panels are mounted by independent flows, and crane, under-rafter and truss trusses are installed in a complex, and roofing panels are laid.
For one-story industrial buildings, a range of prefabricated reinforced concrete columns up to 19.35 m high and weighing up to 26.4 tons, mounted in glass-type foundations, has been developed.
Before installing columns, you must:
Fill up the sinuses of the foundations;
Apply on four faces at the level of the upper plane of the foundations the risks of the installation axes;
Close the glasses of the foundations with shields to protect them from pollution;
Arrange roads for the passage of the assembly crane and cars;
Prepare areas for storing columns at the place of their installation;
Deliver to the installation area the necessary installation tools, fixtures and tools;
Check the position of all embedded parts of the columns;
Apply the risks of the installation axes on the side faces of the columns.
The columns are preliminarily laid out at the installation sites on wooden linings with a thickness of at least 25 mm. The layout of the columns is carried out in such a way that the crane from the assembly site can install them in the design position without changing the boom reach. Before installation, each column must be inspected so that it does not have deformations, damage, cracks, shells, chips, exposed reinforcement, concrete sagging. It is necessary to check the geometric dimensions of the column, the presence of a mounting hole, the correct installation of steel embedded parts.
Before or simultaneously with slinging, a column with a height of more than 12 m is built up with stairs, hinged cradles, braces.
Slinging of columns is carried out for mounting loops, for a mounting rod passed through a special hole in the column. Friction grips or various self-balancing traverses are widely used, allowing the column to be lowered vertically onto the foundation. All of them must provide remote slinging, eliminating the need for a worker to rise to the slinging site after installing the column in the foundation sleeve. The columns are lowered into the foundation glass with the help of a mounting crane on reinforced concrete pads or on a leveling layer of concrete mix.
The alignment and temporary fixing of the columns installed in the foundations is carried out using a set of mounting equipment. The design position of the bottom of the column at the bottom of the foundation glass, temporary fastening and vertical alignment of the columns are carried out using wedge liners. The stability of the columns after installation is provided with temporary fasteners, most often with conductors or wedge liners. Vertical alignment and correction of columns is carried out using jacks; in this case, the deviation from the vertical and the displacement of the axes of the columns in the lower section should not exceed the standard values.
Columns up to 12 m high are usually fixed in foundation glasses only with the help of wedge liners; for higher columns, conductors and braces are additionally used. The slinging of the installed columns should be carried out after they are securely fixed in the foundation glasses with wedge liners, and, if necessary, with braces.
The inventory wedge insert consists of a body with a nut and a handle, a screw with a boss and a wedge suspended on a hinge. Wedge inserts are installed in the gaps between the faces of the column and the walls of the foundation glass. For gaps greater than 90 mm, additional inserts are used. When the screw is rotated with a key, under the action of the boss, the wedge moves in the body on a hinge, as a result, a spreading force is created between the wedge and the body of the glass. Before sealing the joint between the column and the foundation with a concrete mixture, a fence is installed on the wedge liner, which is removed from the glass immediately after compaction of the rigid concrete mixture or after the start of setting with conventional mixtures.
Conductors of various types are used for temporary fixing of columns. The conditions for the use of various types of conductors, the procedure for performing work on the installation and alignment of columns with their use is specified in the project for the production of works.
After the alignment of the columns, their fixing in the design position is carried out by concreting the joints with a concrete mix on quick-hardening non-shrinking cement using a pneumatic blower. The wedge inserts are removed only after the concrete has acquired the joint strength specified in the project for the production of works or when the concrete reaches 50% of the design strength.
When installing columns, it is necessary to check the level of the bottom of the foundation glass, the alignment of the risks on the edge in the lower part of the column with the alignment risk on the upper edge of the foundation, the verticality of the columns, the marks of the crane console and the column head. The alignment of the axes of the column and the staking axes must be controlled along two axes, the verticality of the column must be ensured using one or two theodolites along the two staking axes or a zenith device using the vertical design method. Elevations of support platforms for crane beams and trusses are controlled by the method of geometric leveling.
9.1.1. Installation of prefabricated foundations
The installation of prefabricated foundations is usually carried out in a separate advanced flow during the construction of the underground part of the building. The breakdown of the installation sites of the foundations is carried out using longitudinal and transverse axes, fixed with a wire.
When installing foundations for columns, the position of the axes is transferred to the bottom of the pit with a plumb line, fixing them with pins or pegs hammered into the ground. On glass-type foundations, the middle of the side faces of the glass is determined and axial risks are applied to the upper face. When lowering the block on the base, the position of the block is controlled by risks.
The installation of the glass-type foundation must be carried out immediately in the design position in order to avoid disturbing the surface layer of the base (Fig. 9.1). The position of the foundation block in height is verified using a level, controlling the level of the bottom of the glass. The position of the block in the plan is checked with the slings not removed by combining the marks (installation and marking axes) along two mutually perpendicular axes, a small deviation is eliminated by moving the block with a crowbar.
Upon completion of the installation of the foundation blocks, a geodetic survey of their position is carried out - altitudinal and in plan. Based on the results of the survey, an executive diagram is drawn up, on which possible displacements of the blocks are indicated.
Rice. 9.1. Foundation installation:
1 - crawler crane; 2 - the position of the block of foundations before lifting; 3 - foundation block during installation.
Permissible deviations of the installed cup-type foundation blocks from the design position: the displacement of the axes of the blocks relative to the center axes is not more than ± 10 mm, the deviation of the bottom marks of the cups is 20 mm.
9.1.2. Installation of columns
The installation of glass-type foundations and, in general, the construction of structures of the underground part of the building are classified as zero-cycle works and are carried out by an independent assembly stream. The above-ground part of the building is usually mounted by a mixed method, when columns are mounted and wall panels are mounted by independent flows, and crane, under-rafter and truss trusses are installed in a complex, and roofing panels are laid.
For one-story industrial buildings, a range of prefabricated reinforced concrete columns up to 19.35 m high and weighing up to 26.4 tons, mounted in glass-type foundations, has been developed.
Before installing columns, you must:
- fill the sinuses of the foundations;
- put on four faces at the level of the upper plane of the foundations the risks of the installation axes;
- close the glasses of the foundations with shields to protect them from pollution;
- arrange roads for the passage of the assembly crane and cars;
- prepare sites for storing columns at the place of their installation;
- deliver to the installation area the necessary installation tools, fixtures and tools;
- check the position of all embedded parts of the columns;
- put the risks of the installation axes on the side faces of the columns.
The columns are preliminarily laid out at the installation sites on wooden linings with a thickness of at least 25 mm. The columns are laid out in such a way that the crane from the assembly site can install them in the design position without changing the boom reach (Fig. 9.2). Before installation, each column must be inspected so that it does not have deformations, damage, cracks, shells, chips, exposed reinforcement, concrete sagging. It is necessary to check the geometric dimensions of the column, the presence of a mounting hole, the correct installation of steel embedded parts.
Before or simultaneously with slinging, a column with a height of more than 12 m is built up with stairs, hinged cradles, braces.
Slinging of columns is carried out for mounting loops, for a mounting rod passed through a special hole in the column. Friction grips or various self-balancing traverses are widely used, allowing the column to be lowered vertically onto the foundation. All of them must provide remote slinging, which eliminates the need for a worker to rise to the slinging site after installing the column in the foundation glass. The columns are lowered into the foundation glass with the help of a mounting crane on reinforced concrete pads or on a leveling layer of concrete mix.

Rice. 9.2. Installation of columns:
1 - glass-type foundation; 2 - lining; 3 - the position of the column in the warehouse; 4 - installed column; 5 - mounting traverse; 6 - previously installed column; 7 - embedding of a column in a glass with concrete;
The alignment and temporary fixing of the columns installed in the foundations is carried out using a set of mounting equipment. The design position of the bottom of the column at the bottom of the foundation glass, temporary fastening and vertical alignment of the columns are carried out using wedge liners.
The stability of the columns after installation is provided with temporary fasteners, most often with conductors or wedge liners. Vertical alignment and correction of columns is carried out using jacks; in this case, the deviation from the vertical and the displacement of the axes of the columns in the lower section should not exceed the standard values.
Columns up to 12 m high are usually fixed in foundation glasses only with the help of wedge liners; for higher columns, conductors and braces are additionally used. The slinging of the installed columns should be carried out after they are securely fixed in the foundation glasses with wedge liners, and, if necessary, with braces.

Rice. 9.3. Single conductors for mounting columns in foundation sleeves:
a - normal; b - semi-automatic; 1 - mounted column; 2 - frame; 3 - capture for the mounted structure; 4 - adjusting screw; 5 - gripping the support; 6 - swivel bracket; 7 - foundation; 8 - lining; 9 - mortgage roller; 10 - pressure spring-loaded rollers; 11 - guide fixed rollers;
The inventory wedge insert consists (Fig. 8.17) of a body with a nut and a handle, a screw with a boss and a wedge suspended on a hinge. Wedge inserts are installed in the gaps between the faces of the column and the walls of the foundation glass. For gaps greater than 90 mm, additional inserts are used. When the screw is rotated with a key, under the action of the boss, the wedge moves in the body on a hinge, as a result, a spreading force is created between the wedge and the body of the glass. Before sealing the joint between the column and the foundation with a concrete mixture, a fence is installed on the wedge liner, which is removed from the glass immediately after compaction of the rigid concrete mixture or after the start of setting with conventional mixtures.
For temporary fixing of columns, conductors of various types are used (Fig. 9.3). The conditions for the use of various types of conductors, the procedure for performing work on the installation and alignment of columns with their use is specified in the project for the production of works.
After the alignment of the columns, their fixing in the design position is carried out by concreting the joints with a concrete mix on quick-hardening non-shrinking cement using a pneumatic blower. The wedge inserts are removed only after the concrete has acquired the joint strength specified in the project for the production of works or when the concrete reaches 50% of the design strength.
When installing columns, it is necessary to check the level of the bottom of the foundation glass, the alignment of the risks on the edge in the lower part of the column with the alignment risk on the upper edge of the foundation, the verticality of the columns, the marks of the crane console and the column head. The alignment of the axes of the column and the staking axes must be controlled along two axes, the verticality of the column must be ensured using one or two theodolites along the two staking axes or a zenith device using the vertical design method. Elevations of support platforms for crane beams and trusses are controlled by the method of geometric leveling.
9.1.3. Installation of crane beams
The installation of beams is carried out only after concrete is set in the monolithic joint of the column with the foundation of a given strength. Before installation, the following preparatory work must be carried out:
- layout of areas for laying out crane beams before lifting;
- arrangement of passage for the movement of the assembly crane and vehicles;
- alignment and fixing according to the project of all columns and vertical connections on them;
- geodetic verification of the elevations of the supporting platforms of the consoles of the columns with the definition and provision of the mounting horizon.
Installation of crane beams can be organized by an independent flow or carried out in a complex together with the rest of the coating structures (Fig. 9.4). The layout of beams and other frame elements in the installation area must be carried out on wooden linings, laying prefabricated elements at a sky-high angle to a row of columns (which allows you to inspect the ends and prepare the parts to be connected for installation), and at a distance of about 50 cm from them. are carried out taking into account their installation, when the crane from the installation site lifts and lays them without changing the boom reach (Fig. 9.5). Before lifting the crane beam, it is necessary to install mounting ladders on the columns, clean the mounting units from dirt and debris, fix guy wires on the beam and sling it.

Rice. 9.4. Scheme of layout and installation of elements of standard cells:
1 - mounted column; 2 - crane beam; 3 - a stack of coating plates; 4 - roof trusses; 5 - mounting arrangement of the column.

Rice. 9.5. Installation of crane beams:
1 - column; 2 - crane beam in the design position; 3 - the same, in stock; 4 - mounting crane.
There are two main schemes for mounting crane beams. At the first, beams are mounted within the grip and temporarily fixed. Carry out instrumental leveling of beams at reference points. Under the level of the highest mark, all other supporting points of the beams are raised with steel spacers. Unaligned installation of beams is possible with increased accuracy in the manufacture and installation of columns, providing the necessary horizon of the consoles of these columns. In the second scheme, before installing the crane beams, compensator pads up to 10 mm thick are laid on the embedded parts of the consoles of the columns, which ensure the design accuracy of the supporting surface. This allows you to install and finally fix the crane beams without additional height adjustment.
Crane beams up to 6 m long are lifted to the design position by a conventional traverse with hooks, and beams of greater length - by a traverse with tongs (Fig. 9.6). The beam is raised above the design mark by 30 ... 50 cm and, with the help of braces, it is brought to a position close to the design one. When installing crane beams, the risks on the lower end faces of the beams must match the risks on the consoles of the columns.

Rice. 9.6. Clamps for mounting crane beams:
1 - crane beam; 2 - mechanical grip; 3 - traverse; 4 - flexible cables; 5 - latch.
Alignment of the beam in height and in plan is carried out using a jack or clamp and a horizontal screw device. At the end of the alignment, the estimated thickness of the gasket is laid under the beam and fixed with anchor bolts.
The mark of the upper shelf and the position of the longitudinal axis are verified with geodetic instruments. The beams are fixed by welding of embedded plates at the ends of the beams and at two levels near the column at the upper face of the crane console and on the side face above the beam flange. The gap between the crane beam and the column is filled with a concrete mixture in the inventory formwork, and the joints of the beams are filled with cement mortar.
9.1.4. Installation of truss and truss trusses and beams
These structures include under-rafter trusses with a length of 12 m, truss trusses and beams with a length of 12; 18 and 24 m and prestressed trusses for spans 18...36 m.
The unloading of trusses and beams at the facility, the layout and installation of elements is usually carried out by a truck crane in the area of the assembly crane. The installation of these structures can be carried out with a preliminary layout of the elements (including crane beams and floor slabs) or directly from vehicles. The layout of trusses and beams is carried out in such a way that the crane from the assembly site can install them in the design position without changing the boom reach (Fig. 9.7 and 9.8). To ensure the stability of the mounted elements on the ground, they are stored in special cassettes. When structures are delivered to the facility in significant quantities, temporary storage in group cassettes without layout in the installation area is allowed (Fig. 9.9). If it is planned to mount the crane beams in an independent flow, then it is preferable to mount the truss trusses with them in the same flow.
Before installation of the structure, it is necessary to equip: truss trusses - with a safety rope, a hinged cradle and braces; roof trusses and beams - with a safety rope and braces.
For slinging trusses and beams, traverses equipped with grippers with remote automatic or semi-automatic unslinging should be used.

Rice. 9.7. Installation of truss trusses:
1 - assembly crane; 2 - truss truss in a warehouse; 3 - installation of the farm on supports; 4 - mounting equipment.

Rice. 9.8. Installation of roof trusses:
1 - roof trusses in the warehouse; 2 - lifting the farm to the design position; 3 - traverse; 4 - assembly crane; 5 - mounting arrangement of the column.
When lifting the farm, its position in space is regulated with the help of braces. At a height of 0.6 m above the ground, the truss is supported by installers (located on the installation sites attached to the columns), guide it along the axial risks and set it to the design position. Then the embedded parts are welded, after which the truss is unstrapped. For the installation of beams and trusses, mobile and self-propelled telescopic and articulated towers and lifts are often used, which provide convenience for the installers and allow them to abandon scaffolds and hinged cradles.

Rice. 9.9. Storage of trusses and beams in the on-site warehouse:
a - roof trusses; b - crane beams;
Trusses and roof beams should be installed in the design position, combining the axial risks at their ends with the risks on the supporting surfaces of the underlying structures (columns, truss trusses). The fastening of the elements is carried out with the help of conductors, previously installed on the heads of the columns. The slinging is carried out after the installation of spacers and welding of the ties to the upper chords.
After lifting, installation and alignment, the first truss is unfastened with braces, which are fixed to adjustable inventory anchors or pre-installed and monolithic columns, the subsequent ones are connected to each other with special spacers that have a rigid size of 6 or 12 m in the axes (Fig. 9.10). After the installation of the first pair of trusses, 3...4 coating slabs are laid and fixed on them to create an initial rigid system. Then all elements of temporary fastening are removed, i.e., all inventory spacers and braces are removed as the coating slabs are laid and welded. Simultaneously with the farms, all permanent communications provided for by the project should be established.

Fig.9.10. Installation and unfastening of the first two roof trusses:
1 - handrail; 2 - roof truss (beam); 3 - coupling; 4 - inventory screw coupler; 5 - crane beam; 6 - brace.
9.1.5. Installation of floor slabs
As a rule, coating slabs are 6 m long with a width of 1.5 and 3 m and a length of 12 m with a width of 3 m. The installation of the plates is carried out in the same stream with the trusses (covering beams), therefore, immediately after the installation of the next truss, the next row of slabs is laid.
With a lanternless roof, it is recommended to lay the coating slabs from one end of the truss to the other, starting from the side of the previously installed span (Fig. 9.11), if there are lanterns, from the ends of the trusses to the middle of the span. Coating slabs are laid according to the markings on the upper chords of trusses (beams) in order to ensure their design position in plan on the truss structure.
The first roof slab, installed on the truss structures, is welded at four support nodes. The embedded parts of each subsequent slab in at least three support nodes must be welded to the embedded parts of the upper chord of the truss (the fourth corner of the slab is not available for welding).
When laying the first slab in each cell, one installer is on the slab laid in the adjacent cell, the second - on the ladder-platform, hung on the column. In the future, both installers move on to the newly laid slab for acceptance and installation of the next one.
The edge slabs of the coating must be equipped with an inventory fence structure. The joints between the slabs are sealed with a cement-sand mortar on quick-hardening cement or a fine-grained concrete mixture.
In one-story industrial buildings, large-sized shell slabs, 2T slabs, and other industrial products, which are most often delivered to the facility with already completed insulation and roofing, can be provided as coating elements.
Warehousing of floor slabs is carried out in the working area of the assembly crane along with other elements included in the assembly flow. The slabs are stacked in piles up to 8 ... 9 pg., Sometimes stacks are arranged on both sides of the assembly crane. It is necessary that on these stacks all the slabs fit completely in the installed span. Only for roof slabs, as the lightest frame elements, it is permissible to change the crane outreach when laying the elements on two adjacent trusses. The best solution is to use it as a mounting crane with an extended jib, which will allow lifting and mounting trusses and beams on the main hook, and roofing slabs on the other hook on the jib.
The strut between the trusses is removed after laying and welding to the truss of the embedded parts of the slab laid at the strut. The installation of reinforced concrete floor slabs along the rafters is carried out in the same sequence and with the same methods as for trusses.
9.1.6. Installation of wall fencing
Wall panels are installed in an independent assembly stream after the installation of the frame and covering the entire building or part of it. External wall panels are taken to be 6 and 12 m long and 1.2 and 1.8 m high.
Installation of wall barriers is usually carried out by self-propelled jib cranes on caterpillar or pneumatic wheels with straight booms, with jib booms or with specialized boom tower equipment. Crawler cranes find the greatest application, since it is easier for them to prepare the base for driveways.
For unloading from vehicles and installing wall panels in cassettes, an independent crane is used, more often an automobile one. It is irrational to place cassettes in several rows along the building and thereby expand the installation area. Therefore, if the wall includes more than 12 panels in height, the installation of wall filling is carried out in 2 ... 3 crane penetrations along the length of the grip.
Wall panels are mounted in sections between columns for the entire height of the building. A truck crane is usually used to unload and install panels in cassettes. At the same time, slinging of panels 6 m long is carried out with a two-branch sling, and panels 12 m long - with a traverse. The width of the installation area, the passage for vehicles delivering wall panels, the crane operation area depend on the technology of installation work, on the location of the cassettes with panels and other factors. The smallest width of the area for installation work will be in the case when the cassette with wall panels is located between the crane and the wall to be mounted; at the same time, there should be enough panels in the cassette to make the wall to the full height (Fig. 9.12).

Fig.9.12. Attachment of external wall panels with different storage of structures:
a - when the cassettes are located between the tap and the wall; b - the same, behind the tap; c - when the crane is located between two* cassettes; 1 - crane; 2 - cassettes with wall panels; 3 - braces; 4 - slings; 5 - wall panels; 6 - cover panels; 7 - roof trusses; 8 - installed wall panels; 9 - columns; 10 - hydraulic lifts
According to the existing technology, installers align and fasten the panels to be installed from the inside of the building. If it is possible to travel inside the building, it is advisable to use two car-based lifts as installers' workplaces. This allows installers to accept each panel at its connection to the columns. In the absence of lifts, scaffolds and cradles can be used as a workplace. In case of impossibility of passage inside the building, self-elevating cradles can be used as workplaces.
The technology of mounting external wall panels using a crane with specialized tower-boom equipment is being used. The main technological features of the use of this equipment are:
■ alignment of the crane with the installation site;
■ the ability to move the mounting platform vertically (up and down the crane tower) and horizontally (from the tower to the wall and back);
■ placement of panels in cassettes installed between the crane and the wall to be mounted;
■ Width of the installation area along the perimeter of the building, which is at least 8.5 m.
When installing external panels, the accuracy of installation is of particular importance for the panels to perform not only enclosing, but also aesthetic functions. Therefore, it is necessary to observe the dimensions of the seams, the proper quality of their finish, and the preservation of the edges of the front surfaces.
During geodetic verification of the accuracy of work performance, the following is controlled: for panels of the first row - alignment of the lower edge of the panel with the risks of the alignment axes; alignment of edges installed side by side or one above the other panels; verticality of the faces of the installed row of wall panels.
For jointing horizontal seams or applying sealing mastics from the outside, sealing vertical seams between panels, scaffolds or lifting cradles are used, which are located on the outside of the span after moving the assembly crane to the next parking lot.
9.1.7. Sealing joints of structures
Joint sealing methods are largely determined by their location in the building. There are horizontal and vertical joints. Sealing joints in general consists of the following operations: caulking, waterproofing, insulation, embedding, sealing, surface finishing. Sealing of joints from the inside is carried out during the installation process. If the joint requires processing from the outside, then the joints are sealed from the ground, from a ladder, from retractable or hinged cradles.
The embedding of joints and seams with a mortar or concrete mixture is carried out after verifying the correct installation of structural elements, acceptance of welded joints and anti-corrosion protection of steel embedded parts and reinforcing bars. The quality of sealing joints is of great importance, since the strength and stability of the building depend on them.
Joints that perceive design forces are sealed with a concrete mixture of a higher class than the concrete of the joined elements. Joints that do not perceive design forces can be sealed with a concrete mixture and mortar specified in the project. It is advisable to use a concrete mixture on an expanding or fast-hardening cement. Sand is used quartz medium and coarse-grained. Crushed stone is used granite with a particle size of 5 ... 10 and 10 ... 20 mm in order to better ensure the filling of the concrete mixture at the joint. The largest size of crushed stone should not exceed 3/4 of the smallest clear distance between the reinforcement bars and V3 of the smallest size of the section of the joint cavity.
The connection of the column with the foundation is controlled in two places. The column is installed in the foundation glass on a leveling layer of mortar or concrete mixture of a rigid consistency, which is laid before installing the column. The layer thickness is determined by the height of the mounted column and the bottom of the glass on the executive diagram. It is impossible to lay metal linings instead of a leveling layer and install a column on a hardened concrete layer, since this does not provide the necessary contact over the entire area of the end face of the column and the base.
The nests of the glasses are monolithic after the installation and alignment of the column or a number of columns with a concrete mixture with aggregate with a particle size of 5 ... 20 mm. The concrete mixture is compacted with a deep vibrator with a tip up to 38 mm in diameter.
The remaining joints of the frame elements can have different designs. In accordance with these differences, in the projects for the production of works, methods for sealing joints should be indicated: caulking or sealing joints with mortar or a monolithic joint used to seal the joined reinforcing elements.
The seams are caulked with a hard solution, compacting it to completely caulk the gaps. The seams are closed manually or with the help of mortar pumps. When sealing joints between vertical elements, inventory formwork is used.
Monolithic joints are concreted, laying a concrete mixture (mortar) in the formwork; the formwork is removed after reaching the concrete strength required by the project. Before concreting such joints, the quality of welding of parts and fittings, the correctness of reinforcement are checked. Before laying the concrete mixture, the reinforcement and all surfaces of the joined elements are cleaned of scale, and debris is removed. The concrete mixture is laid, compacting it by vibrating, bayoneting, ensuring that the joint is completely filled with the concrete mixture.
When laying the concrete mixture, make sure that there is no displacement of the reinforcement in the concrete and that the required thickness of the protective layer is maintained. In the process of vibrating, the concrete mixture leaves the loose state and acquires mobility due to the reduction of friction between the particles. As a result, crushed stone and gravel also come into motion and are distributed more evenly in the concrete mixture, which leads to an increase in the density and strength of concrete.
In frame-panel buildings, the quality of installation of structures depends on the assembly of the frame. Therefore, it is important to prevent inaccuracies in the installation of columns, crossbars and other frame elements.
Installation of columns. Columns are mounted using group or individual conductors and gripping devices.
The columns of the first floor are installed in the glasses of the foundations in this sequence. According to the geodetic verification of the work performed, the risks of the axes of the columns are applied to the upper faces of the foundations. Axial risks are also marked on columns prepared for installation. Poured (if necessary) with concrete the bottom of the foundation glass to the design mark. They sling, lift and install the column, combining by weight the risks applied to it with axial risks. on the foundations. The column is aligned and temporarily fixed with the help of a conductor and portable jacks. The column is unslinged and after installing a number of columns in the same sequence, their position is finally checked, the columns are monolithic in the glasses with a concrete mixture.
To lift columns, friction grips, universal slings, semi-automatic and other grips are used.
When installing the column on the foundation (in a glass), before slinging, check the position of the column according to the installation risks and vertically, then temporarily fix it and only after that remove the slings from the column. Before the column is embedded in the foundation glass, it is finally verified: they make sure that the column is installed strictly vertically, and the risks applied to the installed column coincide with the risks on the foundation surface.
Methods of temporary fixing of the column depend on its type, mass and length.
Temporary fastening of columns up to 8-10 mm high, installed in foundation glasses, is carried out mainly with wooden, less often steel or reinforced concrete wedges. On each side, one wedge is placed in the gap between the column and the wall of the foundation glass. Hammer wooden or steel wedges with a metal sledgehammer. After driving, the wedge should be 12 cm higher than the edge of the foundation glass, so that it is easier to remove it after the final sealing of the column in the glass with concrete.
For temporary fixing and alignment along the axes of columns installed in a glass-type foundation, it is also recommended to use inventory rigid conductors.
Columns with a height of more than 10 m and a mass of more than 6 tons, for example, two-three-story columns of frame buildings, in addition to temporary fixing in the foundation glass with the help of wedges or a jig, are additionally fastened with rigid struts or flexible braces to the foundations of adjacent columns or to portable anchors.
The use of mobile or adjustable conductors, with the help of which the columns are temporarily fixed on the supports, significantly reduces the operating time of the erection crane with each column. After fixing the column in the conductor, it is unslinged and the crane can be used to mount other structures. At the same time, using simpler devices, it is possible to align and finally fix the installed columns. As a result of the use of such devices, the productivity of mounting mechanisms is increased, the duration and cost of mounting work are reduced.
Conductor for fixing the column
weighing up to 5 tons (218, a) consists of two fermo-
check 1 and tie bolts 2. The base of the opi truss
dig on the surface of the foundation (through screw
jacks 5) and after installation are pressed against the column
tie bolts.
The installation of the column using the conductor for its fastening and alignment is carried out in the following sequence. The column lifted by the crane is stopped at a height of 30-40 cm from the top of the foundation, turned to the design position and smoothly lowered into the glass. The base for the column (bottom of the glass) must first be calibrated with - taking into account the actual height of the column, so that after installation the mark of the top of it or the consoles is at the design level. When installing the column, the installers guide it in such a way that, if possible, immediately combine its installation axial risks with the risks on the foundation. If this cannot be done, then jacks 3 are lowered into the foundation glass and their screws are brought "to the stop in the faces of the columns. With the help of jacks (218, b), the column is pre-aligned, combining the position of the mounting marks on the column with the risks on the foundation in both directions. To do this, slightly loosen the screws of the jacks on one side of the column and move it with the screw of another jack.Then, on the top of the glass of the foundation on two opposite sides of the column, put the trusses of the conductor 1, and fix it on the column with the help of tie bolts 2. The screws of the jacks 5 abut against the surface of the glass and after that, the slings are removed from it.
With the careful work of the installers and the crane operator, they quite accurately install the column with a crane into the foundation glass. However, this does not exclude the need for subsequent finishing of the column to the design position using a conductor and jacks. The final alignment of the position of the column in the plan is made by horizontal jacks 3.
The conductor for the vertical line (218, c) before about 8 tons is checked with a plumb line from the hand and straightened with jacks 5 of the conductor. When the screw of one or two support jacks is rotated on one side of the column, the corresponding truss of the conductor rises or falls and the column tilts somewhat; By manipulating the conductor's jacks in this way, the verticality of the column is achieved. After that, a geodetic check of the position of the mounted column in plan, height and vertical is carried out. If the accuracy of its installation is within the permissible range, the column is monolithic in the foundation glass. And after the concrete of the joint gains 70% of the design strength, the conductor and other temporary fasteners are removed and used when installing other structures. Columns are monolithic in groups of 6-10 columns on a grip equal to the replaceable installation volume.
The jig for fixing the column with a mass up to § t (219) provides a relatively greater stability of the column and can be used for installation. two-three-story columns - up to 10 m high. It is also used in the construction of one-story industrial buildings. The conductor consists of two trusses 1, welded from beams and corners, interconnected by four coupling bolts 2. The high location of the lower connecting corners of the conductor and the gap in the supporting channels allow you to install horizontal screw jacks on either side of the column and align it after - how it is temporarily fixed in the conductor.
Other types of conductors are also used, which can be installed after the column is loaded into the glass.
Columns of the second and next tiers in multi-storey buildings are mounted after instrumental verification of previously installed columns, crossbars and other structures. On the heads of the mounted columns, axial risks are applied, the heads are cleaned from concrete influxes, devices for temporary fastening of the installed columns are prepared and they are installed.
The jig for temporary fixing and alignment of single columns mounted on the heads of columns protruding above the ceiling consists of four corner posts 1, a clamping clip and two adjusting devices - clips with adjusting screws. The clamping clip is located in the lower part and secures the conductor on the protruding head of the downstream column 2. The adjusting clips are located in the middle and upper parts of the racks. They consist of four beams 4 with adjusting screws 5, which ensure the movement of the installed column. Three beams have one screw each, and the fourth one has two, which makes it possible to rotate column 3 around the vertical axis (220).
Columns are mounted using a jig in the following order. The conductor is installed with racks in the girth of the head of the lower column and fixed on it with the coupling screws of the lower cage. The mounted column is brought in by a crane from above inside the conductor and installed on the head. Temporarily the column is fixed by screwing in the adjusting screws of the upper clips until they stop in the face of the column, after which it is released by the 6T hook of the mounting crane. For installation in the design position, the column is rotated and moved with the help of the upper and lower adjusting screws of the conductor. The alignment of the axial marks of the installed column and the previously installed one is achieved by the lower adjusting screws of the jig, and the vertical position of the column is achieved by the upper screws. After alignment and fixing of the column by welding the embedded parts or outlets of the reinforcement, the clamping screws are loosened and the conductor is removed.
The columns of the second and next tiers in multi-storey buildings are also fixed, depending on the design of the frame, with struts, ties or group conductors.
When supporting columns at the floor level, rigid struts and flexible braces are used. Flexible connections (221, a) consist of an inventory "cage 2, hinged rods 5 made of reinforcing steel and turnbuckles 4, with the help of which the tension of the bonds and the position of the column 1 are changed during alignment. Rigid struts (221.6) consist of a cage 2 , struts 7 from pipes with turnbuckles 4.
When mounting columns of multi-storey buildings, group conductors for four columns are increasingly used, designed to temporarily fix and correct their position during alignment, for example, a frame-hinged indicator (RSHI), developed at the suggestion of eng. Y. S. Deycha.
The frame-hinged indicator (RSHI) provides temporary fixing and the specified accuracy of the installation of columns by forced receptions. It consists of a floating articulated-indicator frame 11 (222, a) with swivel 2 and folding 7 clamps mounted on it for temporary fixing of the installed columns /. Longitudinal 4 and transverse 5 rods with locks provide fixation of the mutual position of the frame-hinge indicators in the plan. Spatial scaffolding 12, the conductor rests on the ceiling or on the upper edges of the foundations (when installing the columns of the first tier). The floating frame is the main working body of the RSHI. It allows you to install RSHI with a deviation in plan by 100-200 mm from the design position, followed by alignment and precise fixation of only the indicator frame itself.
When mounting the frame (222.6), first install the first set of RSHI-I, fix it and align it along alignments A and B, then install RSHI-P and align it along alignment B. In the other alignment, the position of RSHI-P in the plan is not verified, and it is fixed by rods 5 connected to the already calibrated RSHI-I. Next, RSHI-Sh is installed, aligned along alignment A and the position in alignment B is fixed with rods 4 connected to RSHI-I. The position of RSHI-IV is fixed by automatic connection of rods 4 and 5 to the previously adjusted RSHI-P and RSHI-Sh.
After installing, fixing and aligning the RSHI sets, columns are mounted, the position of which in the plan and vertically is fixed with a given accuracy by rotary and folding clamps of the floating frame.
RSHI are rearranged only after the final processing of the butt joints of the columns, installation and fixing of Other prefabricated structures that ensure the stability of the frame. For the convenience of the installers, rotary cradles are mounted on the RSHI spatial scaffolds, from which the frame joints are processed.
Installation of crossbars. The frame crossbars are mounted after the columns are fixed in the design position. The crossbar is slinged for mounting loops and fed to the installation site. The designs of the junction of crossbars with columns in frame multi-storey buildings are different depending on the design solution. However, in all cases, the crossbars are attached to the columns by welding embedded parts or by embedding the reinforcement outlets from the head of the lower column and the reinforcing outlets of the crossbar.
Having lowered the crossbar 3 (223) onto the support platforms [(console) of the column /, they check the compliance with the design of the width of the supports, the coincidence of its marks 7 with the axial risks of the column 4 and attach the crossbar with an electric tack to the embedded parts 6 of the columns. The joints of the crossbars with other elements are sealed after the final alignment of the frame of the mounted cell. When aligning structures with a template or steel tape, the position of the crossbar in the plan is controlled, and with the help of a level or water level, the mark of the top of the crossbar and its horizontalness are checked. Installation of crossbars is carried out from inventory tables or scaffolds.
Installation of panels and decking. Panels
or floor decking during installation is temporarily not
fasten. They are installed in the usual way,
slinging for mounting loops or technological
holes. For permanent fixing of floor slabs
their embedded parts are welded to the embedded parts
crossbars or load-bearing walls. This fastening is performed
before the installation of overlying structures and only
after being verified and finalized
crossbars. The seams between the floor slabs are frame-pa-
residential buildings close up in accordance with the instructions
mi of the project with a solution or with the installation of fittings and
pouring concrete.
Processes of installation of reinforced concrete structures
Preparation of foundations for columns
The accuracy, labor intensity and duration of the installation of columns and other elements of the frame of industrial structures depends primarily on the correct arrangement of foundations for columns and the accuracy of the preparation of supporting surfaces.
In the case of using reinforced concrete glass-type foundations of small height, their features should be taken into account. The upper level of these foundations is significantly lower than the level of the edge of the excavation. Columns on such foundations should be mounted with open pits.
Higher foundations, the upper level of which is about 0.15 m below the floor level, make it possible to lay the foundation beams, fill in the pits, plan the site and arrange preparations for the floors before the installation of the columns to provide favorable conditions for the operation of transport and installation equipment. In order to improve the conditions of transportation and installation, foundations with under-columns are also used.
To ensure the accuracy and speed up the installation of columns, it is required to correctly position the glasses of the foundations in the plan (the displacement of the axes is allowed no more than ± 10 mm); provide accurate design marks of the bottom of the glasses (tolerance ± 20 mm); maintain a specified gap between the design position of the faces of the columns and the walls of the glass. It is advisable to install a shallow pit in the gravy of the bottom of the cup (Fig. 2), corresponding to the outline of the end of the column, located along the center axes and providing a fixed installation of the column along the design axes. To form a pit in the bottom of the glass, metal molds are used.
One type of mold is used for pits when columns are installed on the surface of the bottom of the foundation glass that has been poured up to the design level in advance. The design of this mold with a height of 7.5 cm is equipped with fixing screws for its installation relative to the alignment axes. Another type of form is used for foundations that are not poured to the design level. Unlike the first type, the form is equipped with screws for installation not only along the design axes, but also on the design mark. The process of pouring and forming pits consists of the following operations: installation by a link of two installers of the 3rd, 4th category, headed by a surveyor, forms of the first type on pre-filled surfaces of foundations or forms of the second type in cases where the foundations are taken without pouring to the design mark; lubrication of established molds with technical oil; supplying fine fraction concrete to the bottom of the glass and leveling with a plaster trowel; exposure of concrete for 2-3 hours of disassembly of forms.
After removing the molds, a pit with an outline of the supporting end of the column remains at the bottom of the foundation glass. Due to pinching in the pit, the lower part of the columns does not move from the design axes during vertical alignment, which often occurs and significantly delays installation carried out using conventional technology. The whole process of grouting the bottom of the foundation, from the installation of the form and ending with the disassembly. According to experience, it takes 20-30 minutes.

Rice. 1. Scheme of supporting precast concrete columns in glass-type foundations: 1 - prefabricated reinforced concrete column; 2 - pit in the gravy of the bottom of the glass; 3 - foundation
Checking the state of structures
Checking the state of structures is carried out in order to ensure their correct and quick installation, connection in the design position and the reliability of their work in the structure. By checking prefabricated reinforced concrete structures, the following is established: the presence of OTC marks and stamps on them; the presence of passports; correspondence of the geometric dimensions of the structures to the working drawings; the presence on the structure of a mark about its mass; the absence of cracks, potholes and surface shells in concrete that exceed the allowable dimensions; absence of deviations from the geometric shape (straightness, horizontality of the supporting surfaces); the presence and correct location of embedded parts, the absence of sagging on them; the presence of an anti-corrosion coating on embedded parts; the presence of design and mounting holes and their diameter; the cleanliness of the holes (the absence of concrete in them); compliance with the design of rebar outlets and the absence of cracks and unacceptable deformations in them; compliance with the design of the mounting loops and the absence of deformations and cracks in them; the presence of axial marks on those elements that do not have other landmarks that ensure the possibility of their correct mutual installation; the presence on one-sided reinforced elements of signs indicating the correct position of the element during unloading and installation.
In terms of geometric dimensions and shape, prefabricated reinforced concrete structures for buildings should not have deviations from the design dimensions more than those given in SNiP I-B.5-62.
Pre-assembly of structures
Elements of columns along the length, columns with crossbars, roof trusses with spans of 30-36 m, delivered in the form of two halves, wall panels, sinkholes, bunkers and other structures are enlarged into mounting blocks. Enlargement is performed on special stands or in conductors. The elements to be enlarged are delivered by a crane from the warehouse and placed on the stand supports in such a way that their longitudinal axes coincide. Then, the ends or rebar outlets are adjusted to achieve the alignment of the elements or individual rods. After installing additional clamps and welding the rods, formwork is installed and the joint is concreted. The grade of concrete used to concrete the joint, and its strength after hardening, are established by the project. Usually, the brand is taken the same as that of the connected elements, or one brand higher.
Structural slinging
Slinging of prefabricated structures is carried out using slings, grabs or traverses. Slinging grippers should provide convenient, quick and safe gripping, lifting and installation of structures in the design position and their unslinging. One of the important requirements for gripping devices is the possibility of unsetting from the ground or directly from the crane cabin. This requirement is best met by semi-automatic grippers.
Slings (Fig. 2, a, b) are made of steel ropes; There are two main types - universal and lightweight. Universal slings are made in the form of a closed loop, lightweight - from a piece of rope with hooks fixed at both ends, loops on thimbles or carabiners. Slings can be made with one, two, four or more branches, depending on the type and weight of the lifted element.

Rice. 2. Slings: a - universal; b - lightweight with a hook and loop; in - cable with two branches; g - the same, with four branches
Since with an increase in the angle a, the forces in the branches of the sling increase, which can cause a rupture or pulling out of the mounting loops, as well as increase the compressive forces in the lifted element, the angle a is taken no more than 50-60 °.
For installation work, slings made of steel ropes with a diameter of 12 to 30 mm with permissible loads per branch are most often used: universal slings from 2.15 (19.5 mm in diameter) to 5.25 tf (30 mm in diameter); lightweight slings from 0.65 (diameter 12 mm) to 5.25 tf (diameter 30 mm). In the manufacture of slings with more than three branches, their equality in length should be observed, otherwise the load in the branches will be uneven. Uniform distribution of the load on each of the branches of the sling is provided in a four-leg sling and in a balancing sling. The balancing sling consists of a roller fixed between two cheeks, through which a lightweight sling is passed. The presence of the roller ensures uniform distribution of the load on both ends of the sling, regardless of the position of the load.

Rice. 3. Scheme of efforts in the branches of the sling

Rice. 4. Slinging of columns with a universal sling: 1 - column; 2 - wooden lining; 3 - sling
During operation, the slings wear out from crushing, abrasion in knots, rubbing of wires on the corners of structures, twisting and impacts. The service life of slings, which is usually 2 to 3 months, can be increased if they are used sparingly: using wooden or steel spacers between the slings and the structure being lifted, etc.
Slinging of prefabricated reinforced concrete elements in many cases is carried out for loops (staples) embedded in concrete during the manufacture of products. The disadvantage of this method is the need for the cost of reinforcing steel for the installation of loops.
Clamps allow lifting many reinforced concrete elements (columns, beams, trusses, slabs) without hinges. For this purpose, traverse slings, sling-grabs, semi-automatic finger friction, pincer, cantilever, wedge and other grips are used.
Traverses, having the form of beams or triangular trusses with suspended slings, make it possible to suspend the element being lifted at several points. When lifting loads by traverses, compressive forces in the elements being lifted, arising from their own mass when using inclined slings, are eliminated or reduced. Slinging of prefabricated reinforced concrete foundations for columns is carried out for loops embedded in concrete with a two-legged or four-legged sling. Slinging of columns is carried out using universal (Fig. 4) and traverse slings (Fig. 5), sling-grabs or semi-automatic grips. Slinging of columns with universal slings and sling-grabs is carried out in girth. Traverse slings and grips are fastened with a round rod (finger) passed through the hole left in the column during its manufacture. Disadvantage of slinging with universal and traverse slings (conventional grips): when unslinging, the installer must climb onto the column being installed. To avoid this, sling grips or semi-automatic grips are used.

Rice. 5. Slinging columns with a traverse sling

Rice. 6. Sling-capture for the installation of columns: 1 - lingering cable loop; 2 - lifting cable pegley; 3 - for the press lamb; 4, 5 - earrings; 6 - lifting bracket; 7 - a glass with a spring pin-clamp; 8 - cable for bridging; 9 - gaskets
Sling-grab (Fig. 6) ensures a strictly vertical position of the column during installation, the convenience of slinging and slinging. For columns with a size of 40X40X600 cm and a mass of 3 tons, the gripping loops are made of a cable with a diameter of 16 mm, the lifting bracket and earrings are made of strip and sheet steel, the gaskets are made of pipes cut along the length of 2 ". Turned fingers with a diameter of 25-30 mm. The sling-capture is put on the column, stacked on gaskets, the lifting loop is thrown over the crane hook, the column is tightened and the lambs are fixed. Upon completion of the installation and fixing of the column, the locking pin opens and the gripper freely leaves the column.
A semi-automatic gripper (Fig. 7) for mounting columns is a U-shaped frame with a box rigidly welded to it, on which an electric motor with a gearbox is placed, which drives the screw. The nut, moving along the screw, moves the locking pin along the box, which at the same time enters or exits the space between the side edges of the frame. The frame is attached by cable rods to the beam traverse. The electric motor of the gripping device is driven from the crane operator's cab, where the cable is laid, or from duplicate control buttons installed on the gripping device. A plug-in connector is built into the cable to enable quick disconnection of the gripper from the crane. The gripping device has a set of locking fingers of various diameters, which can be easily changed on the mounting site depending on the change in the mass of the column being lifted. The process of slinging and slinging of columns using gripping devices with remote control is carried out as follows.
The frame of the gripping device is aimed at the column prepared for installation so that the locking pin is against the slinging hole in the column. Then the button is pressed, which turns on the electric motor, the locking pin is set in motion, enters the hole of the column, reaches the opposite side face and stops with
limit switch. After lifting, installing and securing the column, the load is removed from the gripper and the crane operator, by pressing the button in the cab, removes the locking pin from the hole in the column, thus releasing the gripper without the help of the installer.
To lift columns weighing up to 10 g, a friction grip is used (Fig. 8), which holds the mounted element by friction from the own mass of the column. The slinging of the gripper is carried out by lowering the crane hook after the column is fixed to the foundation; at the same time, the capture opens up a little and falls down the column.
Slinging of beams is carried out with universal slings in a girth (Fig. 9), two-branch slings or traverses (Fig. 10) for loops, or through holes left in concrete. For slinging heavy beams and crossbars, the balancing traverse is suspended by means of two clamps and four branches of the sling to the ring put on the crane hook. Support clamps with carabiners are fixed at the ends of the traverse with adjustable bolts. Slinging of roof trusses is carried out using lattice or beam traverses with universal slings, slings with semi-automatic mechanical grippers (Fig. 11) or electric grippers. More perfect is the slinging of trusses with the help of semi-automatic grippers. Slinging is performed in a girth or through holes in the upper chord of the truss.
The semi-automatic gripping device for lifting roof trusses (fig. 12) consists of a rigid traverse, to which grippers with a cable are suspended, similar to those described above, but with non-replaceable locking fingers. When slinging the truss, the fingers of the gripping devices pointed at it pass under its upper chord. After installing and fixing the truss, the fingers are brought back into the gripper boxes, freeing them and the supporting traverse for the following operations.
The slinging of reinforced concrete wall panels, which are in a vertical position before lifting, is usually performed with two-branch slings or traverses, hooking them to the loops embedded in the upper end of the panel. Slinging of floor slabs and coatings is carried out with four-branch slings or traverses for loops, or through mounting holes in concrete, or using cantilever grips.

Rice. 7. Semi-automatic grip for mounting columns: 1 - frame; 2 - cable traction; 3 - beam traverse; 4 - plug connector; 5 - cable; 6 - electric motor; 7 - box; 8 - nut; 9 - duplicate control button; 10 - screw; 11 - locking pin

Rice. 8. Friction grip: 1 - traverse; 2 - nods; 3 - fork ties; 4 - thrust bars; 5 - latches

Rice. 9. Slinging of crane beams with universal slings: 1 - beam; 2 - steel linings; 3 - slings

Rice. 10. Slinging of reinforced concrete beams, purlins and crossbars: a - light beams; b - heavy beams, purlins and crossbars; 1 - clamp; 2 - adjustable bolts; 3 - support clamps; 4-slings; 5 - balancing beam; 6 - carbine
Slinging of plates is carried out for four (Fig. 13, a) or more points. For slinging large-sized reinforced concrete slabs, three-traverse and three-block grippers with an increased number of suspension points are used, which reduces mounting stresses in the lifted elements (Fig. 13, b). The three-beam device can also be used to lift wall panels, flights of stairs, beams, columns and other prefabricated elements by grabbing them with three, two or one traverse. However, this device is metal-intensive, cumbersome and requires a lot of worker effort when pulling the hangers with a traverse during the engagement of the structure with the mounting loops. The three-block fixture does not have the above disadvantages (Fig. 13, c), but it requires a higher lifting height of the crane hook (by about 2 m), which can make it difficult to select an assembly crane for lifting floor slabs of the upper floors of buildings. Large-sized slabs are also lifted using universal (Fig. 14) or spatial (Fig. 15) traverses, or universal balancing slings (Fig. 16). The universal traverse (Fig. 14) consists of bearing beams made of two channels, each of which is equipped with guide rollers. A rope is fixed on the end rings of each beam, which carries three blocks with hooks. The bearing beams are interconnected by two pipes with holes for installing a bolt, which fixes one or another distance between the bearing beams, depending on the width of the panel being lifted.
Universal balancing slings, also called balancing traverses (Fig. 16), consist of two five-ton blocks interconnected by a common ring, which is suspended on a crane hook.

Rice. 11. Schemes for slinging reinforced concrete trusses: 7 - truss; 2 - traverse; 3 - semi-automatic mechanical grip; 4 - finger; 5 - upper truss belt

Rice. 12. Semi-automatic gripping device for mounting reinforced concrete trusses: 1 - grippers; 2 - rigid traverse; 3 - cable
Rice. 13. Slinging of slabs and floor panels: a - with a four-branch sling; b - three-traverse fixture e - three-block fixture
Ropes 19.5 mm thick are thrown through each of the blocks; carbines are suspended from the ends of the ropes, and two-ton blocks are suspended from the ends of the ropes with 13 mm thick ropes thrown over them, ending also with carbines. The blocks are loosely put on the axles, which ensures uniform tension of the ropes hanging from them and even distribution of loads on all six carbines of the gripping device. With the help of such a device, floor panels can be tilted to a horizontal position if they were transported in a vertical position. Canting is done by weight. This device is also used to lift wall panels.
Plates with mounting holes are slinged using wedge or other grips. The wedge grip (Fig. 17) has the form of a bracket with branches connected to each other by steel rods in three places; used for slinging floor panels. On the lower rod, as on an axis, an unequal piece of steel of square section is mounted, which can rotate. In the folded position, the axis of the segment (Fig. 17, a) coincides with the axis of the bracket, and in the expanded position, it occupies a position perpendicular to the axis of the bracket (Fig. 17, b). When used to lift the panel, the folded grip is inserted into its mounting hole, and the segment, due to the different weight of the arms, will tend to rotate 180 °; to prevent this, the grip is lifted until the segment touches the panel and secured with a wedge.
Slinging of reinforced concrete floor slabs using cantilever grips suspended from a traverse (Fig. 18) does not require mounting loops in concrete. For better use of the lifting capacity of erection cranes, it is advisable to use spatial traverses, with the help of which a package of several plates is simultaneously lifted. A traverse of this type (Fig. 19) consists of a steel triangular shape, at the ends of which two transverse traverse beams are attached with straps suspended from them to capture each slab. Design
traverse allows you to sequentially hook three plates on the mounting loops. With this method of lifting, the use of the erection crane is greatly improved. Panels of prefabricated reinforced concrete shells are lifted using traverses (Fig. 20). For the installation of structures outside the range of cranes, special cantilever traverses are used (Fig. 21).
Lifting, aiming and installation on supports, alignment and temporary fastening of structures
In the process of assembly work, it is necessary to pay special attention to compliance with the required sequence of installation of structures, temporary and permanent connections and their reliable fastening. The installation of each overlying tier of structures (crane beams, roof beams, trusses, columns, crossbars, floor slabs) can be started only after the final fixing of the elements of the underlying tier and after the concrete reaches 70% of the design strength at the joints of the supporting structures. In construction practice, cases of structures collapse are known due to the fact that some elements of the connections were not delivered, not all elements of the connections were securely fixed, the sequence of installation of the elements was violated, other applicable norms and rules for the installation of structures were not observed.
Rice. 14. Universal traverse for mounting large-sized slabs: 1 - load-bearing beams; 2 guide rollers; 3- single-roll block-4 - rope; 5 - end ring; 6 - pipe

Rice. 15. Spatial traverse for mounting large-size slabs

Rice. 16. Universal balancing slings: 1 - carabiners; 2 - ropes 13 mm thick; L - blocks with a carrying capacity of 2 g; 4, 7 - ropes with a thickness of 19.5 mm \ 5 - blocks with a load capacity of 5 g; c - ring

Rice. 17. Wedge grip for plates: a - in a collapsed position; b - in the expanded position; 1 - lower rod; 2 - steel segment; 3 - wedge; in - the thickness of the floor panel

Rice. 18. Cantilever grips for lifting flooring slabs: 1 - retainer; 2 - loop

Rice. 19. Spatial traverse for lifting slabs in batches

Rice. 22. Traverse for lifting heavy structures with two cranes of different capacity
Prefabricated structures for lifting onto an object under construction should be fed in the required sequence directly under the hook of the erection crane. Preliminary layout of structures at lifting points is allowed only in some cases, since it is always associated with the performance of unproductive rigging operations, clutters up the construction site and complicates the work of the erection crane.
Reinforced concrete columns, depending on their weight and length, supply conditions, characteristics of cranes, are lifted in the following ways: translational movement of the column by a crane, rotation of the column around the base, rotation of the column around the base and translational movement of the crane, rotation of the column and crane boom.
Heavy and high reinforced concrete columns are lifted by moving the lower end on the trolley (Fig. 23) or turning around the base (Fig. 24). In the latter case, a swivel shoe is used. Such methods of lifting columns make it possible to transfer part of the load to the trolley or shoe, which makes it possible to operate the crane at the beginning of the lift at a longer reach, at which the lifting capacity of the crane is less than the weight of the column. Reinforced concrete frames of industrial and other buildings and structures, made at the installation sites or enlarged from individual racks and crossbars, are lifted by turning from a horizontal position to a vertical one.

Rice. 23. Lifting a heavy and high reinforced concrete column: a - the position of the column during lifting; b - capturing the column; 1 - traverse; 2 steel roller (finger)

Rice. 24. Scheme of lifting a heavy reinforced concrete column at an increased reach of the boom: 1 - traverse sling; 2 - column-3 - log spacer; 4 - swivel steel shoe; 5 - pipe of the rotary shoe; 6 - scarf-7 - channel; 8 - corner

Rice. 25. Landmarks for the correct installation of a reinforced concrete column: a - on a glass foundation; b - on the column; in - elevation marks; 1 - risks on the foundation; 2 - risks on the column; 3 - axes of crane beams; E - thickness of the glass gravy layer
The rotation is carried out around the bases of the racks located above the glasses of the foundations. In order to avoid moving the bases of the racks, the frame, strapped to the brackets in the upper edge of the crossbar or in the girth, is lifted with a gradual change in the position of the crane hook in the plan. After bringing the column or frame to a vertical position, it is directed and lowered to the foundation or to the joint surface of the lower column. To control the correct installation, landmarks are applied to the foundation and column. Such guidelines are the risks applied with the help of a core on steel plates embedded in the upper faces of the foundation (Fig. 25, a) or the grooves left on these faces during the manufacture of foundations, and the risks on the columns (Fig. 25, b). The column is installed in such a way that the risks on it coincide with the risks on the foundation. While holding the column with a crane, its verticality is aligned and temporarily fixed. In the case of the use of special conductors, the final alignment is carried out after the temporary fastening of the column by the conductor.

Rice. 20. Traverses for mounting panels and shells: 1 - traverse; 2 - slings; 3 - pendants; 4 - crane hook; 5 - carbine

Rice. 21. Traverses for mounting structures outside the area of the cranes: 1 - counterweight; 2 - sling; 3 - beam; Q - mass of the lifted load: G - mass of the counterweight
To ensure the accuracy of the installation of columns and the entire frame of the building, it is necessary to prepare in advance the supporting surfaces of the foundations by pouring them with mortar to the design mark or by installing fixed pits in combination with the manufacture of the supporting ends of the column with an accuracy of +5 mm, or use special equipment that does not require the preparation of supporting surfaces.
One of such solutions that provide fixed installation of reinforced concrete columns in foundation sleeves can be the use of equipment consisting of a metal frame with four fixing fingers installed on the foundation, and mounting brackets fixed with tie bolts on the column. When using such equipment, the column is fixed on the frame with the help of fingers inserted into the holes of the mounting tables and corners.
The sequence of work during the installation of columns using equipment, tested experimentally so far, is as follows.
The frame is verified on the foundation. Its risks lead to the position of the center axes, the plane - to the horizontal level. The base is the surface in which the upper points of the fingers are inserted into the holes of the supporting tables. First, one fixing finger (taken as a beacon) is brought to the required level. Then the rest are brought to the same level. Align the frame with jacks using a triangle laid on the surface of three fingers, including the lighthouse, and the water level. The jacks are rotated with special socket wrenches included in the equipment kit. The frame is brought to a horizontal position by two jacks. In this case, the first - lighthouse - remains motionless, the fourth - free - should not touch the surface of the foundation. After bringing the surfaces of the fingers to a horizontal position, this last jack is screwed in until it rests on the foundation. The frame is fixed in an adjusted position with hooks. The nuts on the hooks are screwed with force. Mounting angles are put on the column and fixed with coupling bolts. The nuts on the bolts are screwed with force. The fixing fingers are removed from the holes of the support tables. The column is introduced by a crane into the frame. At the moment of alignment of the holes of the mounting brackets with the holes of the mounting tables, fixing fingers are inserted. The fingers should be inserted in pairs, along one side of the column, not allowing them to be placed diagonally. One of the mounting brackets should be pressed against the cheeks of the tables. Wedge washers are inserted into the gap between the other corner and the cheeks of the tables. The place of their installation is determined by a special sign on the tables.

Rice. 26. Frame alignment schemes: a - on the foundation; b - columns; 1 - conductor's risks; 2 - basic beacon jack; 3 - beacon shaft; 4 - unscrewed jack; 5 - jacks that set the shafts to the required level; 6 - shafts brought to the level of the beacon shaft; 7 - column
If, after installing the column, the solution poured into the glass and squeezed out by the column did not reach the upper edge of the foundation, a solution is added to the gaps between the column and the foundation. After the solution (concrete) acquires a strength of 25 kgf/cm2, the equipment is removed for reuse. Mounting equipment (frame, mounting angles, fixation means), made and installed with the accuracy specified by the project, provides the column with the design position without additional alignment. The correctness of the installation of the mounted columns is checked by control measurements: with respect to the center axes of the building - one measurement for every five columns; regarding the marks of the supporting surfaces - one measurement for every 50 m2 of the area of \u200b\u200bthe structures; vertically - one measurement for every 200 m2 of the area of \u200b\u200bthe structure. Deviations of mounted reinforced concrete structures from their design position should not exceed the tolerances given in SNiP III-B. 3-62*.
Temporary fastening of columns. The column installed in the foundation glass is aligned and temporarily fixed with wedges, adjustable wedges, wedge inserts, braces or struts, conductors. Reinforced concrete columns up to 12 m high can be temporarily fixed by driving concrete, reinforced concrete, steel or oak wedges into the gaps between the side faces of the column and the walls of the glass. It is most expedient to use concrete or reinforced concrete wedges, which are left in foundation glasses. However, it is impossible to straighten columns with such wedges; therefore, they are used after the column is installed in the design position, and when straightening, inventory metal wedges are used. Wooden wedges must be dry, otherwise, when they shrink, the column may deviate from the vertical. Wooden wedges should also not be left in the glasses for a long time to avoid swelling from weathering and possible damage to the structure. The length of the wedges is taken equal to at least 250 mm with a bevel of one side by 1/10; after driving, their upper part should protrude from the glass by about 120 mm. To fix the column, one wedge must be placed at each of its faces up to 400 mm wide, and two wedges at faces of greater width. At the bottom, between the faces of the column and the walls of the glass, there should be a gap of at least 2-3 cm to be able to fill it with a concrete mixture. More effective is the use of inventory adjustable wedges or wedge inserts.
Adjustable wedge consists of cheeks, spherically connected to each other at one end; the cheek is flat, the cheek has the shape of an equal block prism. At the other end, the cheeks are connected by means of an adjustable screw passing through the nut in the cheek and connected to the cheek with the help of a head. The latter enters the slot of the channel welded to the flat cheek. A hinged bracket with a lock is attached to the cheek, with the help of which the device is attached to the wall of the foundation glass by means of a clamping screw.
Prior to the installation of the column, risks are applied on the edge of the foundation, indicating the position of the faces of the column. Then, two adjustable wedges are installed on two adjacent sides of the glass, so that the cheek rests with an edge against the wall of the foundation glass, and the flat cheek passes along the plane of the future position of the column face. The wedges are installed using a duralumin corner ruler. After installing a pair of adjustable wedges, the column is inserted into the sleeve so that its edges are pressed against the outer edges of the flat cheeks fixed with wedges. Next, two more adjustable wedges are installed along the free faces of the column and the column is straightened and temporarily fixed. When the clamping screw is rotated, the jaw rotates around the support rib and presses the column against the previously installed adjustable wedges with its lower end, which ensures alignment of the column position in the plan. By rotating the adjustable screws, the column is straightened and aligned vertically. By the action of the screws of the wedges, the column is pinched with the help of flat cheeks at the level of the location of the adjustable screws.

Rice. 27. Adjustable wedge for straightening and temporary fixing of columns in the foundation glass: 7.2 - cheeks; 3 - channel; 4 - nut; 5 - adjustable screw; 6 - swivel-but-consignment bracket; 7 - clamping screw

Rice. 28. Scheme of the wedge insert: 1 - housing; 2 - faces of the column; 3 - screw; 4 - handle; 5 - glass wall; 6 - wedge; 7-gasket; 8 - boss; 9 - support for extracting the wedge insert; 10-nut; 11- ratchet
The height of the adjustable wedge is taken equal to a third of the depth of the foundation glass, so that it is possible to seal the joint of the column with the foundation with a concrete mixture in two steps; first to the bottom of the wedges, then after removing them from the glass when the concrete reaches 25% of the design strength. The wedge insert (Fig. 28) consists of an L-shaped steel body 250 mm high and 55 mm wide, a steel wedge, a screw and a boss. The wedge is hinged to the horizontal shoulder of the body. The hinge axis freely rotates and moves in the longitudinal grooves on the inner faces of the horizontal arm of the housing. The screw rotates on a sleeve with a screw thread welded to the body. A boss is movably attached to the lower end of the screw. When the screw is screwed in, the boss descends along the vertical part of the body and squeezes out the wedge. For ease of transfer and installation, the insert is equipped with a handle. The wedge insert weighs 6.4 kg. Inventory wedge liners are installed during alignment in the gaps between the walls of the foundation glass and the column. In this case, the screw must be unscrewed so that the insert freely enters the gap. The wedge liner rests with its horizontal shoulder on the wall of the glass. After installing the fixture, the screw is rotated with a ratchet, while the boss is lowered, pressing the wedge against the wall of the glass, and the body against the edge of the column. At the same time, two wedge inserts are fixed, placing them on opposite faces of the column.
According to TsNIIOMTP, when using liners, the duration of installation of columns and crane operation is reduced by about 15%, steel consumption is reduced, and installation accuracy is increased compared to driven steel wedges.
For stability, heavy columns of great length must, in addition to wedges, be strengthened with braces or rigid struts. The upper elements of prefabricated reinforced concrete columns are temporarily attached to the lower elements by assembly welding. To ensure the stability of the upper element of the column, reinforcing outlets or linings located at the corners of the column are welded, and then the element is unstrapped. In the same way, temporary fastening of columns on foundations at the joints with a pipe or reinforced concrete tooth is carried out. For the installation and alignment of reinforced concrete columns, single and group conductors have been developed and used. Single conductors can be divided into two types: freely supported on the foundation and fixed to the foundation.
Conductors of the first type do not perceive loads from the mass of the column. They are designed to expand the base of the column to a size that ensures its stability from tipping over while resting freely on the foundation. When using such conductors, it is impossible to align the position of the column in the plan, and for its straightening it is necessary to use horizontal jacks fixed on the top of the foundation glass. Such conductors can only be used to install light columns (weighing up to 5 g). Conductors of the second type are fixed in the foundations with screws, perceive the mass of the columns and are equipped with devices for alignment. The conductor-fixator of this type of Uralstalconstruction trust is fixed on the foundation with four screws-stops and perceives the mass of the column through the support pins of two vertical screws, for which a steel roller is laid in the column during its manufacture in a precisely calibrated position. The trunnions and ends of the roller are located in the cuts between the limiters. Having installed the column on the bottom of the foundation glass, raise it by 10-15 mm so that it easily rotates in the trunnions. Then its position is verified vertically with racks in the transverse direction and screws in the longitudinal direction. With the help of such a conductor, reinforced concrete columns weighing 15-20 g were installed. For temporary fastening and alignment of high columns, group conductors are used, attached to the foundations with screws. These conductors ensure the stability of two columns simultaneously along and across the row. Common disadvantages of conductors are the complexity of their design, large mass and significant time spent on installation and alignment of columns (up to 1 hour). Improvement of conductors is possible by using aluminum alloys for their manufacture, improving the quality of nodal connections and alignment devices, and simplifying designs. Multi-tiered prefabricated reinforced concrete columns of high-rise frame buildings are joined together by welding steel embedded parts and embedding the joints. Their temporary fastening within each floor or tier is carried out by assembly welding (tacks) of overlays or reinforcement releases, braces with tension couplings or conductors. The upper ends of the braces are fixed to the clamps put on the columns approximately in the middle, the lower ends - to the loops of the floor panels, over which the column is mounted.
Temporary fastening of the first raised frame is carried out with braces or struts (Fig. 31), and the subsequent ones are connected to the previously installed ones by means of two inclined braces and two horizontal struts. Racks of frames are temporarily fixed with wedges, single conductors or field welding. Temporary fastening of frames is also performed using spatial conductors.

Rice. 29. Temporary fastening of the alignment of reinforced concrete columns with a conductor-clamp 1 - stop screw; 2 - cremaler; 3 - limiter; 4 - support pin; 5 - mounted column; 6- steel roller; 7 - column foundation 8 - screw

Rice. 30. Temporary fastening of reinforced concrete frames during their installation: 1 - brace; 2- inclined guy; 3 - horizontal strut
For temporary fastening and alignment of multi-tiered columns of multi-storey industrial buildings, single conductors are used. The conductor (Fig. 32) has corner posts, clamping and adjusting devices. With the lower clamping device, the conductor is attached to the head of the previously installed column. Adjusting devices are located in the middle and upper parts of the racks. The adjuster consists of four beams, adjusting screws and hinges. Three beams have one screw each, and the fourth one has two screws, which makes it possible to rotate the column around its vertical axis.
A more advanced design features a conductor with automatic lever grips, designed for temporary fastening and alignment of reinforced concrete columns of multi-storey buildings. The conductor is installed on the previously mounted column of the lower tier. Before installing the mounted column in the clamping carriages, the automatic lever grippers are moved apart by springs. When lowering, the column expands the levers, which, together with the clamping carriages, ensure centering and reliable grip of the column. The conductor is equipped with two horizontal screw jacks mounted on the upper chord. The horizontal screws are connected to the automatic grips by bearings. The upper belt is attached to the upper ends of four screw vertical jacks. At the moment of capturing the column, the hinged supports of the lower chord, which is a framing frame, are automatically put into operation. Supports-captures of the lower belt are pivotally attached to it, on which vertical jacks are installed. The hinged solution of the lower chord with the use of a lock and hooks contributes to the fact that the preliminary fixation of the conductor on the downstream column, its installation in height and in the horizontal plane are carried out simply and quickly, without special alignment.
The column is adjusted in height and vertical with the help of three vertical jacks, the rods of which can rise to the same height (search for the elevation mark) or to different heights (search for the verticality of the column). Then the column is aligned in the plane of the narrow edge by rotating the horizontal screw jacks.
After the final alignment and fixing of the mating parts of the column, the conductor is moved by a crane to the next prefabricated element.
In addition to single conductors, conductors are used for the installation of prefabricated reinforced concrete structures of multi-storey buildings: group conductors for two columns; group spatial for mounting four columns; spatial for mounting frames; volumetric (frame-hinge indicators) and others. A group spatial conductor is used in a set with two single ones for fastening and aligning columns of industrial buildings. In this case, the installation process of four columns is carried out in this sequence. Single conductors are fixed on the heads of two columns. They install columns and align with the help of these conductors and theodolite. Then, with the help of single conductors, the next two columns are temporarily fixed. To align them, a group spatial conductor is installed on the tops of the four columns. The latter is a rigid metal welded frame made of angle and gas pipes. The frame in plan corresponds to the dimensions of one cell of columns 6X6 m. Caps-columns welded from sheet steel are located at the corners. Each cap is provided with four adjustment clamping screws. In the upper walls of the columns there are holes - windows with built-in sighting axes. At the level of the lower belt of the frame, a wooden flooring was made, on which the installers work. Along the perimeter of the frame there is a rope fence. Four sling loops are welded to the upper chords of the diagonal trusses for moving the conductor with a tower crane. The mass of the group conductor is 900-1000 kg. For temporary fastening of the columns, a single conductor is used, which is a rigid spatial structure - a U-shaped frame with a hinged door, with fixing and adjusting screws. With fixing screws, the conductor is fixed on the head of the previously installed column. With the help of adjusting screws, it is placed in a vertical position, after which the column is taken.

Rice. 31. Conductor for installation and alignment of columns of multi-storey industrial buildings: a - section; b - installation diagram of the conductor; in - adjusting device; g - clamping device; 1 - column; 2- corner post; 3 - joint of columns; 4 - previously installed column; 5 - mounted column; 6 - conductor; 7 - interfloor floors; 8 - beam; 9- hinge; 10 - adjusting screw
Rice. 32. Conductor scheme: 1 - clamping carriage; 2 - automatic lever grip; 3 - springs; 4 - horizontal screw jack; 5-upper belt; 6 - bearing support; 7 - vertical screw jack; 8 - hinged support of the lower belt; 9- lock; 10- hooks; 11 - column

Rice. 33. Scheme of the conductor for mounting frames: a - top view; 6 - front view; c - side view
The mounted column is brought into the jig not from above, as usual, but through the side door, and thus, the structure weighing about 5 g during installation is not above the head of the installer, which ensures safe operation and faster installation of the column in the design position.

Rice. 34. The sequence of installation of the conductor and prefabricated elements: 1, 2 - crane parking; 3, 4 - the position of the conductor; 5-10, I-16 - the sequence of installation of elements
The group conductor ensures the accuracy of the installation of two columns at the same time in the design position, which determines the quality of the further installation of the frame - crossbars, floor slabs and coatings. As a result of the application of this installation method, the alignment time of the columns is reduced by 1/3 and the labor costs are reduced by almost 3 times.
With the help of spatial conductors, several frames are installed. One of these conductors is a spatial structure measuring 12X5.50X3.6 m and weighing about 2 tons, welded from angle steel (Fig. 33). The length of the conductor can be reduced to 9 or 6 m. Clamps are fixed to the conductor for temporary fastening of four frames from one position. During installation, the frames are held in a vertical plane by one clamp fixed to the crossbar. After aligning and fixing the frames, the conductor is transferred by crane to a new workplace (Fig. 34). Frame-hinged indicators (RSHI), proposed by S. Ya. Deich, are a complex device consisting of spatial lattice scaffolding, on which a hinged (floating) frame with corner stops is arranged for fixing four columns at once in the upper position, retractable and rotary cradles for assemblers and welders.

Rice. 35. Sections of a frame-hinged indicator: a - transverse; b-longitudinal; 1 - wooden lining; 2-space ring scaffolding; 3, 7 - retractable swivel cradles; 4 - hinged indicator; 5 - fence; 5-ball bearings; S - detachable flange joint; 9 - stairs
RSHI can be made for one (4 columns), two (8 columns) or three (12 columns) cells, for one or two floors in height. RSHI is installed through the cell of the building and connected with calibration rods. The mass of RSI per cell is 4-5 tons, the cost is 2-3 thousand rubles.
RSHI is installed with a crane and verified with a theodolite. After alignment (approximately 1 hour per two cells), columns are installed, each of which is fixed with corner stops.

Rice. 36. Scheme of a frame-hinged indicator (plan): 1 - longitudinal thrust; 2-clamp cable clamp; 3- clamp tensioner; 4 - rotary hose; 5 - transverse thrust; 6, 15 - brake attachment points of the frame; 7, 14 - longitudinal beams; 8, 10, 13 - movement mechanisms; 9 - folding collar; 11 - brake attachment points of the frame; 12, 16 - cross beams
Temporary fastening of beams. Reinforced concrete beams with a ratio of their height to width up to 4: 1 are laid on horizontal supports without temporary fastening; with a greater ratio of height to width, the mounted beams are fastened with spacers and ties with other firmly installed structures. For temporary fastening of roof beams mounted on columns, a special device is proposed, shown in Fig. 37. Tie rods with towbars tighten the grip, fixed at the top of the end of the beam, with a bolt passed through a hole at the top of the column, and steel brackets fix the position of the bolt.

Rice. 37. Device for installing roof beams on columns: 1 - bolt; 2 - steel brackets; 3 - traction with towbars; 4 - capture
In the structures of the columns, permanent anchors are arranged on the supports, which greatly simplifies the fastening of the roof beams to them. Temporary anchoring of trusses. When installing reinforced concrete trusses, their axes are combined with the risks on the columns and fixed on anchor bolts. The first farm is fastened with braces, tying the nodes of the upper belt adjacent to the ridge to the fixed parts of the structure or to special anchors; subsequent trusses are fastened along the ridge with an inventory screw strut with previously installed struts at the junction points of the braces to the upper chord. Temporary truss fastenings are removed after a rigid system is created from a group of trusses and pavement elements laid on them. Disassembly of temporary fixtures. Temporary fastenings of prefabricated reinforced concrete structures (wedges, struts, braces, spacers, conductors, etc.) may be removed after the concrete has acquired 70% of the design strength at the joints.
Permanent fastening of structures
Permanent (project) fastening of structures is carried out by welding reinforcement at the joints and their subsequent embedding. Prior to sealing the joints, anti-corrosion protection of welded joints is performed. Welding of reinforcement at the joints of reinforced concrete structures, depending on the spatial position of the rods or seams, the diameter of the rods to be welded and the type of joints, can be of several types: semi-automatic submerged arc bath (horizontal and vertical butt joints), manual bath (horizontal butt joints), semi-automatic arc and manual arc (butt, lap and cross vertical and horizontal joints). It is possible to weld joints from low-carbon steels (class A-I, grade St.Z) at an air temperature not lower than -30 ° C, and from medium-carbon (class A-II, grade St.5 and 18G2S) and low-alloy steels not lower than - 20 °C. At lower temperatures, measures are taken to maintain the air temperature at the welder's workplace not below the specified limits.
In order to reduce the effect of welding stresses on the strength of reinforced concrete structures, reinforcing bars are welded in a certain sequence (Fig. 39). Welding quality control includes: preliminary control, in the process of welding, quality control of welded joints. Preliminarily check the compliance of the base and welding materials with the requirements of the technical specifications, the quality of the preparation of the joined elements for welding, and the adjustment of the equipment to the specified mode. During the welding process, the maintenance of the required welding mode and technology is monitored. Quality control of welded joints includes external inspection, testing of specimens for strength, transillumination with gamma rays, etc. Permissible deviations in the dimensions of welded joints are given in SNiP III-B. 3-62*.
Anticorrosive protection of welded joints of prefabricated reinforced concrete structures is carried out by applying metallization, polymer or combined coatings to steel embedded parts, reinforcement joints at joints and fastening parts of enclosing structures: metallization-polymer or metallization-paint and varnish. Zinc is mainly used for metallization coatings. Metallization-polymer coatings consist of zinc or zinc-co-aluminum alloy and polymers (polyethylene, polypropylene, etc.). Zinc, primers (phenolic, polyvinyl butyryl, epoxy), paints (ethinol), varnishes (bi-foam-resin, perchlorovinyl, epoxy, organosilicon, pentophthalic) are used in metallization and paint coatings. The anti-corrosion coating is applied twice: at the factory, before the installation of embedded parts in the structure, and after the installation of the structures on the welds and on individual places of the coatings damaged during welding of the parts.
At the construction site, various coatings are applied in several ways: zinc - by flame spraying or electroplating; zinc-polymer and polymer - flame spraying; paintwork - by applying a zinc sublayer, over which paintwork materials are applied with paint spray guns or manually.

Rice. 38. The sequence of welding joints: a - columns with a foundation by two welders; b - the same, by one welder; in - a crossbar with a column; d - longitudinal ties
Zinc coatings are applied by flame spraying in one layer, electroplating in 2-3 layers (with a thickness of 0.1-0.15 mm) and 3-4 layers (with a coating thickness of 0.15-0.2 mm). Zinc-polymer coating in two layers - first a zinc sublayer, then a polymer layer. The polymer can be applied immediately after the application of zinc. The polymer coating is also formed in two layers. In combined zinc-lacquer coatings, a zinc sublayer is first applied, and then paints and varnishes are applied in 2-3 layers. Each layer of paintwork must be dried at a positive temperature for several hours or even days (depending on the type of material), which is a disadvantage in terms of installation work. Therefore, instead of paints in combined coatings, it is better to use polymers.
Anti-corrosion coatings are applied immediately after welding of the elements and surface preparation, avoiding interruptions lasting more than 4 hours.
The surface must be free of grease, moisture and rust. After applying the coating, check the strength of its adhesion to the base, the thickness of the coating, the presence or absence of swelling and cracks. Sealing joints. Sealing of joints and seams with a mortar or concrete mixture is carried out only after verifying the correct installation of structural elements, acceptance of welded joints and anti-corrosion protection of metal embedded parts. When embedding, it must be taken into account that the concrete (mortar) at the joints of reinforced concrete structures perceives or does not perceive the design loads. So, in the joints of columns with foundations that do not have embedded parts, as well as in joints in which the connection of prefabricated elements is performed by welding the outlets of reinforcing bars, concrete monolithically connects the elements and takes up the load.
In joints with embedded steel parts, concrete (mortar) embedding is a filling between prefabricated elements, protects the embedded parts from corrosion, but does not perceive the loads acting on the structure.
The strength and stability of prefabricated structures with joints, in which the concrete perceives the design loads, depend on the strength of the concrete in the embedment and on the adhesion of the concrete of the embedment to the strength of the prefabricated structure; The roughness of the joint surface significantly increases the adhesion of concrete in the joint. When sealing reinforced concrete columns in foundation glasses, as well as other monolithic joints that perceive design loads, hard concrete mixes of a higher grade than concrete of the main structure (by 20% or more) are used to accelerate hardening and ensure joint strength. It is advisable to use a concrete mixture on an expanding cement, which is characterized by fast setting and hardening, does not shrink, which is very important for the density of the embedment, or stressed cement. Portland cement of grade not lower than 400 is used. Sand is used quartz medium or coarse-grained. Crushed stone for the concrete mixture is chosen fine granite in order to ensure better filling of the joints, fineness up to 20 mm. To increase the plasticity of the concrete mixture at a low water-cement ratio (0.4-0.45), sulphite-alcohol stillage is introduced into the composition, and aluminum powder is added to increase the concrete density.
The most commonly used compositions of dry mortar or concrete mixtures (by weight): 1:1.5; 1:3; 1:3.5; 1:1.5:1.5; 1:1.5:2. In order to activate the hardening of the solution (concrete), additives are introduced into the compositions: 3% semi-aqueous gypsum, 2% sodium chloride, up to 10% sodium nitrite, 10-15% potash by weight of cement, or concrete mixtures preheated by electric current are used. Potash should be added at temperatures up to + 15 °, since at higher temperatures its use is ineffective. For monolithic joints of prefabricated reinforced concrete structures, high-strength polymer solutions and plast concretes are also used, hardening at a temperature not lower than +16°C. Therefore, in the case of their use at lower temperatures, the solution (concrete) in the joint area is heated with electric heaters. The joints of the columns are concreted in steel formwork. It consists of four steel shields 1.5 mm thick, interconnected with bolts. At the top of each shield are pockets for filling and compacting the concrete mixture. The formwork is held on the joined columns with the help of wooden stops resting on the ceiling. The labor intensity of assembling such a formwork is 0.16 man-hours, of concreting one joint - 0.75 man-hours. The formwork is removed 4 hours after concreting, and in the case of using fast-hardening concrete, it is removed earlier. A similar formwork is used for concreting the joints of crossbars with columns. Joints are filled with mortar (concrete) in a mechanized way using mortar pumps, pneumatic blowers, cement guns, syringe machines and other equipment. Pneumatic blowers and injection machines are suitable for sealing joints with both concrete mixture and mortar; mortar pumps and cement guns - only with mortar. To create a wet mode of concrete hardening, monolithic joints are covered with burlap, sawdust and systematically moistened for 3 days.
Sealing joints in winter conditions. In winter conditions, when embedding joints with concrete, which perceives design forces, it is necessary: to warm the joined surfaces to a positive temperature (+ 5-8 ° С); lay the concrete mixture heated to 30-40 ° C; withstand or heat the laid mixture at a temperature of up to 45 ° C until the concrete acquires at least 70% of the design strength.
The joint surfaces of the column with the foundation can be heated in various ways: low-pressure steam; water (the joint cavity is filled with water and then heated with steam supplied through a hose); rod electrodes at a low voltage current; electrical heating appliances. When heating with water, it is necessary to ensure that after heating the water is completely removed from the joint cavity.

Rice. 39. Graph for determining the strength of concrete, depending on the temperature and warm-up time. Portland cement concrete
The concrete mix placed in the joint is prepared with heating of the components or heated in bunkers by electric current up to 60-80°. Along with heating and electrical heating, at an outdoor temperature of up to -15 ° C, antifreeze additives can be introduced into the concrete mix for sealing joints. Joints, the concrete of which does not perceive design forces, at an outdoor temperature of up to -15 ° C can be monolithic with a concrete mixture (mortar) only with anti-frost additives, since such a mixture hardens even at negative temperatures; at the same time, after laying in the joint, the mixture does not need to be heated; in the event of a sharp drop in the outside temperature, it is sufficient to use insulated formwork. Solutions of CaCl2 calcium chloride salts are recommended as antifreeze additives; calcium chloride CaCl with table salt NaCl; calcium chloride CaC12 with common salt NaCl and ammonium chloride NH4C1; sodium nitrite NaN02, etc.

Rice. Fig. 40. Monolithic junction of the column with the foundation in winter conditions: a - scheme of electrical heating of the concrete junction with electrodes; b - heating of the joint surface by electric cylinders; c - heating of the monolithic joint with electric furnaces; g the same. with the help of a warmer; 1 - foundation; 2 - column; 3 - electrode; 4 - transformer; 5 - knife switch; 6 - spotlights; 7 - electrodes
It is forbidden to use antifreeze chemical additives of chloride salts when sealing joints with metal embedded parts and fittings.
To increase the plasticity and water resistance of concrete at the joint, sulphite-alcohol bard is introduced into the concrete mixture with antifreeze additives in an amount of up to 0.15% by weight of cement.
If it is necessary to obtain high embedment strength in a short time (one day or less), concretes prepared with antifreeze additives can be subjected to artificial heating.
When sealing joints with a concrete mixture without antifreeze additives, it is necessary to preheat the mating elements of the joint and warm up the concrete until it acquires the required strength; design joints loaded with the design load in winter must be heated until 100% design strength of concrete in the joint is obtained and until 70% strength is obtained in other cases. The strength of concrete prepared on Portland cement, depending on the temperature and warm-up time, can be approximately determined from the schedule.

Rice. 41. Warming up and warming up of joints of multi-tiered columns and joints of floor slabs with girders during embedding in winter conditions: a - using thermoactive formwork; b - by means of a heating element; 1, 2 - steel sheets; 3- heat-insulating layer; 4 - three layers of electrical insulating fabric with nichrome wire in the middle; 5 - a spiral in a layer of sawdust wetted with a solution of table salt; 6- layer of sand; 7- tubular electric heater; 8 - tarpaulin; 9 - clamp
Most often, heating is carried out by electric current, as well as by steam. For electrical heating, electrodes are used (Fig. 40, a), tubular electric heaters or electric cylinders with tips inserted into the joint cavity (Fig. 40, b), thermoactive formwork, heating cassettes, reflective electric furnaces (Fig. 40, c) or electric heating units (Fig. 40, c) 40, d), electrode panels. Heating and heating of the joints of multi-tiered columns, as well as beams, it is advisable to carry out with the help of thermoactive formwork (Fig. 41). In the cavity of the double formwork, consisting of inner and outer steel sheets, either three layers of electrical insulating sheet with nichrome wire on the middle layer, or a layer of mortar with embedded steel wire and a heat-insulating layer of mineral wool are placed. This formwork is made in accordance with the dimensions of the joined elements and is held on them with a clamp. The concrete mixture with a draft of 10-12 cm is loaded into the joint through a funnel built into the formwork. Tubular electric heaters (TEN) can be used to heat many joints, both directly (Fig. 41, b) and as heating elements of cassettes (thermal shields) (Fig. 42), reverberatory furnaces and other devices. A tubular electric heating element is a metal hollow tube into which a nichrome wire spiral is pressed. The filler is fused magnesium oxide or quartz sand. The filler performs the role of electrical insulation.

Rice. 42. Heating cassettes: a - diagram of a set of cassettes for heating the column joint; b - scheme of cassettes; c - tubular electric heater; 1 - tubular electric heater; 2 - reflector; 3 - body; 4 - insulating sleeve; 5 - filler; 6 - spiral; 7 - fill
On fig. 41, b shows the heating of the joint of the floor slab with a run (or beam) using a tubular electric heater, which is covered with a tarpaulin.
After warming up, lasting about 4-5 hours, remove the tarpaulin and heating element, concrete the joint, cover it with slag or sand and lay the heating element again.
For embedding vertical joints of columns, a universal heating formwork with automatic control of the heat treatment mode is used. It consists of a metal case, heating cassettes, a power supply and control unit. The formwork body serves for laying concrete in a joint and is made of two halves, fastened together with bolts. Each half is made of sheet steel and has guide plates for fixing the heating cassettes and the power supply and control unit. The halves are interchangeable, each has a loading window. Heating cassettes are flat metal heat-insulating boxes with built-in tubular electric heaters with a power of 0.5 kW for a voltage of 220 V. The operating temperature of the heater surface is 600-700 °C. There is an air gap between the heating element and the wall adjacent to the concrete. A reflective plate made of tinplate is installed under the heater. According to experience, the use of heating elements instead of spirals increases the reliability of the heating device, increasing its service life up to 5000 hours, and also allows infrared heating. Three types of heating cassettes in various combinations provide heat treatment of the joint of any section of the column. A set of heating cassettes is inserted along the guides of the metal formwork and covers the joint from four sides.
The installation of the heating formwork at the column joint is carried out manually from halves with heating cassettes installed on them or element by element. The mass of a separate element of the heating cassette is 5.5-9 kg; the mass of the entire formwork for a column with a section of 250X500 mm is 70 kg.
Cassettes are included in the network before concreting the joint. After a preliminary two-hour heating of the joint cavity, the cassettes are turned off for concrete placement. Subsequent heat treatment of the joint concrete - heating up to 50°C and isothermal heating at a given temperature by periodically turning on and off the current. Electricity consumption with automatic control and outdoor temperature down to -15 °C is 35 kWh per joint. With manual regulation, it is equal to 50 kWh per joint.
The design of the junction of the crossbar and floor slabs allows only one-sided peripheral heating. For this purpose, reverberatory furnaces are used. The furnace is an inventory box 1300 mm long, made of two rolled metal sheets, between which thermal insulation made of mineral wool 50 mm thick is laid. The inner sheet is simultaneously a parabolic reflector, along the focal axis of which there are two tubular electric heaters with a power of 0.8 kW each with a mains voltage of 220 V. Each box has a cable outlet ending in a three-phase plug connector, one of the pins of which is grounding. The weight of the box is 50 kg. To reduce heat and moisture loss, the box around the perimeter is covered with sawdust. Electricity consumption at an outdoor temperature of -15°, a heating temperature of + 50° and its automatic regulation is 25 kWh per joint.
To automatically maintain a given constant temperature for concrete processing, a power supply and control unit is used. It consists of a power cable, a thermostat and a control box. In the metal box of the control box are mounted: a magnetic starter, a switch, a signal lamp and a terminal block for connecting the outputs of the heating cassettes. The control box is inserted into the guides of the metal formwork of the joint. The thermostat has one pair of normally closed contacts that open when the temperature rises above the set temperature. The thermostat is connected to a network with a voltage of 220 V. Using it allows you to automate all types of heat treatment of concrete during installation.

Rice. 43. Schemes of a reverberatory furnace (a) and an electrode panel (b): 1 - housing; 2 - tubular heater; 3 - cable outlet with a plug connector; 4 - protective strip; 5-vapor barrier; 6 - terminals; 7 - cone - pins; 8 - steel tires
Electrode panels are also used to heat the joined elements. Three steel rails are mounted on the panel, serving as electrodes, with conical pins that improve the contact of the electrodes with concrete.
To Category: - Installation of building structures
According to the space-planning structure, one-story industrial buildings of a cell type with shed or flat coatings or a span-frame type with coatings in the form of trusses, shells, and folds are distinguished.
For the main industries, one-story industrial buildings with a reinforced concrete frame are designed on the basis of unified standard sections, spans, and column steps.
When choosing one or another method of installation of an industrial building, one should take into account its structural scheme, the necessary sequence of delivery for installation of process equipment in separate spans of the building, the location of future production lines.
For one-story industrial buildings of light type with a reinforced concrete frame, a separate method of mounting structures is more rational. With this method, after the installation of structures and the alignment of the columns, the joints between the columns and the glasses of the foundations are monolithic. By the beginning of the installation of crane beams and roof structures, the concrete in the support joint must gain at least 70% of the design strength. This condition determines the length of the mounting sections.
One-story industrial buildings of a heavy type are mounted mainly by an integrated method. But at the same time, it is necessary to take measures to accelerate the set of concrete at the joints of strength.
 According to the direction, longitudinal installation is distinguished, in which the building is mounted sequentially in separate spans, and transverse (sectional), when the crane moves across the spans. Apply and longitudinal-transverse installation of the building. In this case, the crane, moving along the span, mounts all the columns, and then, moving across the span, conducts sectional installation.
The choice of one or another direction, installation, and hence the sequence of handing over sections of the building for the installation of equipment largely depends on the location of the technological lines of the future enterprise.
One-story industrial buildings are mounted by specialized streams, each of which is given a set of mounting and transport machines and appropriate mounting equipment. For example, a one-span one-story building can be mounted in three streams: installation of columns, roof structures and external fence structures. One-story multi-span buildings can be mounted in several parallel flows.
When erecting one-story buildings of a span type and assembling from vehicles, finished structures are fed into the spans towards installation. Local pre-assembly of structures is carried out on mobile stands that are moved along the installation in the span.
The complex process of installation of metal structures consists of the following processes and operations:
- geodetic breakdown of the location of the columns on the foundations;
- preparation and installation of foundations for columns;
- installation, alignment and fixing of finished columns on foundations;
- preparation of support sites for trusses and beams;
- installation, alignment and fixing of finished trusses on supporting surfaces;
- marking of places for installation of coating slabs;
- installation of floor slabs;
- marking places for installing panels;
- installation, alignment and fixing of wall panels.
Prior to the installation of columns by the general contractor, the following works must be fully completed and accepted by the customer:
- arrangement of foundations for the installation of columns;
- backfilling of the sinuses of trenches and pits was carried out;
- the soil is planned within the zero cycle;
- temporary access roads for vehicles were arranged;
- sites for storage of structures and crane operation have been prepared.
Prior to the installation of the building frame, the following preparatory work must be completed:
- perform a detailed geodetic breakdown with the removal of the main axes and axes of the elements to be installed on the cast-off, as well as the fixing of vertical marks on temporary benchmarks;
- deliver prefabricated structures to the construction site from supplier plants, as well as transport them within the construction site from warehouses to their installation sites;
- prepare the structures and connecting parts necessary for the installation of the building, which have passed the input control;
- put the risks of the installation, longitudinal axes on the side faces of the structures and at the level of the bottom of the supporting surfaces. The risks are applied with a pencil or marker. Scratches or cuts on the surface of structures are unacceptable;
- deliver the necessary mounting fixtures, fixtures and tools to the installation area of structures.
The breakdown of the main axes of the building begins with the removal into nature of the two extreme points that determine the position of the longest longitudinal axis of the building. The layout drawing indicates all the distances between the axes, the binding of structures and, first of all, foundations to the axes. To do this, after breaking down the contour of the building, they proceed to the device of the cast-off, which is designed to fix the main axes of the foundation, walls and other elements of the building. The axes of the building are transferred to the cast-off with the help of a theodolite.
In case of damage to the cast-off, the main axes are fixed on the ground. To do this, temporary, remote control signs with axial risks are installed in their alignment at a distance of 5-10 m from the future building. For vertical breakdown, a working benchmark is arranged near the building under construction. The mark of such a benchmark is determined from the nearest benchmarks of the state leveling network. To simplify the calculation of elevations, the height readings are taken from the conditional zero mark - the floor level of the first floor. Knowing the absolute mark of the working benchmark, determine the absolute mark of the floor level of the first floor.
The efficiency of erection of structures largely depends on the erection cranes used. The choice of a crane for installation depends on the geometric dimensions, weight and location of the mounted elements, the characteristics of the installation site, the volume and duration of installation work, the technical and operational characteristics of the crane.
The feasibility of erecting building structures with one or another crane is established according to the installation flow diagram, taking into account the lifting of the maximum possible number of mounted structures from one parking lot with a minimum number of crane permutations.
When choosing a crane, first determine the path of movement along the construction site and the places of its parking.
Mounted structures are characterized by the mounting mass, mounting height and the required reach. Self-propelled jib cranes are used to mount the heaviest building frame elements, which include columns. The choice of a mounting crane is made by finding three main characteristics: the required hook lifting height (mounting height), lifting capacity (mounting weight) and boom reach.
 |
 |
|
Scheme of parameters for choosing an assembly, jib self-propelled crane: b - the minimum gap between the boom and the mounted element or a previously mounted structure, equal to 0.5-1.0 m; b - half the length (or width) of the mounted element; b - half the thickness of the arrow; b is the distance from the axis of rotation of the crane to the axis of rotation of the boom, m; h is the distance from the level of the crane parking to the axis of rotation of the boom, m; L - boom hook reach at the required lifting height, m; L is the required boom length, m; H - lifting height of the boom hook, m; h is the height of the chain hoist in the tightened position, m; h is the distance from the crane parking level to the support of the prefabricated element on the upper mounting horizon, m; h is the headroom, m; h is the height of the mounted element in the lifting position, m; h is the height of the load handling device (sling), m |
|
The lifting capacity of the crane at a given height and the reach of the cargo hook is found by the formula:
where is the mass of the mounted element, t, is the mass of the rigging equipment (traverse slings, grips, etc.).
The minimum required distance from the crane parking level to the top of the boom head (hook lifting height) is found from the expression:
The required hook reach at the required lifting height is determined by the formula:
![]() ;
;
The required length of the arrow is determined from the expression:
Before the development of the pit, a detailed breakdown of the axes of the building is carried out. Before installing the foundation, all other longitudinal and transverse axes are transferred to the bottom of the pit using a theodolite. The correctness of the offset of the axes is controlled by measuring the length of the diagonals. Prior to the installation of the structures of the above-ground part, the base axes are taken out on the mounting horizon of the basement and detailed layout work is performed.
Loading of structures onto vehicles at manufacturing plants should be carried out by the plant, unloading at the facility - by the assembly site. During loading and unloading operations, transportation and storage, metal structures must be protected from mechanical damage, for which they should be laid in a stable position on wooden linings and secured (during transportation) using inventory fasteners, such as clamps, clamps, turnstiles, cassettes, etc. .P. Deformed structures should be straightened by cold or hot straightening. Do not drop structures from vehicles or drag them over any surface. During loading, slings made of soft material should be used.
Metal structures are stored in the central warehouse of the organization that performs the construction and installation work of this building. Structures are stored in open, planned areas with a coating of crushed stone or sand (H = 5 ... 10 cm) in stacks with gaskets in the same position as they were during transportation.
Gaskets between structures are stacked one above the other strictly vertically. The cross section of gaskets and linings is usually square, with sides of at least 25 cm. The dimensions are selected so that the overlying structures do not rest on the protruding parts of the underlying structures. The height of stacks of foundation blocks should not exceed 2.6 m; stacks of beams and columns - 2.0 m; floor slabs - 2.5 m. Wall panels are installed in an inclined position in pyramids or vertically - in special cassettes.
 |
 |
|
Scheme of the location of the on-site warehouse of parts and structures: 1 - road; 2 - stack of columns; 3 - dangerous zone of the crane; 4 - crane; 5 - mounted columns |
|
The storage areas are separated by through passages with a width of at least 1.0 m every two stacks in the longitudinal direction and every 25.0 m in the transverse direction. To pass to the ends of the products, gaps equal to 0.7 m are arranged between the stacks. A gap of at least 0.2 m wide is left between individual stacks to avoid damage to the elements during loading and unloading operations. The mounting loops of the structures should face up, and the mounting markings should face the passage.
When installing one-story industrial buildings with a wide span, stacks or individual prefabricated structures are placed inside the span of the building, laying out the structures along the perimeter of this building parallel to the axis of the crane penetration, leaving free passage for the crane and vehicles delivering the structures.
Before installation in the design position, prefabricated structures must be prepared accordingly. First of all, it is necessary to check the condition of the structures: the presence of marks and axial marks on them, the correspondence of the geometric dimensions to the working drawings, the absence of cracks, the location of the mounting loops and their condition. Bent hinges must be straightened. Particular attention is paid to the joints. They are cleaned of dirt, washed with water, check the correct location of the embedded parts. Check the marks of the supporting parts and, if necessary, align them to the design level.
To avoid deformation, the elements of the lower belt of trusses are reinforced by installing temporary fasteners made of logs or plates, which are fixed on both sides with bolts or clamps.
 |
 |
|
Preparing a metal truss for installation: a - truss reinforcement scheme; b - details of strengthening the lower chord of the farm: 1 - plate; 2 - log; 3 - the lower belt of the farm; 4 - lining; 5 - bolt; 6 - clamp |
Storage of reinforced concrete trusses |
Prefabricated foundations, as well as channels, wells and other underground structures, are mounted in a separate advanced flow during the construction of the underground part of buildings.
After checking the marks of the bottom of the foundation pits with a level, the marking of the axes on the cast-off is checked, the wire is pulled along the axes and the points of their intersection are transferred to the bottom of the pit. Then put the risks on the foundations.
On the foundation, the middle of the side faces of the lower step is marked with risks, which makes it easier to align the foundations when they are installed on the base. For glass-type foundations, the middle of the upper edge of the glass is marked with risks, which helps with the final alignment of the foundation. Then the foundation is brought by a crane to the design axes and, after the necessary centering at a height of 10 cm, is lowered to the design position. In this case, the risks on the foundation must match the risks on the pegs.
 |
 |
|
The direction of movement of cranes during the installation of a one-story industrial building: a - longitudinal; b - transverse |
Scheme of installation with four sources of a one-story industrial building with a reinforced concrete frame: I-IV - thread numbers; arrows show the direction of installation and movement of the crane |
Preparation of foundations for the installation of the building frame consists in handing them over according to the above act, before drawing up which the sinuses of the pits must be filled up and the soil layout made according to the design marks. Preparation of monolithic foundations for the installation of reinforced concrete columns also does not require other work, except for checking the position of the supporting parts in height and relative to the alignment axes.
Precast concrete foundations under reinforced concrete columns of industrial buildings, as a rule, two types of glass type are made. They are made high when the top edges of the glass reach the bottom of the preparation under the floors, and with under-column when the foundation itself is deepened. In order to simplify the organization of construction and installation of structures, a sub-column is installed that protrudes approximately 60 cm above the floor.
|
|
|
|
Glass type foundations: a - high, b - with a column; 1 - column, 2 - patella, 3 - junction of the column with the sub-column |


For ease of installation, foundation blocks (Fig. 220, a) are laid out one by one near the pit in such a way that crane 3 from the installation position can take and deliver the block to the installation site without moving with the load. The foundation blocks of the glass type are slinged for loops with a two- or four-branch sling.
foundation blocks installed along the axes placed on the base, bringing the foundation block to the design position by weight at the crane. The position of the mounted foundation is checked by theodolites installed on the continuation of mutually intersecting axes. Incorrectly installed foundation blocks should be lifted with a crane and reinstalled after correcting the foundation.
|
|
|
|
|
|
|
Scheme of installation of prefabricated foundations: a, b - installation of plates and shoes, c - crane movement diagram; 1 - plate, 2 - shoe, 3 - mounting crane, 4 - slings |


If the foundation glass is mounted separately, then after installing it on the mortar bed, according to the risks made in advance, the position of the glass in height is checked with a level, and in terms of theodolites.
After the completion of the installation and alignment of the foundations, axial risks are applied and a geodetic survey scheme is drawn up, which is attached to the act of commissioning the foundations. On the scheme, the displacement of the axes of the foundations is fixed, which should not exceed ± 10 mm in relation to the center ones, as well as the marks of the top of the foundations and the bottom of the glasses. The latter can only be done with a minus tolerance (-20 mm), so that deviations from the project can be corrected by adding concrete.
If there are knee pads in the foundations, they are installed in the same way as the main columns are installed. Axial risks are applied to the heads of the kneecaps and a diagram of the position of the kneecaps relative to the center axes is drawn up.
The foundations for the steel frame structures of the building are, as a rule, monolithic.
|
|
|
|
|


Simultaneously with the concreting of the upper part, anchor bolts are laid in them, which are used to fix the columns on the foundations. For the accuracy of the installation of anchor bolts relative to the main axes and vertical marks, special portable conductors are used, attached to the formwork so that the anchors are not displaced during concreting.
Foundation surfaces perform differently, depending on the method of supporting the columns provided for in the project.
The most rational and at the same time the most difficult to implement is the method of supporting the columns directly on the foundation surface, which must be strictly horizontal and correspond to the design mark with a tolerance of ± 2 mm. At the same time, metal columns are installed on foundations without subsequent grouting with cement mortar; base plates of column shoes must be milled.
For greater confidence in the accuracy of the preparation of the supporting surface, the method of pre-installing the base plates separately from the columns is used. The foundation is first concreted 5 cm below the design mark and a base plate with a planed top surface is laid on it, having three mounting bolts similar to those used in geodetic tools. The plate is carefully adjusted in height and horizontal and poured with a solution. The subsequent installation of elements with a milled end on the plate does not present any difficulties.
 |
 |
 |
|
|
Scheme of installation of the glass-type foundation: 1 - caterpillar crane; 2 - position of foundation blocks before lifting; 3 - foundation block at the design level; 4 - four-branch sling |
Column installation accuracy can also be provided by embedding embedded support parts in the form of metal beams into the foundations, usually attached by electric welding to partially concreted anchor bolts. Install the beams on the level. In this case, during concreting, the foundation is not brought to the design mark by 5 cm in order to ensure the quality of the subsequent grouting of the supporting surface of the column with cement mortar.
After graduation foundation concreting axial risks are applied to them. It is recommended to put risks not on concrete, where they can be easily rubbed, but on special metal brackets concreted into the foundation, and make up an executive scheme, fixing the actual position of the foundations and anchor bolts. All detected defects that impede the production of installation are eliminated before the installation of structures.
The installation of columns must be preceded by the acceptance of foundations with a geodetic check of the position of their axes and elevations. Before installing the columns, their dimensions are checked, allowing errors of up to 1 mm, and risks are applied to facilitate the installation of the column in the foundation glass or on the heads of the kneecaps.
|
|
|
|
|
|
|
The executive scheme of the foundations of a reinforced concrete frame building: a - data of geodetic measurements (within - the dimensions between the axes of the columns according to the project); b - design data |


Heavy columns are usually mounted from vehicles or the columns are pre-layed out with the base facing the foundations. Light columns, as a rule, are pre-delivered to the installation area and laid out with their tops facing the foundation. Heavy columns are lifted and placed in a vertical position by turning or sliding. When the pre-assembly of heavy columns is carried out in the immediate vicinity of the object, the columns can be transported on two rail carts.
When lifting the column to bring it to a vertical position, the trolley at the base of the column is moved, which reduces the mounting stresses that occur when the column is tilted. When installing two-branch columns, it may be necessary to unfasten the lower sections of the branches with spacers. Particularly heavy and non-transportable reinforced concrete columns are concreted in inventory forms at positions that provide convenient movement of the erection crane and the installation of one column from each position.
For the installation of light columns of one-story buildings with jib cranes, a fork head, made in the form of a cantilever attachment to the head of the boom, which has blocks for reeving ropes, can be used. The headband is equipped with a device for semi-automatic slinging. It allows the use of cranes with a shorter boom length and, therefore, better use of their lifting capacity. In addition, the minimum hanger length reduces column sway and improves mounting accuracy.
If necessary, the bottom of the glass is leveled with a layer of cement mortar. The columns are installed in the foundation glasses after the strength of this solution reaches at least 70% of the design one. Alignment and temporary fixing of columns, depending on their size, weight and installation location, is carried out using individual conductors or inventory steel, wooden, reinforced concrete wedges (two at each side of the column).
The column installed in the foundation glass is centered until the marks coincide with the marks on the upper plane of the foundation.
To check the verticality of the column, two theodolites are placed at right angles to the digital and alphabetic axes of the buildings. In this case, the sighting axis of the theodolite is combined with the risks marked on the glass in the lower part of the column, and then, smoothly raising the theodolite tube, with the risk at the upper end of the column. The distance of the theodolite from the column being verified is taken such that at the maximum rise of the pipe, its angle of inclination does not exceed 30 ... 35 °.
The planes at the ends or consoles of the columns are leveled according to marked marks or along a rail suspended from the leveled plane.
The verified columns are fixed in the foundation glass with the help of conductors or wedges. Reinforced concrete wedges after alignment of the column are left in concrete.
Columns with a height of more than 12 m are additionally secured with inventory braces in the plane of their least rigidity. The upper ends of the braces are attached to a collar mounted on the column above its center of gravity.
The first two columns of the row are fastened crosswise with braces, the next - with crane beams, which are installed after the concrete reaches at least 70% of the design strength at the joints of the columns with the foundation.
When preparing columns for installation, the following risks are applied to them: the longitudinal axis of the column at the level of the bottom of the column and the top of the foundation. Then they equip with assembly ladders and scaffolds necessary for the installation of subsequent structures.
When preparing columns for installation, the following risks are applied to them: the longitudinal axis of the column at the level of the bottom of the column and the top of the foundation. Then they equip with assembly ladders and scaffolds necessary for the installation of subsequent structures.
 |
 |
|
Scheme of preliminary layout of structures during installation of the coating of a one-story industrial building: 1 - coating panels; 2 - truss trusses; 3 - crane at the installation of truss trusses; 4 - roof trusses; 5 - main assembly crane |
|
Metal columns, as a rule, rest on monolithic reinforced concrete foundations. A base (shoe) is installed at the bottom of the column, which serves to transfer the load from the column to the foundation. The columns are fixed to the foundation of the base with anchor bolts. The ends of the columns are usually milled.
On the foundations, the columns are supported on steel base plates previously installed, adjusted and poured with cement mortar with an upper planed surface (see Fig. 7). This installation method is called non-alignment. It is based on the high precision of manufacturing columns at the factory and their installation in construction conditions.
 |
 |
|
Preparation (a) and installation (b) of base plates on anchor bolts: 1 - plate; 2 - slats; 3 - anchor bolt; 4 - nut; 5 - foundation |
|
With this method, a monolithic foundation is arranged 50-60 mm below the mark of the sole of the base plate 3 of the shoe 4, and after the precise installation of the plate, it is poured with cement mortar. The base plate is installed with adjusting bolts on the support strips, which must be concreted into the foundation flush with its surface, like embedded parts. The position of the base plates in height is adjusted using the nuts 4 along the level, which are screwed onto the anchor bolts 3. In the horizontal position, the plates are adjusted using two levels or an optical flat meter.
After checking the correct installation of the base plates, they are fixed with nuts and welded to the strips by electric welding.
The main operations during the installation of columns: slinging, lifting, aiming at supports, alignment and fixing. The columns are slinged at the upper end, or at the level of support of the crane beams. In some cases, additional weight is attached to the column shoe to lower the center of gravity. The columns are gripped with slings or semi-automatic grippers. After checking the reliability of the slinging, the column is installed by a link of 4 workers. Zvenevoy gives a signal to raise the column. At a height of 30-40 cm above the upper edge of the foundation, the installers direct the column to the anchor bolts, and the driver smoothly lowers it. At the same time, two installers hold the column, and the other two ensure that the axial marks on the column shoe are aligned with the marks on the base plates, which ensures the design position of the column, and it can be fixed with anchor bolts. Additional displacement of the column for alignment along the axes and height is not required in this case.
Before installing the column, it is necessary to scroll the nuts along the threads of the anchor bolts. In addition, the threads of the bolts are lubricated and protected from damage by gas pipe caps.
The first two mounted columns are immediately fixed with permanent connections, and if such connections are not provided for by the project, then with temporary rigid connections. Slings are removed from the column only after its permanent fixing.
Geodetic control of the correct installation of columns vertically is carried out using two theodolites, in mutually perpendicular planes, with the help of which the upper axial risk is projected onto the level of the bottom of the column.
After checking the verticality of a number of columns, the upper planes of their consoles and ends are leveled, which are the supports for crossbars, beams and trusses. Upon completion of the installation of columns and their leveling, the marks of these planes are determined. Perform it as follows. On the ground, before mounting the column, using a tape measure, an integer number of meters is measured from the top of the column or from the console so that no more than 1.5 m remains to the heel of the column, and at this level a horizontal line is drawn with paint. After installing the columns, leveling is carried out along this horizon.
Crane beams are mounted after the concrete at the junction between the column and the walls of the foundation glass gains at least 70% of the design strength.
Crane beams are mounted in a separate stream or simultaneously with roof structures.
Prior to the start of installation, a geodetic check of the marks of the supporting platforms of the crane consoles of the columns is performed. Before lifting, fixtures and scaffolds are hung on the beam for its temporary fixing in the design position, as well as braces for its precise guidance. Beams are installed according to axial risks on them and crane consoles of columns with temporary fastening on anchor bolts and calibrated using special devices.
Crane beams are installed immediately after the installation of the columns in the mounting cell. A group of workers, consisting of five assemblers, participates in the lifting, installation and alignment of the beam. At the command of the link crane beam, the crane beam is lifted with the help of a traverse and two installers are kept from swinging with the help of braces.
 The given beam is taken at the level of 20 ... 30 cm from the platform of its support by the other two installers located on the platforms of the assembly stairs. They keep the structure from coming into contact with previously installed elements and turn it in the right direction before installation. The correctness of the lowering of the beam is controlled by the coincidence of the notches of the longitudinal axis on the beam and the console of the column, as well as by the risk of the previously installed beam. The deviation from the vertical is eliminated by installing metal linings under the supporting edge of the beam. Beams are moved by mounting crowbars or jacks. The beam is temporarily fixed with anchor bolts. The design position of the axis of the crane tracks is determined using a theodolite, and in height - by leveling the upper chord of the beam. The rails are mounted after alignment and fixing of the beams according to the project. The rails are guided to the design mark by hanging the rail axis with a thin metal wire. The design position of the rails is fixed with metal strips.
The axes of the crane beams are aligned with a theodolite mounted along the axis of the first crane beam on a special bracket attached to the first column so that the theodolite is located at a height of 500 mm above the upper plane of the beam. With a span of no more than 18 m, the axis of the crane beams is verified by measuring the span against each column with a tape measure. Crane beams and crane rails are leveled with a device installed in the middle of the span of the building at a height of 200 ... 300 mm from the surface of the beam.
After the final alignment of the crane beams, an executive diagram is drawn up, on which the marks of the top of the beams, deviations, and the design mark of the top of the beams are indicated. This scheme is used when installing rail tracks. After alignment and geodetic verification of the correct installation of the beams, the embedded parts are welded.
Coating trusses are usually mounted from vehicles. In some cases, as well as if it is necessary to enlarge the farms at the installation site, they are placed in special cassettes. installed span. At the same time, the trusses are laid out in such a way that the crane from each position can install the truss without a brace and, if possible, lay the coating slabs without moving.
Roof trusses are usually mounted in the same stream with crane beams after the beams are installed from one crane station.
Roof trusses and roof beams are mounted after installation and fixing of all underlying structures of the building frame. Before lifting, they are equipped with cradles and ladders, spacers for temporary fastening, a safety rope, braces and braces are fixed.
Preparation of farms for installation consists of the following operations:
- cleaning of rust and dirt from the openings of the support platforms;
- attaching planks to support the floor slabs;
- fastening the spacer with one end of the screw clamps to the upper chord of the truss (in the ridge knot) and tying the guy rope to the second end of the spacer;
- attaching two hemp rope guys at the ends of the truss to keep the truss from swinging when lifting.
For slinging trusses, traverses with semi-automatic grippers are used, which provide remote slinging. The truss is slinged by the upper belt, at the nodes where the racks and braces converge - for two or four points. Installation of trusses is carried out by a team of assembly workers of five people. An electric welder is also involved in the work.
The crane driver starts lifting the farm at the command of the leader. When lifting the truss, its position in space is regulated, keeping the truss from swinging, with the help of guy ropes, two installers. After lifting into the installation area, the truss is deployed using braces across the span by two installers. At a height of about 0.6 m above the place of support, the truss is received by two other installers (located on the mounting platforms attached to the columns), direct it, combining the risks that fix the geometric axes of the lower chords of the trusses with the risks of the axes of the columns in the upper section or with oriented risks in the support node of the truss trusses and set to the design position. In the transverse direction, if necessary, the truss is displaced with a crowbar without lifting it, and to shift the truss in the longitudinal direction, it is preliminarily raised.
 |
 |
|
Installation and fixing of the truss on the column supports: 1 - brace; 2 - farm; 3 - traverse; 4 - ladder with mounting platform |
|
During installation, the truss is lifted, deployed by 90 ° using braces. Then they raise it to a height 0.5 ... 0.7 m higher than the level of the supports, and lower it onto the supports. The correct installation of beams and trusses is controlled by combining the corresponding risks. For slinging trusses, traverses with semi-automatic grippers are used, which provide remote slinging.
After lifting, installation and alignment, the first truss or beam is fastened with braces, and the subsequent ones are fixed with special braces at the rate of at least two for trusses with a span of 24 ... 30 m. Braces and braces are removed only after installation and welding of the covering panels. To align and adjust the position on the support of beams or trusses, special conductors are used.
Coating slabs are preliminarily stored in the area of action of the assembly crane. The number of stacks of slabs and their location is determined from the condition of covering the cell between two trusses from one crane stand. Cover slabs are mounted immediately after installation and permanent fastening of the truss truss. This ensures the rigidity of the assembled building frame cell. The plates should be mounted with a symmetrical loading of the truss, they are welded to the embedded parts and released from the slings only after welding at three points. Weld gaps can break the stability of the upper chords of the trusses and lead to an accident. After installing the plates, the joints are monolithic.
Installation of wall panels is a labor-intensive process, in which labor costs can be 30..40% of labor costs during the installation of the above-ground part of the building.
 |
 |
 |
|
The conductor for alignment of farms and beams of a covering: 1 farm (beam); 2 - communication; 3 - adjusting screws; 4 - clip of the conductor; 5 - clamping screw |
||
For temporary fastening, alignment and regulation of the position of the truss on the support, conductors are used, previously installed on the heads of the columns.
After lifting, installation and alignment, the first truss is unfastened with braces, which are fixed to the columns.
The following trusses are temporarily unfastened by connecting to each other with struts having a rigid size of 6 or 12 m in the axes. After installing the truss, the second end of the strut is lifted and attached to the previously mounted structure.
 |
 |
|
The use of a fixing strut for temporary fastening of a truss truss: a - fastening the strut to the truss before lifting it; b - installation of a truss on a column; c - temporary fastening of the farm with a spacer: 1 - farm; 2 - spacer; 3 - column; 4 - guy; 5 - rope for lifting the strut; 6 - coating plate; 7 - crane beam |
|
 After the installation of the first pair of trusses, 3…4 covering slabs are laid and fixed on them to create a rigid initial system. After checking the position of the structures, the welder, together with one of the installers, welds the embedded parts. In each node, the embedded part of the truss is welded to the base plate of the column. Then all elements of temporary fastening are removed, i.e. all inventory spacers and braces are removed as the coating slabs are laid and welded. The slinging is carried out after the installation of spacers and welding of the ties to the upper chords.
The roof slabs are mounted after the roof trusses are fixed with temporary struts or permanent braces from one edge of the roof to the other. In this case, the first slab is fed from suspended scaffolds on columns, and the subsequent slabs are fed from the laid slabs. Along the lantern, the plates are mounted from one end of the lantern to the other, while the first plate is installed from cradles hung on the lantern stand.
Installation is carried out by a link consisting of three installers and one rigger. The rigger slings the stacked slabs to feed them into the installation area. At the top of the slab, two installers are received and installed in the design position. The third installer welds the plates to the embedded parts of the truss.
When laying slabs on steel trusses, the required length of the supporting part of a slab 6.0 m long must be at least 70 mm, and slabs 12.0 m long - 100 mm.
Plates are welded to the embedded parts of the farm immediately after installation. In this case, the first plate is welded at four points, and the rest at least three, since one of the corners of the plate is not available for welding. In the event that the gap between the embedded parts of the slabs and roof structures exceeds 4.0 mm, steel linings are installed, which are welded to the embedded parts of the trusses and roof slabs (see Fig. 14).
 |
 |
|
Scheme of installation of coating slabs: 1 - farm; 2 - installed plate; 3 - installed plate; 4 - plate located in the installation area; 5 - crane; 6 - column; 7 - crane beam; 8 - traverse; 9 - guy; 10 - lantern; 11 - fence; A - the first stage of mounting plates on the lantern; B - second |
|
Installation of wall panels is usually carried out in a separate stream immediately after the concrete has set the required strength in this area at the joints between columns and foundations.
Large-sized wall panels up to 12 m long, as a rule, are mounted from vehicles using jib cranes or special installers in the form of self-propelled tower units equipped with a self-elevating mounting platform.
Wall panels are mounted in sections between columns for the entire height of the building
 |
 |
|
Attachment of external wall panels: 1 - crane; 2 - cassettes with wall panels; 3 - mounted wall panels; 4 - panel installation; 5 - auto-hydraulic lift |
|
Installation is carried out by a team of four installers. Two assemblers are on the ground doing all the preparatory work, the other two assemblers install and fix the panels. If it is possible to travel inside the building, auto-hydraulic lifts are used as jobs for installers.
The installation of the panels of the outer walls should be carried out, resting them on beacons adjusted relative to the mounting horizon - wooden planks, the thickness of which may vary depending on the results of the leveling survey of the mounting horizon, but should be 12 mm on average.
 Two beacons are placed under each panel at a distance of 15 ... 20 cm from the side faces closer to the outer plane of the building wall. A porous gernite cord is laid on the upper face of the underlying panel on a thin layer of "izol" mastic. Immediately before installing the panel, the surface of the cord is covered with a layer of mastic, the cement mortar is spread over the entire supporting plane of the panel with a layer 3 ... 5 cm above the level of the beacons. The mortar bed should not reach the edge of the wall by 2 ... 3 cm so that the mortar is not squeezed out and does not pollute the facade of the building. At the end of the installation of the panels, a layer of sealant-paste is applied on the outside of all joints. To protect the paste from external atmospheric influences, after it dries, a protective layer of organosilicon enamel is applied on top.
For slinging panels 6 m long, two-branch slings are used, and 12 m long - traverses. At the end of the slinging, the link officer gives a command to the crane operator to lift the panel by 20 ... 30 cm. After checking the reliability of the slinging, the panel is moved to the installation site. Installers regulate the position of the panel in space when it is lifted with the help of braces. At a height of 15…20 cm from the mounting mark, the installers take the panel and guide it to the installation site.
The panels are installed, starting with the "beacon" corners, along which the intermediate panels of the row are aligned. Having installed the panel in place, with the slings stretched, they correct its position with mounting crowbars. After the panel is installed in the design position, the welder fixes it by welding the embedded parts of the panel and the frame structure. Next, the loops of the slings are released, the horizontal seam of the panel is compacted and leveled.
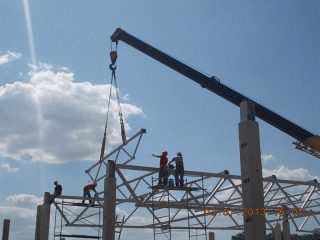
When installing the panel on a mortar bed, it is necessary to provide some initial inclination of it inward by laying "lighthouse" gaskets closer to the outer edge of the wall.
When the panel is moved to a vertical position with the help of braces, the solution under its outer edge will be compacted. If, when installing the panel, it is tilted outward, which is unacceptable, then when it is transferred to a vertical position, a gap is formed between the panel and the bed, which is very difficult to notice and caulk from the outside.
The panels are installed according to the risk, fixing the position of the vertical seam, the outer edge of the panel - along the cut line of the wall and along the line that defines the inner plane of the wall. Installers check the vertical installation accuracy of the panel with a plumb-line rail, along two faces: side and open end, and horizontally - with a level. When aligning the position of the panel, special templates can be used, such as a gage template and a plumb template.


")


- What was taught to women who became guards in concentration camps Torture used by the Nazis
- Singer Alex Malinovsky: biography, career, personal life, photo Let's start the story again
- Do I need to shave the testicles and how to do it right at home How to shave the eggs
- Chinese girls with small breasts
- Famous girls with small breasts
- Shoulder girdle: why you can’t sympathize with Russian truckers
- How to clean your computer from junk and speed up its work
- Wedding predictions for guests: funny and funny ideas Comic fortune-telling of a gypsy in prose
- Business on coffee grounds or how to open a mobile coffee shop on wheels?
- Congratulation of a gypsy on a woman's anniversary
- Define the concepts: choir, vocal ensemble, trio, duet, solo
- Guy's Room Design: Ideas and Examples
- General rules for drawing up a foundation plan Drawings of the foundation of a house
- modern art deco bedroom small art deco bedroom
- Pansies: characteristics and photos of flowers
- Making an art deco bedroom: the choice of materials Beige art deco bedroom
- Bedroom interiors in art deco style Bedroom art deco style beige
- Young: planting and care in the open field Young planting and care in the open
- Varieties for open ground
- Pansies: cultivation and care in the open field