How to choose an electric underfloor heating: tips, calculations and diagrams, how to choose and install electric underfloor heating. Electric underfloor heating - energy consumption. How many kW per month? Electric underfloor heating
The feeling of even and pleasant warmth, which gives an electric floor heating, ensures comfort in the room. But this type of heating has become popular not only for this reason. Modern intelligent control systems make it possible to rationally use electricity and make this heating method cost-effective.
Types of electric floor heating
Depending on the type of heating element, electric floors come in the following varieties:
- traditional cable;
- innovative film;
- rod.
Cable models can be supplied for sale in the form of a simple coil, sections, as well as mats made of a special elastic mesh. The latter version uses a thinner cable than other models.
Electric cable floor is only convection, and film and rod models work on the principle of infrared heaters.
Each of the varieties has its own styling features and restrictions on use. If you decide to equip an electric underfloor heating, choose its characteristics based on what installation method is possible in the room.
Cable electric floor
The use of cable heating has already become a classic. For the manufacture of underfloor heating, both resistive and more complex self-regulating models are used. The resistive cable can be single-core or two-core, and the second option, due to its design features, is used for electric floor heating much more often.

The fact is that the consequence of the operation of the system is electromagnetic radiation, and the use of a two-core cable allows you to somewhat reduce its intensity. Self-regulating models are much more complicated than a conventional heating cable. They are able to identify areas where overheating has occurred and reduce, or even completely turn off the power.
Basic rules for installing cable underfloor heating
In general, the technology for installing an electric underfloor heating is approximately the same, regardless of which particular variety is used. Using the example of laying a conventional heating cable, we will consider the main stages of this process. Features and nuances that characterize the installation process of other models will be discussed in the relevant chapters.
The arrangement of any kind of electric floors begins with the choice of a place to install a thermostat. A recess is made in the wall for the device and wires that will power the system. A conductor for connecting the sensor will also be laid in it.
After that, the floor surface is prepared. A heat-insulating material is laid on a plane leveled and cleared of debris. The heating sections are placed on top and fixed with a mounting tape.

By the way, using a cable makes it possible to choose the distance between the elements, depending on what intensity of heating is required. For example, sections can be laid along a cold outer wall with a smaller step than in more protected parts of the room.
Important: Make sure that the heating conductors do not cross during installation!
After laying is completed, all electrical wire connections are made. Then the internal sensor is installed. It must be placed inside the corrugated tube. This will protect the device from damage. The tube with the sensor and the connected wire is placed between the heating cable. It remains to test the system for performance. If the resistance of the sections and the sensor corresponds to the data specified in the technical data sheet, then you can start pouring the cement-sand screed.
After three days, the topcoat is laid. The warm floor is connected only after the screed has dried completely - not earlier than after 28 days. You can independently equip a warm electric floor, installation - the video of which is presented below, is not a very complicated process. The main thing is to follow the instructions given in this video. But if during the viewing process it turns out that you do not have any skills or you do not have the necessary tools, then use the services of a specialized company.
Heating mats - a variant of a warm floor under a tile
Warm mats are a variation of the traditional cable floor. They have the same heating element - a cable, but in the manufacture of mats, models with a smaller cross section are used. In addition, such a floor is sold ready-made - it is fixed on an elastic fiberglass mesh. Most often, mats are used to heat the floor, lined with ceramic tiles.

The underside of the mesh is usually covered with an adhesive that allows the structure to be fixed almost instantly. Therefore, the installation of an electric underfloor heating in this case does without the use of a mounting tape. After the heating mats are laid out and fixed, the necessary connections and system testing are carried out. Then the surface is poured with a mortar for fixing ceramic tiles and the top coat is laid.
Infrared Electric Floors
Infrared floor with carbon heating rods is gradually becoming a strong competitor for other varieties of electric floor heating systems. Only a rather high price limits its widespread use so far. This is the healthiest way to keep your home at a comfortable temperature. Those who have already installed a core warm floor, the reviews about it are mostly positive.
Such a floor can be laid even under a surface cluttered with furniture, as well as calmly move it during operation. Carbon rods are not afraid of overheating because they have a self-regulating function. The carbon mat is designed for installation using a screed or glue. It is suitable for laying ceramic tiles, but it can also be used under other coatings.

To increase the efficiency of the system, a heat-reflecting film substrate is first placed on the floor surface. For reliable adhesion of glue or screed to the subfloor, special holes are made in the insulation. Laying the electric floor heating is carried out evenly over the entire surface. If necessary, the mats are cut in those places where the connecting wire is located, into pieces of the desired size. After completion of installation and inspection work, the surface is covered with a thin layer of cement-sand screed or glue.
The easiest way is to install a warm electric floor of a film structure. It does not require preliminary measures for the arrangement of the surface. Such a floor is laid on a heat-reflecting substrate, and the selected coating is laid on top.
Electric floor control
The system is not only connected to the power supply through the thermostat, but also controlled by it. This device monitors the level of heating of floors and air, reading the readings of internal and external sensors. Internal sensors are the main ones, they are installed when installing a warm electric floor in a screed or under a coating. Auxiliary sensors record the air temperature. They are usually located on the wall.

The simplest thermostat is able to maintain a certain temperature in the room: if certain parameters are exceeded, it simply turns off the power and allows the system to cool down. A programmable thermostat for an electric underfloor heating works according to a more complex scheme. Its use allows owners to set the desired room heating algorithm.
Some models have a set of standard programs that take into account the time of day, weekends or working days.
They will independently turn on the power before the arrival of the owners and turn it off while no one is at home. At the moment, there are already thermostats that are controlled remotely, via the Internet or a mobile phone. This allows apartment owners to adjust the program if plans change.
Of course, you will have to pay several times more for a thermostat with artificial intelligence than for a simple model. But the costs will pay off due to the fact that the operation of the electric floor heating will be more rational, and energy consumption will be economical.
Electric underfloor heating: main and additional heating system
It is possible to use electric underfloor heating as the main heating system only if the thermal insulation of the room is carefully carried out. But even if this condition is met, this heating method is more suitable for areas with warm winters. In more severe conditions, it will not be very effective and very costly.
To maintain a comfortable temperature level only due to the warm floor, its area should be quite large - at least two thirds of the entire area of \u200b\u200bthe room.
Accordingly, if there is a lot of furniture in the room, then the system will not perform its task to the fullest. In addition, a specific power of at least 150 watts is required.
 Underfloor heating for balcony
Winter, of course, is a wonderful time of the year, frost, sun, snow ... but in the house you want comfort and warmth at this time. A warm floor gives exactly this feeling, and therefore, probably, it is becoming more and more popular. You can heat the floor with hot water or using various types of electric heaters. They can be different - cable, film or rod, but have one common name - electric underfloor heating.
The system is quite complicated, and in some cases cumbersome, but it can be implemented by a non-specialist. So, if you want, you can make your own electric underfloor heating. It will only take time to sort out the details, as well as a certain amount of money. It is impossible to say exactly how many: there are too many different components and components that should be associated with the parameters of your premises.
Heating elements are only part of the system. But you can immediately say that the cheapest are resistive cables, the mats of them are a little more expensive. Self-regulating or "smart" cables cost twice as much, but they have an undoubted advantage - they are not afraid of overheating and regulate the amount of heat they emit (without a control element). The most expensive - , and in both versions: both film (slightly cheaper) and rod. But infrared radiation is very useful, so many, despite the high price, choose this option.
Resistive cables for underfloor heating cost the least (single-core a little cheaper, two-core a little more expensive)
You also need to choose the type of heating element based on the installation method, and it can be of two types: “wet” - under the screed, and “dry” - without the need to use a solution. Of the electric underfloor heating, only the infrared film floor is laid in a “dry” way. Because the floor is made by hand more often than others. It is the easiest and fastest to install: if your subfloor is flat, one medium-sized room can be heated in one or two days (depending on the complexity of laying the flooring). All other electric floor heaters involve the use of a screed, or tiles laid on a special adhesive (for a film floor, this option is the worst) and they can be operated at least a month after installation.
Electric floor heating device
Now let's take a closer look at what parts the system consists of. Several parts are required:

These are not all parts of the "pie", but only its mandatory elements. Strictly speaking, an electric underfloor heating will work without a thermostat with sensors, but then it will be uneconomical and there will be a fairly high probability that the system will overheat and stop working due to an untimely shutdown. Experts say that even the most expensive thermostat (programmable electronic with the ability to control via a computer) will pay off in the first heating season. So, probably, this is also a mandatory element of the system.
Work order
To make a decision: whether or not you want an electric floor heating, you need an idea of the amount of work that lies ahead. Briefly, here is what is needed:

These are all the steps that are necessary to make an electric underfloor heating with your own hands. Not the easiest task, but quite real.
Types of heaters
To heat the floor with electricity, two technologies are used: convection and infrared radiation.
Infrared heated floors
In infrared heating elements there is carbon, which radiates heat in the IR range. can be made in the form of films or rod mats. Although both use carbon, they are installed in different ways: for foils they use a “dry” installation, for a core floor they use a “wet” installation - with a screed or under a tile with adhesive.

What they have in common is a fairly complex electrical connection. In order to cover the required part of the floor surface, several strips of infrared films or rod mats are used. Moreover, according to certain rules, they can be cut from one roll. Here the connection of the pieces into a single electrical circuit is the most difficult and critical part of the installation.
Manufacturers have made sure that everything is simple: crimp contacts, insulation plates and a detailed manual are included with the heater. Most of the major companies have also released videos on how to properly lay and connect the electric floors of their production.

Joining the strips of infrared films is the hardest part of the installation.
It should be noted that these crimp contacts are not difficult to install, but if you know how to solder, you can connect everything using soldering - this is a more reliable way.
Now about the release forms. Infrared heating films for the floor are available in widths of 50 cm, 80 cm and 1 m. There are sets of different lengths: from 70 cm to 15 m in one roll. there are so far one size 82-83 cm wide. The length of one roll is from 1 m to 12 m. It is necessary to place the strips of a film or mat end-to-end or with some distance between them (up to 10-15 cm), but in no case should one piece be allowed to overlap with another.

Cable heaters (convection heating type)
It must be said that cable floor heating has been used in Europe for 50 years. There are a significant number of European manufacturers on the market with a very good reputation. Many of them give a guarantee for their products (heating cables and mats) from 7 to 15 years, and the declared service life is generally 20-50 years. Cable underfloor heating is available in two types:

What's better? There is no particular difference in the parameters, but the mats are stacked many times faster. After all, in order to lay the cable, you need to fix the entire required length according to a certain scheme every 30-50 cm, and even more often when cornering. It takes a lot of time. If you use fastening straps, things move faster, but the straps also need to be fixed.
In the case of mats, they are simply rolled out onto a clean subfloor (you can use an old tile). In the place where it is necessary to turn (usually at the opposite wall) leaving the cable intact, the substrate mesh is cut, and the mat is turned in the desired direction. So they cover the whole space. The whole procedure takes several tens of minutes, while laying the cable (tens and hundreds of meters) takes hours.

Now about. There are two of them: resistive and self-regulating. The cheapest are resistive. It's just a conductor (or two) in a protective sheath. But the material for the conductor is different from those used in conventional electrical cables. There, the main task is to conduct current without loss, including for heating. In heating cables, the goal is different - to get as much heat as possible. That's why the material is different.
Resistive cables are single-core and two-core. Single-core ones are cheaper by about 10-20%, but laying them is a little more difficult: two ends of the cable are required to be connected to the thermostat, and this complicates the task. When laying two-wire, you need to connect only one end, in addition, they create electromagnetic fields of lower voltage.

Self-regulating cables are, strictly speaking, not cables at all, but a metal-polymer matrix. They consist of two conductive cores, between which a polymer is located. It is this polymer that generates heat. Their main advantage is that they can independently regulate the amount of heat generated in each section of their length.
The thing is that the resistance of a polymer is highly dependent on its temperature: the higher the temperature, the higher the resistance. When the cable section is heated, the resistance of the polymer increases, the current passing through it decreases and, accordingly, the amount of heat generated also decreases. The overheated area of the floor returns to normal temperature.
This property allows you to move furniture after laying the cable underfloor heating, and not be afraid of overheating (if a resistive cable is used, this cannot be done, otherwise it will burn out).
Let's talk a little more about underfloor heating. They are made of single-core and two-core resistive cables. The difference in price is approximately the same - 10-20% (single-core is cheaper). Roll width 45-50 cm. Length of one set - from 70 cm to 20-36 meters.
Electric floor calculation
To determine the required heating power, you need to know several parameters:
- What role will the underfloor heating play? If this is only a greater level of comfort, then approximately 150 W of power is taken per square meter of heated floor. If underfloor heating is the only heating system, then 220 watts per square is required.
- Purpose of the room and its location. For example, in bedrooms they take not 150 W / m 2, but 180 W / m 2, in bathrooms they generally count 200 W / m 2 each. But if the same living room, which normally requires 150 W / m 2, has two or three outer walls, then it is better to lay a more powerful cable / mat / film in it.
- The type of room that is downstairs. If this is another apartment, the estimated power is enough for you, but if it is an unheated room, a basement or soil in general, then in addition to a thicker layer of thermal insulation, you will need more powerful heating. The electric heated floor on the balcony generally requires maximum power - this is the coldest room, especially if there is not even elementary insulation below your balcony. At the same time, do not be afraid to “overdo it” - after all, there will be a thermostat on which you will set the temperature you want, and you will not walk on the burning floor. But if the power is not enough, then the thermostat will not help: the floor will remain cold.
But that is not all. The total power is calculated based on the heated area, and this is not the whole room. From the passport area of the room, subtract the dimensions of the furniture that you are not going to move, large-sized equipment and plumbing fixtures. In addition to the fact that some heaters are afraid of overheating (resistive cables and mats, as well as infrared films), it is simply unwise to spend money on heating a cabinet, sofa or washing machine. The remaining area will be heated.

Now you can estimate the total power consumption for floor heating in the room: take the selected rated power, multiply by the heated area. And although the numbers usually turn out to be decent, this does not mean at all that this is how much your counter will constantly rewind, every hour. That's why thermostats are good because they save money: they turn on electric heaters only when their temperature is below the set temperature by 1 ° C. With good thermal insulation, your floor will consume 30-40% of the calculated power. Therefore, it is so important when making an electric underfloor heating with your own hands, to pay sufficient attention to thermal insulation.
Electric floor connection
Installation of an electric underfloor heating begins with determining the place where the thermostat will be installed. Most often it is located on one of the walls, not far from the outlet. If the total power of the heating elements is above 3 kW, the installation of an RCD is mandatory. In principle, even with less power, such a device will not hurt: safety is paramount. Therefore, the power supply is first turned on to the machine, and then it is brought out to the thermostat.

Thermoregulators (thermostats) are of two types: overhead and mortise. Mortise fits perfectly into a standard mounting box and looks quite good when mounted. Appearance overhead is far from ideal, but they are often placed either in separate rooms reserved for heating equipment, or hidden together with the RCD in a special cabinet. By the way, this is a good idea if you have small children: they are very attracted to all sorts of knobs / buttons, and it is better to hide everything behind a closing door.
If a mortise thermostat model is selected, a hole is cut out under the mounting box in the wall, and the mounting box is installed there. They turn on the power supply, insulate the ends and do not connect to the thermostat yet. From the box down to the floor, a strobe is laid, in which wires from the electric floor and a corrugated pipe will be located, through which the floor temperature sensor is inserted. The strobe continues along the floor at a distance of 50 cm from the wall - this is where the sensor will be located, and the corrugation is needed in order to replace the broken sensor, if necessary, without disassembling the entire structure.
The corrugation is fixed in a strobe on the floor, the second end is brought to the mounting box and also fixed. The sensor is inserted there (lowered from the mounting box on its own wire). After you saw that the sensor appeared on the other side of the corrugation, you need to pull it back a little, and close the open edge of the pipe with electrical tape or a foam plug so that the solution does not get there. After installing the sensor, connect the wires from it to the corresponding terminals on the back of the thermostat housing.

The next step is laying in a strobe and connecting cables from electric floor heaters. They are also connected to the terminals on the thermostat. And only after that you can connect the power wires. And this should be done by an electrician. The electrical part is the only thing that is undesirable to do on your own when installing a warm floor. Still, it is better to invite a specialist. Actually on this connection of the electric floor heating is completed. Next, you need to check the operation of the system (turn it on for a while) and, if everything is normal, proceed to the next step - pour the screed, lay tiles on the adhesive, or, if a film heated floor is used, immediately lay a laminate, parquet or floor board on the substrate .
grounding
Any electrical device is a source of potential danger. Especially if the electricity runs across the floor, where water can often be present. How to make electric underfloor heating in the bathroom safe? Select heating elements with a good protective sheath and connect a protective earth. Grounding will not hurt in other rooms either - cases are different, and modern heaters for warm electric floors necessarily have a protective metal sheath. So all that is needed is to connect this shell to a special terminal on the shield.

If your warm floor does not have a protective braid, a metal mesh is laid over the heating electrical elements, connected with wires into a single structure and then connected to a protective bus. Such a grid will also give the floor additional rigidity, which also does not hurt. After all, the thickness of the electric underfloor heating is not very large - about 3-5 cm (excluding the thickness of the heat insulator). And with a mesh, the mechanical load will be distributed more evenly.
If you are laying a warm electric floor in a private house, then you need to make a separate circuit for it - it's safer that way.
Results
Do-it-yourself electric underfloor heating is real. The main thing is to decide on the type of heating element that suits you best for some parameters, and then just follow the instructions. There are many of them today in text and video format: there are videos from manufacturing companies, and there are from all kinds of repair schools.
An electric underfloor heating is used as an additional source of heat. This scheme works well on floors of any kind and is arranged in houses made of any material. A distinctive feature is simple installation, which will appeal to an inexperienced master. It is good to mount such a floor in rooms where it is very difficult to lay a heating system. For example, a balcony or terrace. Sometimes, underfloor heating is used as the only heating method, in which case it is necessary to take into account the upcoming energy costs.
Benefits of electric floors
Electric floor heating has a number of advantages, thanks to which it is often used in an apartment or a private house.
- Possibility of heating the whole room, as well as a separate part of it. Warm floors can be laid over the entire area of the room, or you can install it only in a certain part. In this case, space zoning is performed.
- Electric warm floors are convenient to use, since they are controlled by a remote control or a temperature controller is used.
- It is possible to connect to the "smart home" system. In this case, the heating can be controlled remotely.
- Simple and easy installation that does not require special tools.
- No possibility of leakage.
During installation, the floor does not occupy a large amount of the height of the room, and therefore it must be used where this moment will not have a negative impact
Such floors are easier to use in high-rise buildings, since the standard water heating method puts a greater load on the floors, and the electric warm floor weighs several times less.
 Warm floor
 But it should not be noted that such a coating also has disadvantages.
Disadvantages of electric floors
These include:
- The possibility of a short circuit - this problem can occur with any electrically heated device and a warm floor is no exception. This problem should be prevented by checking all cables before laying the flooring.
- Energy costs are not so much a problem as a disadvantage. When using such a scheme, an increase in costs cannot be avoided - the decision depends on what use is envisaged:
- If electric floor heating is used as a permanent power source, then it makes sense for reliable home insulation. For example, to make high-quality thermal insulation of walls. In this case, heat losses will decrease and, as a result, heating costs will also decrease.
- If the system is used as an additional source of heat, then it makes sense to lay the elements where there is the most movement. As a rule, the most frequent movement is carried out in the center of the room, respectively, and the heating elements must be laid in the center. Thus, fewer elements will be required, and costs will be reduced by heating a certain area of \u200b\u200bthe room, and not all at once.
Sometimes radiation is singled out as disadvantages. But the fact is that such a system does not differ from another electronic device, and therefore you should not be afraid of harm from it.
Types of electric heating
On the market for electric underfloor heating, you can find several versions. Each has its own pros and cons. In order to understand which option is best suited to a particular housing, it is necessary to study each of them.
Electric underfloor heating is divided into 2 types by action:
- Resistive - heating in this type of heating is carried out by cables.
- Infrared - heating is carried out due to a special component that transfers heat to surrounding things.
Cable electric floor
The cable version is different in that it uses cables to match the quality of the heating elements. Connected to electricity, they heat up due to which the surface is heated.
Solid wires
Cables with one core are both a conductor of heat and a heating element. If the installation of electric underfloor heating occurs with such a cable, then it is important that the ends of the wire converge in one place. This is necessary to connect the system to the control unit.

Two-core wires
Two-core wires are much more convenient in terms of use. One core is needed for heating, the other closes the circuit. When using these cables, the meeting of the two ends is not necessary. Therefore, it is more often used, it is much easier to bring one end of the wire to the control unit than to mount the system so that both ends meet in one place.
heating mat
The convenience of mats is that you do not need to independently calculate the necessary power, this was all done by the manufacturer. Mats are purchased depending on the number of square meters on which it is necessary to mount the heating element.
Infrared heating types
Rod type of heating
A kind of infrared floors is a rod electric warm floor. It resembles a rope ladder with wooden or metal rungs. But a rod with a heating element is used as crossbars.
Underfloor heating is provided by this rod. And as a "rope" a polymer is used that can be cut to carry out the installation. However, the cut polymer will need to be fixed into the circuit, as it plays the role of a conductor.

Film type of heating
Electric floor heating can also have a film look. In this case, the heating of surfaces occurs due to infrared radiation. The elements responsible for heating transmit a thermal signal over short distances, heating what is next to them. These elements are made of carbon paste, and copper wires, which are enclosed in a film, are responsible for heating it. For laying, the film version is most often used, since it is easy to install.
 Film option
 The film floor has a very small thickness, and therefore it can also be used where ceilings have a limited height.
Thermal sensor for electric floor
If you decide to install electric underfloor heating in the house, then you need to thoroughly prepare for this. In addition to materials such as concrete, flooring and other building materials, you need to purchase the right set of underfloor heating and additional elements that will control the system.
These elements are:
- Temperature sensor - it shows the temperature data.
- Thermostat - it is necessary to set the temperature to which the element will heat up.
Both of these elements work in pairs, as soon as the temperature sensor detects the temperature to which the elements have heated up, the thermostat receives a command and turns off further heating.
Modern thermostats can be equipped with various parts that allow you to mount an electronic underfloor heating. In this option, you can set the heating and shutdown temperature, and the data can be entered into the memory once, further control will be taken over by the thermostat system.
 heat sensor
 In new models of the device, control can be carried out remotely by installing a SIM card. That is, in fact, the control sensor is transferred to the phone.
By means of an SMS message, you can set the time to turn on and turn on the heating, the temperature of the floor heating.
Also, you can turn off the entire system, if necessary.
Calculation of the power of underfloor heating
Before choosing a warm floor, it is necessary to calculate the area of \u200b\u200bthe room and the power of the system, so that it can heat the home. First you need to decide on the mode in which the heated floor from electricity will be used. If the floor will be the main source of heat, then a complex calculation scheme is used. If the floor is used as an additional source, then the calculations in this case are much simpler.
When using a warm floor as the main heating system, an accurate technological calculation is needed, which should take into account such points as the area of \u200b\u200bthe house, the number of doors and windows, and possible heat losses. At the same time, when the area is calculated, you need to pay attention to the furniture that will be placed in the room. Warm floors must be laid on those spaces that are free from furniture.
An exception to this condition is the heating rod elements. They can be laid over the entire area, as they are self-adjusting.

When calculating, it is important to correctly calculate the possible heat loss. Close attention should be paid to these data, since incorrect calculations will lead to the fact that such a system simply will not be able to cope with the heating of the room and the house will be cold. Possible heat losses are calculated using special tables. It is best to entrust these calculations to specialists. They will more accurately calculate the required power of the system.
If the electric floor heating will be used as an additional source of heat, then the necessary calculations can be made independently. In this calculation, it is necessary to take into account the type of floor used, resistive or infrared, the laying area, that is, the area on which the heating elements will be located and the power of the wire.
Laying rules
Before you start laying floors, you must familiarize yourself with the laying rules. It is necessary to strictly follow the instructions, then you can guarantee the correct and accurate operation of the entire system.
These requirements include the following:
- Before laying, it is necessary to install a thermally insulating layer. This is necessary for all types of floors, as part of the heat energy will not go down. In this case, heat loss will be minimal, and floor heating will also occur faster. In this way, electricity costs can be reduced.
- When placing floors, the location of furniture must be taken into account, heating elements cannot be placed under them, except for rod floors.
- From the walls there should be indents of 5 cm, and from heaters (batteries) at least 10 cm.
- When laying, it is necessary to observe the wire pitch, and also not to allow the wires to cross.
- During installation, it is important to ensure that there are as few cuts for turns as possible. Thus, the integrity of the system is not violated. All incisions must be carefully insulated. If this rule is not observed, power is lost, and there is also the possibility of a short circuit.

- Connections of small pieces of the floor are also undesirable, the minimum length of the section should be at least 50 cm. When buying a warm floor, it is better to take it with a margin.
It is imperative to install an RCD device, it will turn off the heat supply in case of problems. For example, if power is lost, the RCD will disconnect the system from electricity.
All floor installation work is best left to a professional electrician.
Also, for electric floor heating, it is better to allocate a separate line where only this system will be connected. Also, it is better to bring the system to a separate machine, in case of problems with electricity or the floor itself, you can de-energize the system with this device.
Installation of a warm electric floor
Before choosing electric underfloor heating, it is better to clarify what kind of flooring is planned to be laid and how the base for the underfloor heating will be prepared. Already depending on these data and buy a floor heating system.
There are three ways to mount the floor:
- Screed installation.
- Mounting on a screed, but fixing with tiles.
- Installation under flooring, but not under tiles.
If it is necessary to install an electric underfloor heating in a screed or under a tile, then you will have to choose cable systems or rod floors.
Laying the film floor is only allowed under the floor covering. Moisture damages this floor. Therefore, it is desirable to lay it in rooms, and not in sanitary facilities.
The installation itself is almost the same:
- A layout plan is drawn up, taking into account the location of furniture and indents. The plan is best done on graph paper with respect to scale.
- A layer of waterproofing and a layer of insulation are laid, if necessary.
- The markup is transferred to the prepared base.
- According to the markup, the floor is laid. All places that are cut, if necessary, must be insulated. Also, the position of the temperature sensor and thermostat is determined. The latter is installed on the wall and from the place of its installation it is necessary to lower the strobe to the floor.
- After laying all the elements, check the resistance.
- A pipe is laid in the strobe, one end of which is connected to a thermostat, and the other end contains a temperature sensor. The end of the pipe with the temperature sensor is placed in the middle of the nearest heating elements.
 Electric heating layer cake
 Verification work
After these works have been carried out, it is necessary to check the operability of the sensor and the thermostat, once again the resistance and the system are completely de-energized, and the regulator is removed. Then, the screed is poured, the tiles or flooring are laid. Moreover, if a screed is planned, then first they wait for the concrete to dry, then they check the performance of the system again, and then they mount the floor covering.
It is worth checking how the temperature sensor is removed from the pipe, this is necessary so that later it can be replaced without problems if necessary.
Energy saving
The electric floor heating system has its pros and cons, which are described above. But, with proper design and use, this system will cause only positive emotions. Do not be afraid of a large consumption of electricity, and, as a result, an increase in payments. With a reasonable approach to use, the number of kilowatts will not increase much, and the heat in the house will be constant. This effect is achieved by using the floor only during hours when someone is at home.
Also, it will not be superfluous to think over the insulation of problem areas: doors, windows, balconies. Thus, it is possible to minimize heat loss, respectively, and the system itself will not work at full capacity. The effect of the work done can be seen on the heating bills.
Having decided to create a system of underfloor heating in an apartment or house, the owners are faced with another choice problem - which heating technology for the lower part of the premises to choose. Now on the market there are types of systems. Some of them run on water, others on electricity. However, not everyone knows that there is also an electric-water heated floor - one of the latest technologies that has already gained good reputation among many craftsmen and those who have tried this floor heating system.
Why do people still argue which floor is better - running on water or on electricity? The thing is that these heating technologies differ from each other in installation features, have certain disadvantages and advantages. And the choice is not always easy to make.

Underfloor heating - which is better?
Features of water floors
This is a rather complicated system in terms of installation, which operates on such a coolant as hot water. The advantage of water heating is that this type is quite economical during operation.

The main disadvantage is the complexity and some features of installation. For example, not in all cases it is allowed to connect a water heated floor to a central heating system - for this you need to obtain permission from the management company. In a private house, you will need an installation, which is also associated with the features of this type of heating system. The boiler itself, depending on the type, can take up quite a lot of space in the house, this should also be taken into account when choosing this heating system.

Also, for the installation of a water heating system for underfloor heating, a lot of preparatory work will have to be done. It is worth remembering that before commissioning such a floor, the cement screed must dry well.
Features of electric floors
This heating system works, as you might guess, on the basis of electricity. The heat generated by the special cables or mats is transferred directly to the floor finish, making the floor feel pleasant, cozy and warm.

Wiring diagram for a warm electric floor
The main difference from the water floor is that in this case the heating of the surface always occurs in the same way, while the water runs through the pipes constantly and has time to cool before the next heating. This is both an advantage and a disadvantage of this type of heating.

On a note! Because of this feature, electric floors can not always be used. Everything will depend on what kind of flooring is laid, as well as on the location of the furniture in the apartment. However, the places where there are cabinets and sofas can be simply bypassed during the laying of electric floors.
Electric floors are divided into film and cable. The first is laid on the surface of the screed directly under the finishing coating, the second, like a water floor, is poured with a cement screed.

With the help of both types of floor heating, you can easily equip heating in any home. However, choosing between them is always difficult. But technology does not stand still, and now there is an electric water floor on sale, which combines the advantages of both types.
Liquid electric floor
An electric-water floor is a combined type of heating system that combines the advantages of both water and electric heating types.

On a note! Calling such a floor water is not entirely correct. Water is not used as a coolant in some models - antifreeze is pumped into the tubes. Thus, the correct name for this underfloor heating system would be "liquid floor".

electric water underfloor heating
This type of floor heating is a tube system or one long thick-walled tube. When the liquid heating system is turned on, the coolant is heated, due to which a certain pressure is created and the antifreeze or distilled water begins to boil (the coolant is used differently in different systems). Thus, heat energy is generated.

Benefits of electric water underfloor heating
In order to fully appreciate all the benefits of a liquid underfloor heating, it is important to know its advantages, which distinguish this system from other analogues. And the advantages of electric-water systems over conventional water systems are many:
- they do not need to be connected to a heating boiler or heating system;
- the system does not need a pump;
- when installing the floor, you do not have to install a collector and a distribution cabinet;
- the volume of liquid contained inside the system is small, and therefore the probability of flooding the apartment or even a strong leakage of equipment is completely excluded;
- the heating of the system is as uniform as possible, the liquid inside the tube does not have time to cool down;
- ease of installation compared to water systems.

Also, the liquid system has considerable advantages over electric ones:
- since the cable is constantly inside the liquid, its overheating and burnout are excluded, unlike an electric cable simply laid in a screed;
- liquid floor repairs are easy to make. For example, pouring antifreeze or replacing a heating element is easy to do through a special mounting box. A damaged area can be identified by small spots on the screed;
- thermal energy is stored not only inside the screed, but also in the pipe itself, due to which the heating effect lasts longer.

If we compare liquid floors with film ones (which, in fact, also refer to electric ones), then the former can be used indoors with any indicators of humidity, which distinguishes them from the latter. Also, liquid-based floors can be laid under absolutely any floor covering.

Popular liquid electric floor models
There are two main models of electric water underfloor heating. These are XL Pipe (Korea, Daewoo Enertec) and Unimat Aqua (Korea, Caleo). They have structural differences.
On a note! Unimat Aqua systems are also produced in Russia. And this is worth remembering when choosing products.
These are two completely different designs that have only a common principle of operation - the coolant is heated by electricity. But the heaters and the heating mechanism are somewhat different.
This type of floor heating is one long thick-walled tube with a diameter of 2 cm, which is made of a special type of polyethylene. This element is a "tank" for a coolant, which is a certain brand of antifreeze. Inside the pipe, a seven-core cable is laid in a Teflon lining, made of chromium-nickel metal. The pipe is sealed at both ends, so that the coolant does not circulate, which, in turn, eliminates the need to purchase any other equipment.
On a note! The approximate power consumption of this system is 14.5 watts/m 2 .
Heating due to the liquid system occurs quickly and evenly, allows you to ensure the heating of the entire surface of the finish coating. At the same time, such a floor cools down for a very long time. The advantages of a liquid floor include the fact that it is not afraid of pressure from the outside, that is, you can safely put furniture on the finish coating where such a system lies - it will not bring harm to heating.

Installation of XL Pipe is carried out inside the screed, or rather, the laid system is poured with cement mortar about 4-5 cm thick. Pipe laying is carried out according to a certain scheme. For installation, you will also need a thermostat,. At the same time, there are no features of the installation of these elements - they are mounted in the same way as in the arrangement of other types of heating. Unless you have to purchase a specific thermostat, designed specifically for liquid electric floors. A mounting box 12x12x14 cm is also useful.

The XL Pipe system is reliability, safety and environmental friendliness in one type of equipment. The warranty period is 10 years, but in general, you can use the system with proper installation for about 50 years.

Table. Characteristics and cost of XL Pipe floors.
| Model | Length, m | Power, W | Cost, rub. |
|---|---|---|---|
| DW-010 | 14 | 560 | 5400 |
| DW-015 | 21 | 840 | 8000 |
| DW-020 | 28 | 1120 | 10700 |
| DW-025 | 35 | 1400 | 13400 |
| DW-030 | 42 | 1680 | 15300 |
| DW-040 | 56 | 2240 | 21300 |
| DW-050 | 70 | 2800 | 24300 |
| DW-060 | 84 | 3360 | 28000 |
Advantages of XL Pipe
This underfloor heating system has certain advantages:
- it is not a source of electromagnetic radiation;
- practically does not need to install additional equipment;
- does not overheat and does not adversely affect the finish;
- allows you to put furniture on yourself;
- maintainable;
- economical (electricity costs are on average 20-30% lower than when using electric floor heating);
- relatively simple installation.

Do-it-yourself installation of XL Pipe
Step 1. The base of the subfloor is being prepared - it is cleaned of debris, all cracks and irregularities are corrected. Further, slabs of extruded polystyrene foam 5 cm thick are laid on the surface for thermal insulation.

Step 2 Plates are fastened with special "umbrellas". Pre-holes are made in the plates for the fixing material, then dowels-umbrellas are inserted into them.

Step 3 A reinforcing mesh with a cell of 10-20 cm is laid on top of the polystyrene foam plates.

Step 4 Separate parts of the grid are interconnected with a knitting wire.

Step 5 The heating cable is unpacked and tested for resistance.

Step 6 The layout of the XL Pipe pipe on the floor surface is made from the mounting box according to the selected pattern in increments of 20-30 cm. The pipe is fixed with plastic clamps on the reinforcing mesh.


Step 7 A power cable is connected from the thermostat to the junction box.


Step 8 The wires extending from the pipe are connected to the power cable. Wires can be connected with special terminals.


Step 9 The ground wire is connected to the reinforcing mesh.

Step 10 A temperature sensor is attached at a distance of 5 cm from the system tube.

Step 11 The mounting box is closed with a lid, the seams of which are sealed with a sealant. Everything, laying and installation are completed, it remains only to fill the system with a cement screed and wait for it to dry.

Video - Installation of XL Pipe without screed on a wooden floor
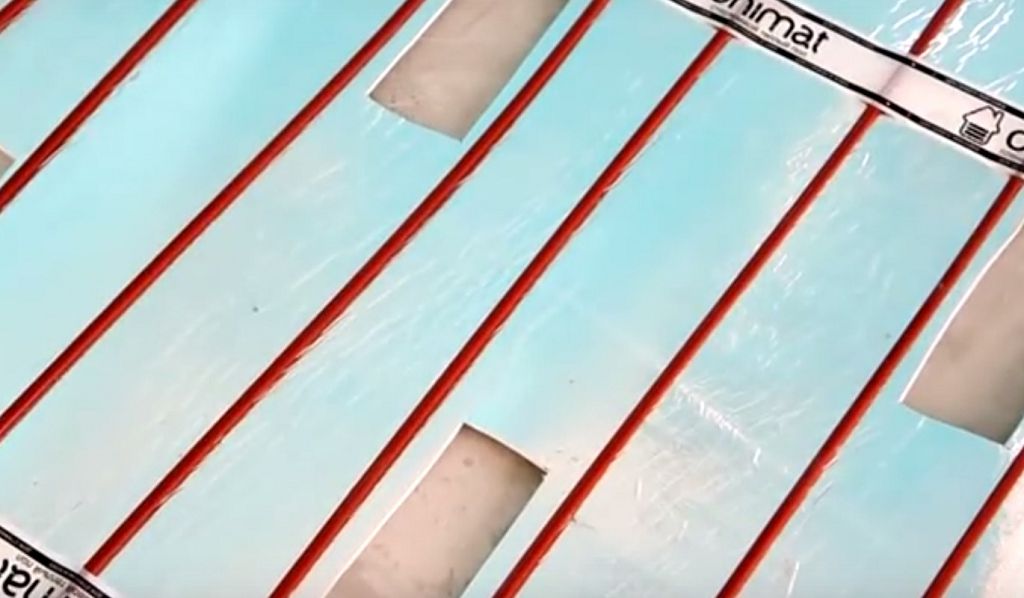
Capillary floor heating Unimat Aqua
The Unimat Aqua system is somewhat different from the XL Pipe. Instead of one thick tube, it has in its structure a large number of tubes of small diameter. That is why the system is called capillary. It is connected to a special device with a power of about 2.4 kW, due to which the coolant is heated and thermal energy is released. The system is closed, the pressure in it is created using the same device. The system also does not require the installation of additional heating equipment.

On a note! The volume of liquid inside the Unimat Aqua system is no more than 6 liters. The coolant is distilled water.
The area of heating by one system is about 20 m 2 . That is why it is not used for spacious rooms, although several Unimat Aqua can be installed in one room. Service life - about 5 years.

Unimat Aqua is represented by two types - basic and additional. The first one in the composition has a control unit, a mounting kit and two pieces of a connecting pipe. From all this, a small pipeline is formed. An additional set consists of coils of tubes of small diameter, the amount of which is enough to heat an area of 10-20 m 2. Also used for installation, fasteners for tubes and material reflecting thermal energy. For pouring the screed, a standard cement mixture is used.

The main advantage of this system lies in the multifunctional control unit, which can:
- determine and control the temperature in the room or the heating of the coolant;
- set the time for switching on and off the heating system.
The system is completely safe and can be installed even in a bath. But Unimat Aqua has a certain drawback - it is similar to the water floor system. The coolant comes from a heating unit with a higher temperature, gradually cools down, and therefore the heating of the floors will be uneven.
Table. CharacteristicsUnimatAqua.
Installation of underfloor heating Unimat Aqua Caleo
Step 1. The surface of the subfloor is thoroughly cleaned of debris, all irregularities are removed.

Step 2 The installation location of the thermostat on the wall is selected.

Step 3 A strobe is made in the draft base or screed for laying the temperature sensor.

Step 4 Heat-reflecting material is being laid. The sheets are interconnected with adhesive tape or fastened to the base with a stapler.

Step 5 The floor heating system is laid out on the surface from the side where the thermostat is planned to be installed.

Step 6 Where the mat needs to be rotated, one connecting wire is cut. The strip turns 180 degrees. The tubes must not cross each other.

Attention! The cut must be made only in the middle of the power wire. The maximum strip length should not exceed 25 m.
Step 7 The system is glued to the surface of the heat reflector with adhesive tape.

Step 8 Mounting wires are used to connect the mats to each other. To do this, the ends are stripped of insulation at the cut site. A sleeve is installed in this place, it is clamped with crimping pliers.

Step 9 A heat-shrinkable tube is put on the wire. The power wire is connected to the connecting wire. The sleeve is crimped and heated with a special hair dryer. The sleeve is closed with a tube, which is then heated and shrinks.

Step 10 Next, the system is connected to the thermostat. The Unimat Aqua strip is attached to it with the help of a connecting wire and special clamps of the regulator. The connection is made according to the diagram supplied with the thermostat.

Step 11 Holes are cut out in the heat reflector to connect the future screed with the floor base.

Step 12 A temperature sensor is installed inside the corrugated tube. It is located along the rods of the system.
floor heating sensor

Step 13 System performance is checked for 15 minutes.

Step 14 The system is poured with a cement mixture, a screed is formed.

Video - Unimat Aqua floor installation
Liquid or water electric floors are an excellent alternative to other types of heating. They are easy to use, practical and perform their functions well. The use of such systems will give the apartment or house coziness, making the flooring warm and pleasant.


")


- What was taught to women who became guards in concentration camps Torture used by the Nazis
- Singer Alex Malinovsky: biography, career, personal life, photo Let's start the story again
- Do I need to shave the testicles and how to do it right at home How to shave the eggs
- Chinese girls with small breasts
- Famous girls with small breasts
- Shoulder girdle: why you can’t sympathize with Russian truckers
- How to clean your computer from junk and speed up its work
- Wedding predictions for guests: funny and funny ideas Comic fortune-telling of a gypsy in prose
- Business on coffee grounds or how to open a mobile coffee shop on wheels?
- Congratulation of a gypsy on a woman's anniversary
- Define the concepts: choir, vocal ensemble, trio, duet, solo
- Guy's Room Design: Ideas and Examples
- General rules for drawing up a foundation plan House foundation drawings
- modern art deco bedroom small art deco bedroom
- Pansies: characteristics and photos of flowers
- Making an art deco bedroom: the choice of materials Beige art deco bedroom
- Bedroom interiors in art deco style Bedroom art deco style beige
- Young: planting and care in the open field Young planting and care in the open
- Varieties for open ground
- Pansies: cultivation and care in the open field