A small do-it-yourself block. How to build a barn: detailed step-by-step instructions with a photo. Advantages and disadvantages of a foam block barn
When planning the construction of a private house or cottage, it is important to provide for the presence of such an important building as a barn in the project. During the construction of housing, the utility block will serve as a good shelter for inventory, and at the end of all work it will be able to play the role of a pantry or chicken coop or become a reliable place to store firewood. Using various building materials and original projects, it is quite possible to install such a structure on a land plot with your own hands.


Peculiarities
Dacha life begins not only with the improvement of residential premises, but also with a personal plot. Therefore, in order to provide convenient placement of things and keep the area clean, you will need a garden shed. Before building such a change house, the summer resident must decide what functions it will perform. If you plan a shed for a summer residence, which will only accommodate tools and garden tools, then you can erect a simple building without a foundation with windows and a good roof. In the same case, when the owners want to store hay in it, vegetables and fruits harvested for the winter, vehicles and keep poultry, then a more durable structure will be needed.


Since the barn will act as a separate building on the site, it will have to be registered after preparing all the necessary documents.
For the construction of utility blocks, the law provides for special standards, so they cannot be erected without obtaining permits from the sanitary and epidemiological services. In addition, it is worth considering that capital structures can obscure the beds in the neighboring area, which will lead to conflict situations. To avoid this, it is necessary to comply with the rules for placing a shed, according to which the distance from its borders to the passage and the borders from the side of the street must be at least 5 m. As for the distances within the site, outbuildings can be installed from houses not less than 3 m, other buildings - from 1 m, and from trees - 4 m.
The legislation also states that each owner of a land plot cannot infringe on the rights of neighbors. Therefore, the placement of the barn should be planned in such a way that it does not interfere with other summer residents in any way. Blocks without keeping birds and animals are recommended to be installed according to household and sanitary standards at a distance of 6 m from adjacent territories. Before registering a barn, you must also obtain permission from the fire department. To do this, representatives of the Ministry of Emergency Situations will go to the site and make an assessment of the plan and make a conclusion on the technical characteristics of the facility.
After all the documentation is in order, you can safely proceed to the construction and arrangement of the barn.


Design
Any construction begins with the design, and the installation of an economic unit is no exception. As a rule, at dachas, a change house is used not only for storing tools and things, but also serves as a separate room for a shower and a bathroom. Therefore, depending on the purpose of the barn, the owners need to provide for the installation of windows and doors in the future building. The simplest is the project of structures from boards with assembly, but there are also many options using other building materials. Before drawing up the drawings of the barn, you should decide on its size and location.

It is also important to take into account whether the construction will be capital or temporary, which will help to avoid all kinds of extensions in the future. On medium-sized plots, barn projects with a size of 2 × 3 m and a height of 2.4 m are usually chosen.
Plank structures are considered an economical option for construction; they are installed within a week and can be easily dismantled. If a permanent economic block is planned, then it is best to give preference to brick buildings. They are strong, durable, but their construction is expensive.
In addition, at the design stage, it is necessary to resolve the issue of laying the foundation. The lack of a base can lead to rapid rotting of the floors, due to which the life of the barn will decrease. If, according to the project, a cellar is placed under the barn, then the foundation must be installed. For this, a drawing of the main and underground structure is drawn up.


layout
The barn is a simple structure, so it is quite possible to build it yourself. In order for the outbuilding to harmoniously fit into the landscape design and serve as a convenient place to place things, before installing it, you need to properly think over the layout and make drawings, taking into account the following nuances:
- The building is best placed in the background of the site so that it is not visible from the main entrance to the courtyard.
- The location of the building is chosen so that it does not restrict access to other buildings.
- To protect the structure from rain and melt water, it should be erected on a hill.
- Planning options need to be considered before construction work begins. If the barn is additionally equipped with a summer kitchen, a play area or a workshop, then in this case it is advisable to make two separate entrances.
- If the utility block will only act as a place to store inventory, then it is enough to put a small collapsible shed on the site and sheathe it with siding or clapboard.
- When planning a structure, you should choose the appropriate type of roof for it. Usually it is made single or double.
- The location of the doors and the roof slope should be determined before construction, otherwise precipitation will flow directly above the entrance.


In the event that the area of \u200b\u200bthe site allows, then it is possible to build a spacious shed, the layout of which would include not only a spacious pantry, but also a shower with a bathroom. This will allow you to rationally store tools, garden tools and take a shower after working in the beds.


Kinds
Depending on the design features, the barn can be permanent or temporary. Country buildings that are planned to be used on a permanent basis, as a rule, are erected in such a way that they fit beautifully into the general appearance of the site and resemble a residential building. Such mini-houses perfectly decorate the landscape design, since the same building materials are used to decorate their walls and roofs as for the main house. The capital barn must be durable, so it is installed on the foundation. In this regard, for this type of buildings, it is important to choose the right location, because after installation it is problematic to transfer them.


The foundation for the capital barn is selected taking into account the material of its walls and the type of soil on the site. As a rule, a columnar, shallowly buried, monolithic and strip foundation can act as a reliable foundation. As for the walls, aerated concrete blocks are considered an excellent option for them, which are easy to install and are light in weight. In addition, many craftsmen use frame technologies for exterior decoration, sheathing the walls with decorated corrugated board, clapboard or siding.


If a budget barn is being built, then concrete blocks are suitable for it.
The roof of permanent structures is usually covered with ondulin. This sheet material is in great demand, as it is characterized by excellent performance properties and is available in various colors. Traditionally, these types of sheds are built with a toilet or shower.
No less popular with summer residents are modular designs that have a collapsible look. They are placed mainly in small areas or when the construction of a residential building is not completed and further planning of the territory is to be done. Temporary sheds are built as soon as possible from improvised materials. Since the design is simple, it is possible to build it yourself, without resorting to the help of specialists.


The dimensions of the block are selected depending on the number of items that are planned to be stored in it. Usually these are small sheds 2 × 2 or 3 × 3 m in size. Their design is made of a frame, choosing wood as a sheathing. This allows quick disassembly and assembly. As for the interior decoration, the walls are often left unsheathed, since the structure is designed for a short service life.


How to choose?
The main components of any suburban area is a house, a garage, a gazebo and, of course, a barn. These facilities are necessary for comfortable living outside the city, so they must be included in the plan of the territory. When the area of the site allows, then household objects are built separately, but if the place is small, then they are often combined to build a barn. In such situations, it combines at the same time a pantry, a shower room and a small toilet, options for outbuildings with a firewood shed are also possible. Therefore, the layout and design of the barn must be chosen even before construction begins.


The outbuilding should be placed in such a way that it is located behind the house, next to the boundary of the site. To hide it from neighboring views, it is recommended to mask it with vertical gardening.
You can also choose the original type of building and install it close to the house. The dimensions and appearance of the barn are chosen not only taking into account the area of \u200b\u200bthe backyard territory, but also its general design.
The simplest option for giving is considered to be ready-made utility blocks that have a prefabricated type of construction. They are a monoblock structure consisting of a metal frame. The walls of such a barn are sheathed with metal and additionally insulated. Since electrical wiring is carried out inside the building, the structure can be used as a multifunctional unit, including a place to relax, a small storage room, a shower room and a toilet. In addition, some prefabricated models have a folding canopy that allows you to install a veranda.

Ready-made sheds are considered beneficial for a summer cottage, they are quickly assembled, inexpensive and take up little space. For the installation of a container structure, it is not necessary to lay a foundation, it is enough to get by with monoblocks or a columnar base. The only thing to consider is that when buying such a model, you will have to connect internal communications: electricity and water collectors with hoses.
The installation of prefabricated structures is carried out using a truck crane. Such sheds look attractive and fit perfectly into any landscape design. In addition, they are also durable and reliable in operation, and due to their mobility, household blocks can either be sold after the construction of the house, or transferred to another convenient place.


Economical sheds built from slabs are also considered a good option for giving. For their installation, an unedged board is used. The frame is placed on a pre-prepared base. Since the structure is light in weight, a foundation is not needed for it.


To protect the building from moisture, it is placed on wide beams or wooden pallets. As for the size of the shed, it is usually made 2 × 3 m with a height of 2.5 m, the frame of the budget shed is made of timber, which is sheathed with slabs. The attractiveness of such buildings is given by a shed roof and planted climbing plants.
If the owners of the cottage want to see a more modern version of the barn on their site, then they need to choose frame structures. They are quick to install, but the main condition for their construction is the manufacture of a strong frame of their high-quality timber. The exterior decoration of such blocks can be done with siding, which over time can be easily replaced with another material. The roof is usually made single or gable, it is covered with shingles. A columnar foundation is well suited for a frame structure.

Of course, choosing a barn for a summer residence is not an easy task, but if you first calculate everything and create an individual project, then even the most nondescript hozblok will become a real decoration of the site. In addition, today there are many design ideas, thanks to which an ordinary pantry will turn into not only a place to store things, but also an excellent relaxation area.


materials
When planning the construction of a farm building, it is important to foresee its location, size and choose building materials. Brick sheds are very popular with summer residents. They are durable, practical, have a beautiful look.
They also have disadvantages:
- Not everyone can do brickwork, so often you have to use the services of specialists for construction. And this will entail additional costs.
- Expensive cost. In addition to bricks, gravel, sand and cement must also be purchased for work. In the end, the amount will be rather big.
- The need for the organization of the construction site. If the backyard area is small, then this will create certain problems and inconveniences.


In no way inferior in their performance and wooden sheds. They are quickly and easily assembled from timber; MDF, boards or OSB are used for their sheathing. The main advantage of such buildings is considered to be light weight, low cost and the possibility of installation by one's own hands. The only drawback of wooden structures is the need to constantly treat the tree with special protective agents or paint.


In order for such a structure to look beautiful on the site, it also needs to be regularly restored, and this will require additional costs.
Sometimes cellular concrete is chosen for the construction of a barn. At the same time, it is not recommended to use gas silicate, since it quickly absorbs moisture and, therefore, a structure without a high-quality finish will last a short time. Foam concrete is good for outbuildings, it is easy to install, it is inexpensive. Ordinary plaster can serve as its finishing. There are practically no minuses in the foam block.
In the event that it is planned to install a barn of light construction, then polycarbonate will be an ideal choice for this. This material is usually attached to a support frame made of timber. The frame is usually made of aluminum profiles or plastic pipes. With proper installation, the barn is assembled in a few days, all work is carried out without outside help and unnecessary financial costs.


A budget option for a country barn will also serve as corrugated board, which sheaths the structure. It has an aesthetic appearance, but in order to extend the life of the structure, you will have to worry about protecting it from moisture. With intense condensation and dampness, the “iron” will rust. In addition, it is not recommended to leave tools and other garden accessories in such a block for the winter.
If the barn is intended for temporary use, then it can be built from improvised materials. Installation in this case is carried out from everything that is at hand: old boards, profiles and slate. After the layout of the site is completed and the residential building is built, such a utility block is dismantled and a permanent facility is installed.


How to do?
The country barn is a simple design, so it is quite possible to build it yourself. The most important thing is that everything needs to be done in stages and worry about the availability of tools and materials in advance. Recently, wooden structures have been in great demand among summer residents; they can be easily installed by yourself at minimal cost.
Before starting construction, you should make a construction plan and purchase the following building materials:
- brick;
- ruberoid;
- shaped boards with a section of 150 × 50 mm;
- slate;
- logs 25 mm thick;
- staples;
- nails.


If the work is carried out by a novice master, then the following step-by-step guide will help them complete the construction:
- First of all, it is necessary to carefully prepare the site and clean it of debris and plantings. Then, in order to protect the lower part of the building from moisture, “brick chairs” are constructed, on which a layer of waterproofing material is necessarily laid and covered with a bar on top.
- The next step will be the installation of racks. Their number is determined depending on the size of the barn. When installing the racks, a step of 1.5 m is observed. In the corners, the joints are fixed with nails and the supports are fixed with temporary struts.
- Then the upper harness is prepared and the corners are fixed "to the floor of the tree." All harnesses and racks are fastened with nails at least 200 mm long. In this case, you need to pay attention to the fact that the ends of the strapping are released from the back and front of the shed by 20-30 cm. A crate is installed on the upper strapping, which is covered with roofing material and slate from above.
- Next, permanent struts and bars with a section of 50 × 50 mm are mounted. They should be placed on the corner posts diagonally. In the place where the doors will be installed, they additionally put a rack and attach a crossbar to it. The door frame is inserted into the prepared opening, after which boards are nailed to the uprights of the structure. In the event that the boards are even, then they are laid tightly to each other, unedged boards are best nailed alternately.
- The walls of the boards are covered on the outside with roofing material, this will protect them from the negative effects of the external environment. The roofing material should be nailed in such a way that its upper edges go beyond the lower ones.
- The final stage of work will be the flooring of the floorboards along the bottom trim. They also hang the door itself and attach the lock.


This instruction concerns the construction of a wooden barn for temporary use. If it is planned to install a permanent structure, then you must first lay a solid foundation, make a frame and sheathe it with any building material. For utility blocks, which will perform not only the role of a pantry, it will also be necessary to perform interior decoration.


Arrangement for the intended purpose
The garden shed has different functionality, so it can be arranged inside in different ways. The most popular type of finishing for utility blocks is clapboard cladding. It is possible to design a barn in this way if it is intended for storing shovels, firewood and other equipment, but when a shower is installed in the change house, then wooden walls will not be the best idea. To solve this problem, a plasterboard partition is first erected, which is later lined with inexpensive tiles.
An important issue in the arrangement of the barn will be the installation of all communications, including the installation of lighting. For summer residents who plan to use the building as a workshop, it is necessary to provide for the presence of spacious cabinets and shelves in it. Often in spacious sheds there is a place for storing vehicles, in this case, to facilitate entry, a concrete descent should be made near the entrance gate. In addition, the hozblok should be provided with a canopy, which will serve as an excellent place to store firewood.


Design
Recently, most urban residents are trying to spend their free time in summer cottages. Therefore, the cottage should not only be comfortable for living, but also have an appropriate appearance, emphasizing the beauty of nature. This applies to both a residential building and all outbuildings adjacent to it. If you decorate the barn in an original way, then the dusty and tool-clogged pantry will easily turn into an attractive “room”.


It is necessary to create the design of hozblokov from their placement on the site. If the area allows, it is best to build spacious facilities with a similar style and finish as a residential building.
This combination will harmoniously fit into the landscape of the backyard territory. In the case when the cottage is small, you can install neat structures, decorating their walls with weaving plants. So they will be invisible and will merge in an original way with other plantings.
The color of the barn finish should be selected depending on its size and the prevailing palette on the site. For small cottages, it is best to choose light shades, they will help to visually expand the space. In addition, decorative painting can be done on a white or pastel background of the walls, thanks to which the building will take on a fabulous look. To get the original design of the barn, it is advisable to use several types of building materials when finishing it. For example, combinations of wood, brick and metal look unusual.


Beautiful examples
- To date, there are many projects for the construction of a barn, but interesting design options are very popular with summer residents, allowing you to make something original out of an ordinary pantry. Regardless of the size and design of the adjustment, it must be ennobled with the help of climbing plants or caps with flowers. Thus, a small shed with a canopy and a woodshed will turn into a beautiful mini-greenhouse.
- Recently, most summer cottage owners prefer to replace ordinary sheds with large buildings, complemented by windows and doors. Thanks to this, a spacious and bright room is obtained, where you can not only store garden tools, but also relax comfortably. In this case, it is recommended to install windows made of plastic, and wall cladding should be done with colored corrugated board. A small office shed or library shed is also a good solution, where electrical outlets, fresh interior and smart design will allow you to enjoy coffee and read books in the morning.
In order for the summer cottage to be well-groomed and tidy, you will definitely have to work hard on it, taking care of the plants and ennobling the entire landscape. Accordingly, in the country it is extremely necessary to build a barn in which all tools, work clothes and shoes, and important garden tools will be stored.
In this case, the barn can become an extension to an existing capital building or be built on a separate, independent foundation. The choice of option depends on the area and topography of a particular site, as well as on the personal wishes of the owners.

PlasticsPlastic shed
The lightest and most mobile sheds are plastic. It takes no more than two hours to assemble them. At the same time, there is no question of pouring the foundation. However, this option is not economically most profitable, and it cannot be considered as a capital facility for year-round storage of tools.
Video - Plastic shed
With wood-polymer composite sheathing, they are practical (you can drill plates and attach hooks, light shelves), light weight and quick installation. WPC is a fairly durable material that can withstand significant loads. Such a barn will perfectly fit into the landscape of a summer cottage, and with properly equipped ventilation, it will last a very long time.

Shed made of bricks or blocks the most reliable, durable and convenient. Such a barn is not afraid of seasonal changes, precipitation of any nature, and it is not easy for intruders to penetrate into a capital structure. However, the construction of a brick shed implies a series of lengthy labor-intensive work and knowledge of building walls, pouring a monolithic foundation-slab. From the financial side, a brick building is 20-40% inferior to a frame shed, the construction of which will be discussed later.


Draw a plan of your site, mark the existing buildings, trees, footpaths. Choose a place for the shed so that it is equally convenient to get tools for work, bring and get firewood, and in the event of a sudden start of rain, you do not have to run across the entire plot to hide any garden accessories.

It is also undesirable to build a barn above the place of underground laying of sewer or water pipes, buried electrical cables and in the immediate vicinity of the outdoor toilet.

In the process of choosing a place to place a barn, draw up a plan that will indicate:

Foundation for a shed
Since the frame structure weighs relatively little, the columnar foundation for it is the most acceptable option.
Making markup

We stock up on a cord, a tape measure, sharp pegs, a hammer, a barn plan and set off to make markings.
Hammer the pegs into the ground. We stretch the cord between the stakes. We make measurements with a tape measure. The diagonals of the marked rectangle must be equal.
Laying the foundation
Step one. We dig rectangular holes for posts. For a shed 3x6 meters, the optimal quantity is 15 pcs.

Pits size:
- depth - 30 cm;
- perimeter approximately 300 x 300 mm.
If desired, you can get by with only nine columns, but in this case, you will need to lay a more massive beam of the lower trim and a floor joist.
Step two. Pour a mixture of sand and gravel into the holes. The thickness of the pillow is 10-15 cm. We spill it with water and ram.
Step three. We drive iron bars strictly vertically into the center of each hole.
Step four. We lay out the columns of bricks. For 15 columns, approximately 8 bags of mortar, 25 kg each, will be required. We check the columns for horizontality and alignment using a hydraulic level and a tape measure. If horizontal deviations are noticed, then we eliminate them with a layer of cement mortar.

Step five. When the cement dries, we plaster the posts with any mixture for outdoor use. This will protect the brick from moisture and make the foundation of the shed outwardly more aesthetic. We cover the underground part of the foundation with bituminous mastic. This will significantly extend the life of the foundation.
Step six. We fill up all the pits with brick columns with sand and carefully ram it.


For the lower strapping, you will need a beam with a section of 100 x 100 mm and boards for a subfloor 40 mm thick. If the foundation columns were built not 15, but 9, a timber 150 x 150 mm thick and a board 50 mm thick should be prepared.
Important! Before laying, we treat all wooden elements with impregnation with fire and bioprotective properties, and we lay double pieces of roofing material glued with bitumen on the posts.


We cut the beams to the required length. We cut the ends of the beams in half the thickness for joining (the “half-tree” method). We drill holes with a diameter of 20 mm and insert dowels into each connection.


You will need beams 3 meters long for the front wall and 2.2 meters for the back.

Do not forget about checking all the elements of the frame for evenness.

In total, 13 beams should be installed: 5 each for the front and rear walls and 3 for supporting the ceiling (the height of the central beams is 2.2 m).
Top harness
At this stage, it is necessary to prepare 2 beams 6 meters long. In each beam we make cuts “in half a tree” for laying on vertical beams.
We install goats, lay beams, fasten vertical and horizontal elements with metal corners and self-tapping screws.
Before laying the transverse beams (3 pieces 3 m long), we fasten the metal corners to the vertical supports. We lay transverse beams horizontally on these corners, fix the structure with self-tapping screws.


We cut the boards along the length of the barn (6 m) and fasten them to the logs with self-tapping screws. We make cuts in the appropriate places.
To begin with, we take measurements. Using a tape measure, we calculate the length of the rafters, taking into account the allowance for a canopy of 20-30 cm above the facade and the back wall of the barn.
In total, we will prepare 12 rafters from a board with a thickness of 40 mm, one of which will serve as a template for making the rest.


On the rafters we make cuts that will not allow the roof to slide down. We put each rafter in place. We screw in the screws and drive in a nail 20 cm long from above.
Roof and wind protection installation
We take boards 25x150 mm and 6 meters long, fasten them as a crate to the rafters. We fasten the board with nails, driving in 2 pcs. into each rafter. The step between the boards is 150 mm.

We insert a vertical bar between the extreme rafters and the horizontal beams of the upper trim and screw the screws obliquely for fixing.
We sheathe the parts of the rafters protruding above the walls with boards from all sides. We fasten the boards on the side and from below under the rafters to the overhangs.

As a finishing roofing, it is better to choose materials with low weight, for example, ondulin (euro slate), metal tiles or corrugated board. Together with the coating, we purchase nails with decorative caps.


We lay a layer of waterproofing on the crate, which can be roofing material. We fix it with a construction stapler.
We start laying euroslate from the lower right corner of the barn, moving in rows to the very top of the roof slope. It is very important to carefully align the first sheet of ondulin so that subsequently the entire coating does not skew. We leave the overhang of the ondulin over the boards of the batten 5-8 cm on each side of the roof. We drive nails into the crests of the euroslate exactly in the places where the boards of the crate pass.


For rough sheathing, we prepare OSB boards. We cut the necessary window and door openings, fasten the plates to the beams with self-tapping screws. At the same time, we fix the plates in such a way as to completely hide the beams of the lower trim. We screw the screws in increments of 30 cm, retreating from the edge of the plates by 10 cm. We fasten the plates at the bottom and top of the shed by screwing the screws every 10 cm.

Be sure to leave a technological gap of 3-5 mm between the plates. We make sure that the joints of adjacent plates fall on the beams.
When the barn is completely sheathed, we begin to attach the windproof membrane using a furniture stapler. We stretch adjacent canvases with an overlap of up to 15 cm.

We fasten to the walls of the barn a crate of thin rails. We put mineral wool slabs into the cells of the crate. Warming the barn will allow you not to worry about your belongings and tools left in the country for the whole winter.
On top of the mineral wool, we horizontally fasten another layer of vapor and moisture protection. The walls of the barn are ready for sheathing with wooden boards or other siding. Before attaching the siding, we vertically nail thin strips to the frame. This will provide the necessary clearance needed to ventilate the front of the barn.
Video - Wall insulation with mineral wool
From the inside, the floor of the barn should also be insulated by laying logs, a layer of waterproofing film, mineral wool and installing a fine floor covering.
Decorate the walls from the inside to your taste. Nail shelves, tool holders, equip a firewood shed. This shed will serve you for a very long time.
Video - Do-it-yourself shed for a summer residence
Every year more and more people acquire suburban areas. One of the first tasks they face is building a barn. Not a single summer resident can do without it. In order for the barn to turn out to be a reliable structure, it is necessary to correctly approach the task of its construction. The construction of the barn should be planned in advance. How to make it with your own hands and avoid mistakes - this will be discussed in this article.
Choosing a place to build a barn
Before starting the construction of such a structure as a do-it-yourself barn, it is necessary draw up a plan, which should display the location of all the outbuildings that you have built or will build in the future.
First you need to determine the place where the residential building, bathhouse will be located. Focusing on the location of these objects, you need to pick up a piece of land on your site, on which the barn will be located. Place to place this outbuilding each owner chooses in his own way.
Some have it as close to home as possible. Others approach the choice of a place for this structure more practically. They place it where the land is unsuitable for growing horticultural crops.
The location of your barn will largely depend on such factors:
- general zoning of the suburban area;
- materials that you will use to build this outbuilding.
An important point is the way it is decorated. Although the barn is mainly functional, you can decorate it if you wish, turning it into a design object that will add beauty to your summer cottage.
How diverse the sheds can be at their summer cottage can be seen if you look on the Internet and familiarize yourself with photo of original outbuildings.
If we talk about a standard barn, then this is a structure with dimensions of 2 × 3 × 2.4 m. When building it with your own hands, it is used as the main material unedged board. The roof is made single-pitched. To cover it, roofing material is used as a roofing material.
It will take you only two days to build a standard barn with your own hands. In this case, you do not have to seek outside help. You can easily cope with the construction of such a building on your own if a drawing is prepared.
If you follow the construction technology, then upon completion of the work you will receive a completely solid barn on your site. Its unsightly appearance can be changed for the better if it is slightly ennobled. Walls can be decorated in the following ways:
- Place flower pots.
- Decorate the barn walls with graffiti.
- Place around the building barn.
If not only the functional component is important to you, but also the appearance, then use brick or foam blocks. Of course, this will require a lot of money and time, but upon completion of the work, you can get a beautiful structure that will not be inferior in functionality to a standard shed made of unedged boards.
A structure built from these materials may have single pitched or double pitched roof. You can cover it with a metal sheet or slate.
If you have never built a barn for a summer residence, then it is easy to make mistakes in the process of building it. Therefore, before starting construction, it is necessary read the instruction for building a barn. The main stages of the construction of a barn made of wood and foam blocks, we will consider in detail in this article.
Do-it-yourself frame shed for a summer residence
If you want to build a cheap barn in a short time, then in this case you need to make a choice in favor of a structure being built by frame technology. The construction of such a barn will require the owner to spend money in the amount of 5-10 thousand rubles.
The work will take a maximum of two days to complete. When the barn is built, you can expect it to serve for 6-8 years.
The order of construction work:
- The construction of a frame shed begins with the fact that the chosen place is leveled. If desired, the location of the future building can be leveled with gravel.
- Next, you need to dig four pillars into the ground. They should be deepened by 60 cm. In order not to encounter the need for early replacement of the pillars, it is necessary to wrap the bottom of the pillars with roofing paper before burying them in the ground and fix them using a carpentry stapler. Such a measure will eliminate the occurrence of decay, and the structure will last longer. The pillars of the back wall should be 20 cm lower than those located in front. This will provide the slope of the barn roof.
- Then you should make the bottom strapping. For its manufacture, a bar with a section of 50 × 50 mm is used as a material. They must be attached to poles at a height of 10 cm from ground level. In order to avoid distortion during fastening, you should use the building level.
- After that, you need to make the top harness. The technology of its device is the same as when creating the bottom.
- Then the distance between the upper and lower bars must be divided in half, and then four more bars should be nailed.
- Next, you can move on to building walls. Prepared boards are nailed vertically to the lower, middle and upper bar.
- After that, you can proceed to the next stage - the construction of the roof. At an equal distance from each other, three transverse bars are attached to the bars of the upper trim. They will act as rafters. After that, you need to nail the boards to them.
- Roofing material, for example, roofing material, is laid on the rafters and they begin to move from the lower edge, moving up and leaving an overlap of five cm. To fix the roofing material, vertically located bars must be nailed. Then it remains to install a rain drain.
- Then you need to lay the floors and install the door. You can also arrange shelves for storing tools and various household supplies.
At the end of work it is possible to build a flower bed, plant ornamental plants that will decorate the outbuilding.
Construction of a beautiful barn
 The frame barn can be different. If you do not want to see a faceless structure on your site, then, by showing imagination, you can get a functional original building using readily available building materials.
However, it will take more time to build a beautiful barn with your own hands on the site. In addition, your financial costs for its construction will also increase. Need to cook right away not less than 20 000 r. The time spent on the construction of an outbuilding will also increase.
We'll have to allocate two days for the construction of the barn. However, these costs will not be in vain. With proper work, you can get a structure that will last for 20 years.
Being engaged in the construction of a beautiful barn in the country, during the work you can try yourself not only as a builder, but also become an architect for a while. How the barn will be as a result depends largely on your desire, as well as the amount of money that you are willing to spend on its construction.
Construction stages
 The construction of the utility block begins with the leveling of the prepared site. After that need to build a foundation. Since the structure is light in weight, a columnar foundation will be quite enough.
For its construction, it is necessary to dig asbestos pipes to a depth of 1.5 meters. After that they poured with concrete. For its preparation, sand, crushed stone and cement are mixed. These components are taken in a ratio of 3:4:2.
Then you need to add water and bring the concrete mixture to the consistency of sour cream. Next, you need to leave the foundation for a few days so that it grabs and gains the necessary strength.
- Prepared wooden materials that will be used in the construction of the barn must be impregnated with a special antiseptic protective agent. This will avoid decay processes, and the structure will last a long time.
- Further, you can proceed directly to the construction of an economic structure. Start with the construction of a wooden frame. The lower harness must be laid on the foundation. Bars are used for its manufacture.
- When this is done, it is necessary to arrange logs on which the floor will be laid. It can be laid immediately or dealt with at the final stage of the construction of the structure.
- Then it is necessary to fix the vertical racks to the strapping. After that, the upper trim is fixed to them, which is also arranged from the bars. It is enough just to find out the number of required support racks. Their installation is carried out at the corners of the building. They are also located in the place where the door and window openings will be.
- After that, you can proceed to the construction of the roof. A simpler task is the construction of a shed type roof. However, the outbuilding will have a more attractive appearance with a gable type roof.
- The next step is to sheathe the walls using prepared boards. Then the door and windows are installed. Then you can proceed to sheathing the barn with clapboard. Next, you can move on to the interior decoration, the arrangement of shelves.
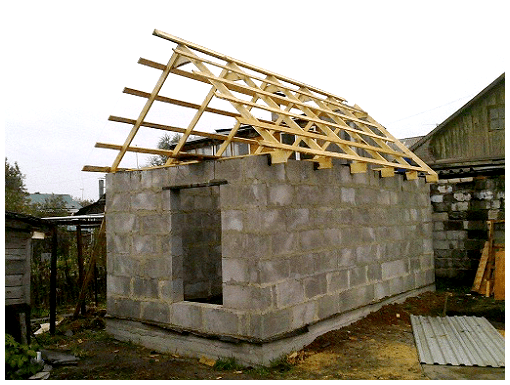
Construction of a barn from foam blocks
 Most often, when building a barn with their own hands, they use an unedged board. However, recently many have begun to build sheds, using foam blocks as the main building material.
This decision is quite justified, since such a hozblok has a long service life, and foam block is more convenient for construction.
If during the construction of the structure the construction technology is observed, then the building will serve for at least 30 years. However, if you decide to build a barn from foam blocks, then it will be difficult for you to cope with this task alone.
It is necessary to attract specialists to the construction of the outbuilding. You also need to be prepared for the fact that the construction of such a barn will require serious financial investments. Especially considering the fact that this room is residential.
Construction stages
 It all starts with pouring the foundation of the tape type. After that, on the surface of the foundation it is necessary roll out waterproofing material. The most commonly used ruberoid.
Then you can proceed to the laying of foam blocks. Used to attach them to each other cement and sand mortar. The ingredients are taken in a ratio of 1:4. When performing masonry, it is necessary to monitor the thickness of the seam, in which there should not be more than five mm.
When performing masonry work, you must first lay out the corners, and then, using the building level and plumb line, level the horizontal and vertical surfaces of the building. After that, you should raise the walls. The reinforcing belt must be made at the top and bottom.
After that, you can proceed to the construction of the roof of the hozblok. The principle of its construction is the same as in the construction of a frame shed. Next, it is necessary install windows and doors and lay the floor.
The next step is to carry out interior finishing work. The walls of the hozblok can be plastered, but this will require a serious investment of time and effort. In order not to spend a lot of time on interior decoration, you can use drywall, which is used to sheathe the wall. This will allow you to get a reliable and beautiful interior finish.
Barn at their summer cottage - necessary building. It is used to store tools, and if the area allows, then they adapt it to the workshop. If you have just acquired a summer cottage, then for you the construction of a barn is a task for the near future.
There are many options for the construction of this outbuilding. If the goal is to save money, then you should choose the economy option. If you need a building for many years, then in this case you should build a barn out of foam blocks.
The main thing is necessary choose the right place to accommodate. So that the barn does not spoil the external landscape design of your site, you need to decorate it and lay a beautiful path to it.
A flower bed near the barn will be useful. You can also plant ornamental shrubs. Plants such as lilac, viburnum or bird cherry will perfectly decorate the barn.
The very first garden building that should be present in a summer cottage is a barn, or in other words, a utility block. Its benefit lies in the fact that at the time when you are building a living space in the country, all the necessary fixtures can be stored in the barn, and when the house is built, the barn can be used as a chicken coop, pantry, storage space for firewood, etc. In order to build a shed for a summer residence with your own hands, it will not take a lot of time and money, so now we will provide you with all the necessary information so that you can make a convenient hozblok yourself.
Suitable place for a country barn
Since the shed for giving will serve you for more than a decade, it must be built in a convenient place so that the appearance of the backyard territory does not deteriorate, and it is convenient to operate this building. To begin with, it is required to draw up a complete project of all elements of the summer cottage, based on this project, it is necessary to determine the location of the barn. Some summer residents prefer a place behind a residential building so that the barn does not catch the eye of guests, the rest, on the contrary, decorate the hozblok decoratively and place it in the center of the yard for everyone to see. Therefore, the location of the barn, first of all, will depend on your preference, which is based on the type of barn, purpose, etc.
Types of sheds for summer cottages
Today it is more expedient to build the following types of sheds:
- Economy class shed from unedged boards
- Brick shed
- wooden barn
- Foam block barn
Let's briefly consider the advantages of each type.

As for the economy class shed, its main advantage is the very low cost and high speed of installation. This hozblok will serve as an exclusively temporary structure while the main housing is being built or repaired. An economical barn can be erected even without a foundation, simply by installing it on wide bars or pallets so that the bottom does not rot. The total construction time of this building is no more than two days, and the construction features are as follows:
- The optimal dimensions are: length 2 m, width 3 m, height 2.4 m.
- Roof option - shed, covered with roofing felt or roofing felt
- Production material - frame made of bars, sheathed with unedged board
- It is recommended to decorate the hozblok with climbing plants in a cough or trellis
As for the brick shed, its main advantage is durability, strength and combination with the general garden decor. The construction of a brick shed requires the construction of a strip foundation, the correct choice of the location of the building, the insulation of walls, floors and roofs, as well as the use of substantial material resources. However, if you build a shed for a summer residence with your own hands using bricks, this building will serve you for more than one year and can be used for a wide variety of purposes (like a pantry, a workshop,).

A wooden shed made of timber is one of the most popular and cost-effective options for a barn, and a foam block shed can last longer, so let's focus on how to build a foam block and wood shed, because. Recently, summer residents have been choosing between these construction options.

Building a barn for a summer residence from a foam block with your own hands
Today, such a building material as a foam block is a very popular and competitive material. Its main advantage lies in the speed of installation and high durability (at least 25 years). The disadvantage of the foam block is its high cost and the requirement for the help of a specialist in the construction of the structure.
Consider the instructions for building a barn from a foam block with your own hands:
- To begin with, we prepare the area for the future foundation: remove the debris and remove the soil layer (at least 50 cm).
- After that, we proceed to pouring the strip foundation (the finished foundation must be completely solidified for several days, if the pouring is carried out in hot weather, then we must pour the fresh foundation with water so that the solution does not dry out and crack).
- When the foundation is dry, it is necessary to lay a waterproofing material on it. It is best to use ruberoid.
- We are preparing a solution for laying foam blocks. It is necessary to use a cement-sand mortar with a ratio of 1: 4

- We proceed to the laying of foam blocks, it must be carried out from the corners, only after their construction we proceed to raising the walls. When laying the foam block, it is imperative to use a plumb line and a building level so that the structure is perfectly flat both in the horizontal and vertical planes. Don't forget to leave room for doors and windows as well.
- Let's move on to the roof. To do this, we use any of the popular roofing materials (slate, corrugated board, metal tiles). The roof structure can be either single-pitched or double-pitched, but it is better to use the latter option, because. he is more attractive.

- Approaching the final, we insert doors and windows, lay and insulate the floor.
- Well, in the end, we move on to the finishing work: we plaster the outer and inner parts of the walls (the inner part can simply be sheathed with drywall), we equip the area near the utility block and other architectural forms.

That's all, a do-it-yourself foam block barn is considered built. If necessary, we conduct an electrical network to it and enjoy our own garden building!
How to build a wooden shed
Let us first consider a simpler design of a dacha hozblok, namely the construction of an economy class barn in a summer cottage.
Instructions for creating a simple wooden shed are as follows:
- We prepare a place for the future barn (remove garbage and fill the area with gravel)

- At the corners of the planned building, we dig 4 three-meter pillars 60 cm into the soil. The lower part of future supports must be insulated from premature decay (there are a lot of insulation options on the Internet, for example, using roofing paper). The rear pillars must be made 15-20 cm lower in order to carry out the water slope.
- We carry out the lower and upper strapping of the structure with the help of bars 50 * 50 mm and the building level. Both straps should run 10 cm below/above from the top/bottom edge of the structure.

- We create another harness, in the center, between the previous two
- We sew up the structure with boards that must be nailed vertically. Be sure to create holes in the boards for doors and windows.

- We pass to the roof of the roof. To do this, we attach 3 bars to the upper harness (they will be used as rafters). The distance between the bars should be the same. Next, we sew up the rafters with boards and lay roofing material on them (letting in 5 cm between the joints). Sheets of roofing material must be fixed with the help of bars, which are nailed along the roof. Don't forget to build a rainwater drain.
- We install doors and windows, lay the floor, build a shed with internal fixtures (shelves, cabinets, etc.)
- We process the entire structure with an antiseptic that protects the barn from premature decay.
- We decorate a do-it-yourself shed for a summer residence with the help of fakes, etc.

As you can see, building an economy class barn with your own hands is not particularly difficult, the total operating time can be 4-5 hours, material costs will not exceed 1500 UAH, and the service life reaches 6 years. Simple, cheap, convenient!
Well, a more durable wooden shed for a summer residence can be built as follows:
- As in the previous version, we prepare the area for future construction

- The foundation will be columnar, for this we dig holes for supporting pillars (depth about 1.5 m), install asbestos pipes in them and use concrete mortar (2 parts of cement, 4 parts of crushed stone and 3 parts of sand) to fill the foundation. In order for the solution to freeze, it will take at least 3-4 days.
- Before erecting the wooden structure of the barn, we treat all structural elements with an antiseptic that protects the barn from rotting and insect damage.
- We are building a barn frame from wooden blocks. It is immediately recommended to make the lower harness and logs for the floor.
- We nail vertical racks to the lower harness, to which it is further necessary to nail the upper harness. The number of racks is calculated as follows: 2 for each window and door and 4 pcs. at the corners.
- We build the roof using the guide of the previous version.

- We sheathe the structure with edged boards, after which we insert doors and windows.

- Edged boards are sewn up with clapboard or using siding
- As in building an economy class barn, in the end, we create internal fixtures in the building (shelves, cabinets, etc.).

The construction of a more durable wooden shed for giving with your own hands is considered complete. This building will serve you for about 20 years, despite the fact that the material costs of building will not exceed 4000 UAH.
We will provide you with a video on how to make a wooden shed with your own hands:
Video tutorial on building a wooden shed with your own hands
The barn in the country is one of the most important buildings, often it is one of the first to be erected. It may have various purposes. At the first stages of the construction of the dacha, it serves as a shelter from the weather, and later as a place to store inventory. A do-it-yourself shed for a summer residence can be made of various designs and from different materials. However, the most simple and inexpensive to build is a wooden shed. How to build it and how to sheathe it will be described in this material.
Optimal barn dimensions
A barn in the country should be easy to build and easy to use. The easiest to build is a wooden shed, for this reason, most summer residents prefer this type. Simplicity of a design will provide its fast construction and the minimum investment of means. A handy tool shed is one that has everything close at hand, so it's important to plan it properly.

Fig.1.
The scheme of the barn is highly dependent on the purpose of its use. Depending on what and in what quantity it will be stored in it, the overall dimensions of the barn, as well as the presence of shelves and the layout of storage areas, depend.

Fig.3.

Fig.4.

Fig.5.
- garden tools(rakes, shovels, pitchforks, etc.). To store this tool, a building measuring 1.5x1.5 m is enough. You can additionally install hooks or a special stand for storing secateurs, hacksaws, etc.

Fig.6.

Fig.7.

Fig.8.
- Garden tools and accessories(fertilizer, paint, materials for greenhouses and greenhouses, etc.). For these purposes, you will need a utility block with dimensions of 1.5x2 m. It will have enough space for wide shelves where additional materials will be stored.

Fig.9.

Fig.10.

Fig.11.
- Garden tools and park equipment(lawn mower, trimmer, etc.). To store the entire set of country equipment, you need a barn 1.5 wide and 2.5 - 3 m long.

Fig.13.

Fig.14.
Barn construction scheme
The most versatile building size: width 1.5 m, length 2.5 - 3 m. It will be quite spacious, you can install several rows of shelves in it and there will be room for a lawn mower and other overall tools. Structurally, the utility block will be a rectangular building with a pitched roof.

Fig.15.

Fig.16.

Fig.17.
The easiest way to build a barn using frame technology. The frame is made of wooden blocks, and the facade can be sheathed with any material, from lining to siding. The roof can also be covered with any material, most often a profiled sheet is used for these purposes.

Fig.18.

Fig.19.
For the construction of a barn, a beam with a cross section of 80x80 mm can be used. In this case, the number of racks indicated in the drawing is sufficient. With a smaller section of the board, the number of racks must be increased.

Fig.20.

Fig.21.
A board 40x100 mm can be used for overlapping. For the flooring of the profiled sheet, it is additionally necessary to make a crate from a board with a thickness of 20 - 25 mm.

Fig.22.
Foundation for the barn
Despite the ease of construction, the foundation for the barn is necessary. It is important to note two points. If you install a building without a foundation on the soil, then the base boards will rot very quickly, even if they are pre-treated with an antiseptic. If the soil is prone to heaving and the foundation is not deepened below the freezing level, then after the winter the structure will squint and lose its original appearance.
For a wooden shed made using frame technology, three types of foundations are well suited: block, pile and monolithic slab.
- block foundation- the easiest to assemble. The foundation of this type is made of concrete blocks. Blocks are installed on a sand cushion with a step of 1 - 1.5 m around the perimeter. It is good to use such a foundation on soils with a low tendency to heaving. Otherwise, after the winter, the foundation blocks may settle, which will lead to the curvature of the building.

Fig.23.

Fig.24.

Fig.25.
- pile foundation devoid of the disadvantages of block and can be used on any soil. Piles can be used any. One of the simplest types of piles is metal pipes that are buried 1.5 m into the ground. For a wooden shed measuring 1.5 x 3 m, 6 to 8 piles are enough, depending on the thickness of the beam section at the base.

Fig.26.

Fig.27.

Fig.28.
- Monolithic slab the most versatile option. It is made from a cement-sand mortar laid on a sand cushion. For a country shed, a slab thickness of 10 cm is enough, and a sand cushion thickness of 15-20 cm. To increase the strength of the slab, reinforcement is used. A monolithic slab is easy to manufacture without special equipment in 1 day. The plate has its advantages, there is no need for flooring. The floor will be the foundation.

Fig.29.

Fig.30.
We build a barn using frame technology
The construction of a barn using frame technology is quite simple. Start by assembling the floor. To do this, install and fasten 4 bars together. The bars are connected to each other in half a tree. Fix the bars with nails or screws. If the building has a width of no more than 1.5 m, then additional cross members are not required. If the width is greater, then additional crossbars must be installed, otherwise the floor will play.

Fig.31.
Next, install vertical racks. In order for the racks to stand evenly, they are leveled and temporarily fixed to the base with scraps of boards. Racks are attached to the base with metal corners. On the installed racks fix the bars on which the rafters will be installed.

Fig.32.
After all the vertical racks are assembled, install the horizontal crossbars. They are necessary to give the structure rigidity. All elements are fastened by means of structural metal corners with self-tapping screws. At the same stage, rafters are installed, window and door openings are formed.

Fig.33.
Thus, the frame of the barn is assembled. The final stage of construction is the roofing and wall cladding. It is important to consider that if the hozblok will be sheathed with siding or profiled sheet, then its walls must first be sewn up with OSB or plywood.


")


- What was taught to women who became guards in concentration camps Torture used by the Nazis
- Singer Alex Malinovsky: biography, career, personal life, photo Let's start the story again
- Do I need to shave the testicles and how to do it right at home How to shave the eggs
- Chinese girls with small breasts
- Famous girls with small breasts
- Shoulder girdle: why you can’t sympathize with Russian truckers
- How to clean your computer from junk and speed up its work
- Wedding predictions for guests: funny and funny ideas Comic fortune-telling of a gypsy in prose
- Business on coffee grounds or how to open a mobile coffee shop on wheels?
- Congratulation of a gypsy on a woman's anniversary
- Define the concepts: choir, vocal ensemble, trio, duet, solo
- Guy's Room Design: Ideas and Examples
- General rules for drawing up a foundation plan House foundation drawings
- modern art deco bedroom small art deco bedroom
- Pansies: characteristics and photos of flowers
- Making an art deco bedroom: the choice of materials Beige art deco bedroom
- Bedroom interiors in art deco style Bedroom art deco style beige
- Young: planting and care in the open field Young planting and care in the open
- Varieties for open ground
- Pansies: cultivation and care in the open field