Additional panel on the desktop. Beautiful panel with floating desktop shortcuts
The RocketDock is a replacement for the taskbar in Windows, which is designed to quickly launch programs. The appearance of the RocketDock is similar to the Dock found on Mac computers.
Such a panel is used to quickly launch the necessary programs, or to quickly open frequently used folders. For some users, this quick launch implementation will be more convenient.
The free program RocketDock installs a kind of Dock for Windows on a computer with a Windows operating system. The RocketDock panel works in much the same way as it was implemented on Apple computers that are running the Mac OS X operating system.
In this image, you can see what the Dock looks like in Mac OS X Mountain Lion.
After installing the RocketDock program on your computer, a similar panel will appear on your computer. When you move the mouse cursor over any application that is located on the RocketDock panel, animation will be used, approximately the same as on Apple computers. When animated, app icons will increase in size.

The RocketDock program can be downloaded from the official website of the program. The RocketDock program supports plugins that increase the functionality of the panel. You can download plugins from the official page of the program by opening the “Get Addons!” tab.
download RocketDock
Install RocketDock on your computer. The application will be installed in Russian.
After the installation of the program is complete, you can launch the RocketDock program on your computer.
Change the position of the panel on the screen
By default, after launch, the RocketDock panel will be located at the top of the Desktop. To change the position of the panel on the monitor screen, you will need to right-click in the panel area. In the context menu, you will need to select the item "Position on the screen:", and then in the submenu select the desired location: "Top", "Bottom", "Left" or "Right".

You can swap the Windows Taskbar and RocketDock so they don't interfere with each other.
Moving the Windows taskbar
To transfer the Taskbar, you will first need to right-click on the free space in the Taskbar, and then click on the “Properties” item in the context menu.
In the "Taskbar and Start Menu Properties" window, in the "Taskbar" tab, in the "Position of the taskbar on the screen" settings item, you will need to select a location for the new location of the taskbar.

You can generally hide the Windows Taskbar from your computer's desktop. To do this, in the "Taskbar" tab, activate the "Auto-hide the taskbar" item, and then click on the "OK" button.
The taskbar will be reopened when you move your mouse cursor to the bottom edge of the screen (or to another part of the screen if you moved the panel to a different location) where the taskbar was previously displayed.
To unhide the Taskbar, you will need to uncheck the box next to the "Automatically Hide the Taskbar" item.
RocketDock Settings
After opening the "RocketDock panel settings" window, in the "General" tab, it will be possible to make the necessary general settings. If necessary, if you are not satisfied with the program settings you have made, you can return the default panel settings after you click on the "Default" button.
In the general settings, you can select the desired language. If necessary, you can choose to launch the program at the start of the operating system, mark already running applications in the panel, activate a running application instead of a new launch, pin icons, etc.
After making the settings, do not forget to click on the "OK" button. You can return the default program settings by clicking on the "Default" button.

In the "Icons" tab, you will be able to select options for displaying application icons that will be placed on the RocketDock. Here it will be possible to change the display quality, the method of increasing the icons, change the size of the icons, and also change the number of neighboring icons involved in the increase.
You can immediately observe all the changes made on the panel, customizing it to your needs.

The position of the panel on the desktop of the computer can be adjusted from the "Position" tab. You can also adjust the indent from the screen border, or move the panel in any direction.

In the "Style" tab, you can select a theme for displaying the panel, select a font for icon labels, and adjust the level of transparency. You can also disable icon labels here.

From the "Reaction" tab, it will be possible to adjust the effect and level of reaction to user actions. Here it will be possible to activate the item "Automatically hide the panel" so that the panel is displayed only when necessary.
After the mouse cursor is moved to the place where the panel is located, the RocketDock panel will again be displayed on the desktop of your computer.

After right-clicking on the panel, from the context menu, you can manage the program settings. In particular, it will be possible to pin icons to the RocketDock.
After completing all the settings, the RocketDock panel will look the way you need it.
How to add an icon to the RocketDock
In most cases, adding an icon to the RocketDock will suffice with drag and drop. In the context menu, the checkbox opposite the "Lock icons" item should be unchecked.
In the event that icons are not added to the panel using a simple drag and drop method, then to add an icon to the RocketDock panel, select the "Add icon:" item in the context menu. Next, in the submenu, select "File" or "Folder Path", and then in Explorer, find the application that you need to add to the panel.
After that, the program icon will be added to the RocketDock panel. Now you can quickly launch the desired program from the added icon.
After adding program shortcuts from the Desktop to the Quick Launch bar, these shortcuts can be removed so that they do not appear on the Desktop. It will be possible to hide such elements of the Desktop as "Recycle Bin" and "Computer" through the "Control Panel", from the "Personalization" section.
How to remove an icon from RocketDock
To remove an icon from the RocketDock panel, simply drag the icon out of the panel with the mouse.
Otherwise, the icon can be deleted using the context menu by selecting the "Delete icon" item in the context menu.
How to change icon in RocketDock
If you want to change the standard icon of the program to another icon, for example, loaded into the program, then you will need to do the following.
First, right-click on the panel on the icon that you want to change, and then select the "Customize icon ..." item in the context menu.
The "Customize Icon..." window will open, in which you will need to select a new icon to launch the program. Then look at the "Properties" settings of this icon.
Everything should already be set up here. The name of this program is entered in the Name field, a link to the application is added to the Target field, and a link to the folder of the corresponding program is added to the Working Folder field. Next, click on the "OK" button.
Everything, now after clicking on this new icon, exactly the program that you associated with this icon will be launched.
In this example, I chose one of the icons offered by the program, and then associated the Notepad++ program with this icon.

You can download icons from the Internet that were specially created for RocketDock or other similar programs (the icons match each other).
Article Conclusions
The freeware RocketDock creates a quick launch bar for Windows that resembles the Dock found on Mac computers.
Desktop shortcut bar. Probably, there are almost no such people who would not like the desktop of the computer to be not only convenient, but also beautiful. Personally, I like to decorate everything that is possible. It is much more pleasant to work when at least something pleases the eye.
I have such a nice and very convenient panel with shortcuts to the most necessary programs installed on my desktop. When you move the cursor over it, the icons seem to float to the fore, and increase in size. This panel is called RocketDock.
Shortcut bar on desktop. Installation

The panel is installed easily and simply. It is enough to type in the search engine the phrase " program RocketDock download”, go to the site with the program and download it to your computer. Then run the setup file and follow the installation instructions.

Your new panel will appear at the top of the desktop.
Customizing the Desktop Shortcut Bar
In order to customize your panel with shortcuts, you need to right-click on an empty space on the panel and select the item from the drop-down list. Panel setup .

A window will open Panel setup .

Customize the panel to your liking. Pay special attention to the tab Style. Open the list Subject, and choose a style that suits your desktop.

Don't forget to save your settings with the button OK .
In order to add a program icon or a folder, simply grab and drag it directly onto the panel. In the same way, you can swap icons.
The panel can be made invisible. To do this, again, right-click on the free space on the panel and check the box next to the entry Auto-hide panel . Now it will only appear when you hover your mouse over where the panel should be.
By the way, you can place it on the top, right, left or bottom of your desktop.
Now all your icons will be placed on the shortcut bar and the desktop will be clean. And the most convenient thing is that all shortcuts will be available with all open windows. Whether it's a browser window, Photoshop, Word text editor or Excel spreadsheets.
You can download animated icons from the Internet and replace uninteresting labels with them. Often on sites with the program they offer to download whole sets of such icons on various topics for free. That's how these


Use and enjoy.
The computer desktop is the main user's workplace that appears on the screen immediately after the operating system is loaded. Just like on a regular desktop, the user can place on it all the tools necessary for work, given that we are talking about computers, it would be more accurate to say programs, as well as documents, media files and everything that he may need to work.Naturally, in order to make it convenient to work at the desktop, everything you need should be placed on it in the order that is most suitable for a particular user. Therefore, it is very important to properly organize your workplace before starting work, and in our case, set up the desktop and all the tools on it.
Desktop customization
First of all, it is worth placing shortcuts to all programs and files that may be useful in your work on your desktop. Most programs automatically create a shortcut on the desktop during installation, and if not, you can create it by accessing the Start menu, which we will talk about later. If some shortcut seems superfluous to you, you can easily remove it from the desktop, and if necessary, restore it using the same Start menu. You can place shortcuts in the order convenient for you simply by dragging them around the screen while holding down the left mouse button.


But just placing shortcuts doesn't end desktop customization. In order to make the work as comfortable as possible, it makes sense to use the settings menu. To call it, just right-click anywhere on the desktop.
Using the settings menu, you can increase or decrease the size of icons on the desktop, as well as change the size of text and other elements. In addition, using the "Personalization" section, you can change the desktop design, screen saver and "wallpaper", the appearance of menus and folders. In a word, the desktop can be made not only functional, but also as attractive as possible.
At the bottom of the desktop is the so-called "Taskbar". It consists of several tools, each of which we will consider in more detail.


Start menu customization
In the left corner of the Taskbar is the "Start" button, when clicked, a menu of the same name opens. Its use simplifies access to frequently used programs, the Internet, e-mail, and so on. In addition, the Start menu gives you access to the computer control panel, in which you can configure all of its components. Just like the desktop, the Start menu can be "customized". To do this, right-click on the "Start" button and select the "Properties" section in the window that opens. Using the "Customize" button, you can change the size of the icons in this menu, set the number of programs displayed in it (from 3 to 30), select your preferred Internet browser and mail client, and also "pin" frequently used programs to the menu. After making changes, click on the "Apply" button.
Customizing the taskbar
The taskbar displays all open programs and files, as well as the icons of programs pinned to the panel for quick access to them (one click of the left mouse button). To customize the taskbar, just like to customize the Start menu, you need to right-click on it. Using the menu that opens, you can pin or remove programs from the taskbar (more on this in the next paragraph), determine the location of the taskbar on the computer screen, hide the panel in automatic mode, change the size and layout of icons, and so on.
Customizing the Quick Launch
As already mentioned, on the taskbar there is a “quick access panel”, with which you can launch the program you need as quickly as possible.In order for the quick launch bar to be displayed, you must check the box next to the corresponding item in the taskbar settings menu. To change its size (by default, 3 icons are placed in the quick launch bar), as well as to add and remove programs, the checkmark in the "Lock the taskbar" section must be unchecked. After that, the width of the panel can be changed simply by moving the limiter with the mouse, adding programs by simply dragging and dropping, and deleting them by right-clicking on their shortcut and selecting "Delete".

Clock panel customization
There is a clock in the right corner of the taskbar. To configure them, you can use the "Control Panel", which opens from the "Start" menu, or right-click on the clock and select "Set date / time". Using the menu that opens, you can set the time and date, select the time zone, and so on.
Language selection panel
Next to the clock on the taskbar is the language bar. It displays the current text input language (the first two letters). To configure the language bar, again use the right mouse button. The menu that opens will allow you to expand the language bar (it will be displayed at the top of the screen), make it transparent, change the location of the bar from horizontal to vertical. By clicking on the "Options" tab, you can select the "default" input language, add or remove languages, and also select a keyboard shortcut to change them. Naturally, after making all the changes, you must save them by clicking on the "Apply" button.
notification area
The notification area is located on the right side of the taskbar, and contains icons that inform about the current state of the computer, Internet connection, antivirus work, receiving email, and so on. Some notification icons are located in the "default" panel, others can be added (some programs do this automatically) or, if not needed, removed. To do this, as in previous cases, just click on the unnecessary symbol with the right mouse button and select the appropriate item in the menu that opens.We hope that our tips will help you make your desktop beautiful and organized, and work at your computer pleasant and comfortable.
I have never been an apple fan, but I still welcome some options and details. For example, the design of smartphones and Macbooks. Certain functions of their work. When I first happened to work on a Mac (it was a long time ago), the first thing that I remember and seemed very convenient was their desktop organization. BUT quick launch bar I still missed Windows for a long time. It took a long time before, quite by accident, I came across the RocketDock utility, which exactly repeated panel for quick launch of programs in the style of Mac OS. Since then, I have not parted with her.
Rocketdock for Windows 7
First, it is necessary download Rocketdock. It is best to do this from the official site. Install and enable the utility.
The panel will appear at the top of the window. To configure the application, click on the icon shown in the figure below.

In the window that opens, click "General" and set the following parameters.

This is the interface language "Russian" and start at system boot.
In the "Icons" I set the values as follows.

I changed the Display Quality to High. Completely eliminated transparency. And since I don’t have a lot of applications currently involved, I also set the size of the labels accordingly.
I chose the “Position” for myself at the bottom of the desktop, like on Mac OS, and so that the panel is hidden behind the windows while working.

The choice of style occurs in the application tab of the same name.

There are more than 10 types of them, and everything else can be downloaded. For icon labels (if you use them), you can use the desired font, its color and background, which is also very convenient.
We also choose the animation when hovering over the icons to your liking.

As you can see in the screenshot, I did not enable the "Auto-hide" and "Activations on top of windows" functions. If you need it, just check the box for the desired item.
How to add an icon
Everything is very simple here, you need to drag the utility shortcut from the desktop directly to the panel with the mouse. If it doesn't exist, create it. And repeat the procedure again.
Or, right-click to open the menu and mark the corresponding item.

Change Icon in RocketDock
If the user wants to change the original icon of the program to another one (for example, already loaded into it), you need to do the following:
First you need to right-click on the panel on the existing one that you want to change. Then, in the context menu, mark "Customize icon ..." The window of the same name should open, where you select another one to run the software. In its "Properties" settings, everything should already be set to default. The name of the program has been added to the "name", a link to the "object" to the application, and also to the "working folder" to the folder. After that, click "ok". Now, by clicking on such an icon, the process of launching a specific utility will begin.
The taskbar is one of the main mechanisms for managing and interacting with the system in Windows. Therefore, the comfort of your work with the OS and the computer as a whole will directly depend on its settings and the settings of those important elements that are located on it.
Task bar
To go to settings Taskbars and start menu you need to right-click on start button in the lower left corner of the screen and in the context menu that opens, select the item Properties. After that, a window will open in front of you Taskbar and Start Menu Properties, whose component settings we will consider.

By the way, access to the taskbar settings can also be obtained from Control panels by clicking on the item with the talking name Taskbar and Start Menu.
The Taskbar and Start Menu window contains three tabs: Task bar, Start Menu and Toolbars, which are responsible for setting the parameters of the corresponding Windows components.
Customizing the Taskbar and Notification Area
At the top of the tab are the settings responsible for the design and display of the taskbar.
Pin the taskbar . By checking the box in this item, you can fix the taskbar on the monitor screen in the place where it is located at the moment. In this case, it will be impossible to stretch, move or collapse. As a rule, this item is checked by default. If you want to increase the height of the taskbar (when located at the top or bottom of the screen) or its width (when located on the left or right of the screen), as well as resize the notification area and toolbar, then this item must be unchecked. After that, you can do all the above operations by dragging the borders of the desired areas with the mouse.
Automatically hide the taskbar. Activating this option will allow you to use the maximum area of the desktop when working, since the control panel will be hidden and will no longer be displayed on the screen on top of all windows. To open the panel in this mode, move the mouse cursor to the edge of the screen along which it is located.
Use small icons. This option allows you to reduce the icons of programs and open applications located on the taskbar. Thus, it is possible to achieve an expansion of the workspace and an increase in the number of displayed elements on the panel itself.
Position of the taskbar on the screen. Allows you to select from the drop-down menu the place where the panel will be placed on the screen. You have four options: Bottom, Top, Right or Left.
Taskbar buttons. At this point, you can choose how the icons of running programs and open windows will be displayed on the taskbar:
- Always group, hide labels. This mode is activated by default and allows you to expand the free space on the taskbar due to the fact that the icons of similar open applications are grouped, and the icons themselves do not have signatures of their names. For example, if you have several Explorer windows open at once, they will be grouped into one icon on the taskbar, which will be displayed as several rectangles superimposed on each other.
- Group when filling the taskbar. Unlike the previous version, this mode is more informative for the user. All icons of open applications are located on the taskbar separately and have signatures of the names of the windows in which they are running. Icon grouping occurs only when the taskbar is full and there is no free space to place new icons.
- Do not group. Grouping icons of open programs does not occur, under any circumstances.
In the middle of the Taskbar tab is the item notification area , which is responsible for setting the display of system icons and background program icons, as well as their messages in the notification area (tray).
After clicking on the Settings button, you will see a window with a list of all background and system application icons, next to which you can select their behavior in the tray from three available options:
- Show badge and notifications
- Hide icon and notifications
- Show only notifications

Below the general list of all icons are items Turning system icons on and off(Clock, Volume, Network, Power and Action Center), as well as Restoring Default Icon Behavior. You can also enable the option Always show icons and notifications on the taskbar.
And finally, in the lower area of the tab we are considering, there is an option setting Desktop PreviewusingAeroPeek. Activating this function allows, when you hover the mouse cursor over the button, Minimize all windows, produce a quick temporary view of the content desktop. At the same time, open windows are not minimized, as happens when this button is pressed, but become transparent.
Customizing the Start Menu
Let's move on to studying the next tab of the window with a telling name Start Menu. As you probably already guessed, options are located here that are responsible for setting the parameters of one of the key components of Windows system management, which is called using the button of the same name located at the very beginning of the taskbar.
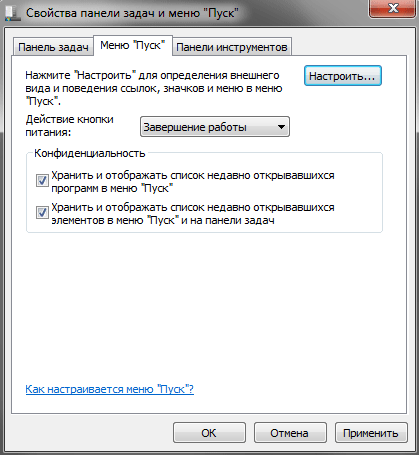
The appearance of the Start menu and the elements of which it consists, as well as the behavior of objects and icons in it, is influenced by a lot of parameters that simply would not fit on this tab. This is probably why the developers put them in a separate window that opens after pressing the button Tune. We will talk about this a little later, but for now let's return to our bookmark and consider those few parameters that are nevertheless located on it.
Power button action . Using this item, you can configure the system action that will occur after you press the physical power button located on the computer case. To do this, select any of the six options from the drop-down menu:
- Shutdown- leads to the complete closure of all programs, exiting the system and turning off the computer. This action is set by default.
- User change- causes the user to log out of the system to the account selection screen without closing running programs.
- Ending a session- causes the user to log out of the system to the account selection screen, closing all running applications.
- Computer lock- leads to blocking the system without closing running programs. The user will need to enter a password to resume work. - leads to the closing of all applications, exiting the system and restarting the computer.
- Dream- puts the computer into a low power state. At the same time, all parameters of the current session are saved, which allows you to quickly resume work in the future.
Confidentiality . This option contains two options that allow you to show or hide recently opened programs, files, or documents on the left side of the Start menu. Everything is simple here - if the checkboxes are checked, then the display is allowed, if unchecked, it is prohibited.
Now let's look at the parameters that are contained in the window Start menu customization called by the above button Tune.

This window contains quite a few settings, but there is no point in considering all of them in detail. Many items have self-explanatory names and do not need any additional comments, but we will still make a little clarification about some.
Most of the settings on the Start menu relate to displaying themed user folders and menus, including: Videos, Music, Documents, Homegroup, Games, Pictures, Personal Folder, Favorites, Recent Documents, TV Recordings and Downloads, as well as basic items management group: Administrative Tools, Run command, Computer, Control Panel, Network, Connect to, Default Programs, Help, Devices and Printers.
Depending on the menu item, several display options can be applied to it:
- Do not display this item
- Display as menu- the group will be displayed on the right side of the Start menu as a folder with an arrow that expands automatically when you hover over the mouse.
- Display as link- the element will be displayed on the right side of the Start menu as a regular link, after clicking on which, a new window will open with the contents of the folder of the same name.
Highlight recently installed programs . If this option is checked, the system in the Start menu and the All Programs group will highlight in dark yellow new (recently installed) applications and the folders that contain them.
Search other files and libraries . An item that allows you to expand the search locations for the necessary information or speed up the search process itself by disabling scanning of shared folders.
Search Control Panel Programs and Features . When this option is activated, you will be able to search for the desired objects in Control panels systems.
Large icons . Unchecking this item will reduce the icons of the most frequently launched programs, the list of which is located on the left side of the Start menu. This will increase the number of displayed applications in this list.
Allow context menu and object dragging . Activating this option allows you to call the context menu of objects in the Start menu, as well as drag them with the mouse to various work areas of the system. For example, you can drag the program icon from the Start Menu to the Desktop, or vice versa, add a link to the application to the Start menu by dragging the icon from any open window there.
In addition to the above options, at the bottom of the settings window there are two more elements with which you can adjust the size, or rather the height of the Start menu. They regulate the display of the number of positions in the lists of recently used programs and items.
Customizing Toolbars
As in previous versions of operating systems, Windows7 implements the ability to work with toolbars that serve to quickly launch program components and access resources.
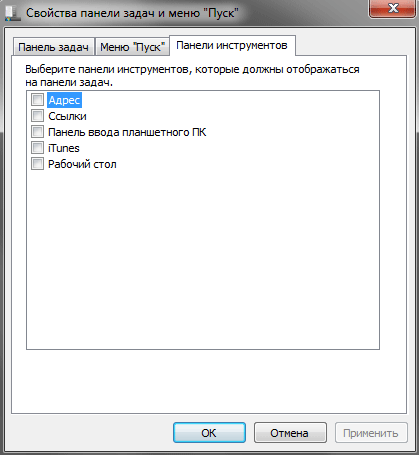
Initially, the system includes only a few standard toolbars: Address, Links, Tablet PC Input Panel and Desktop. But as new applications are installed, the list of these panels will expand. For example, in our case, you see the appearance of an additional iTunes panel.
You can also create your own toolbars. To do this, right-click on an empty space on Taskbars and in the context menu that opens, select Panels and then the command Create Dashboard in.

Controlling the display of toolbars is carried out at an intuitive level. To do this, just uncheck or check the box next to the desired panel and click the button Apply.


")


- What was taught to women who became guards in concentration camps Torture used by the Nazis
- Singer Alex Malinovsky: biography, career, personal life, photo Let's start the story again
- Do I need to shave the testicles and how to do it right at home How to shave the eggs
- Chinese girls with small breasts
- Famous girls with small breasts
- Shoulder girdle: why you can’t sympathize with Russian truckers
- How to clean your computer from junk and speed up its work
- Wedding predictions for guests: funny and funny ideas Comic fortune-telling of a gypsy in prose
- Business on coffee grounds or how to open a mobile coffee shop on wheels?
- Congratulation of a gypsy on a woman's anniversary
- Define the concepts: choir, vocal ensemble, trio, duet, solo
- Guy's Room Design: Ideas and Examples
- General rules for drawing up a foundation plan House foundation drawings
- modern art deco bedroom small art deco bedroom
- Pansies: characteristics and photos of flowers
- Making an art deco bedroom: the choice of materials Beige art deco bedroom
- Bedroom interiors in art deco style Bedroom art deco style beige
- Young: planting and care in the open field Young planting and care in the open
- Varieties for open ground
- Pansies: cultivation and care in the open field