Quick Walkthrough
Once the hero reaches level two, go to Azura's Shrine and talk to Mels Marion.
To summon Azura you will need the glowing dust that remains after killing the will-o'-the-wisps.
You will need to approach Azura's Shrine with glow dust at dawn (5-7 am) or sunset (5-7 pm).
Kill Azura's former followers who are trapped in the Devastated Mine.
Return to the Sanctuary and claim your reward.
Detailed walkthrough.
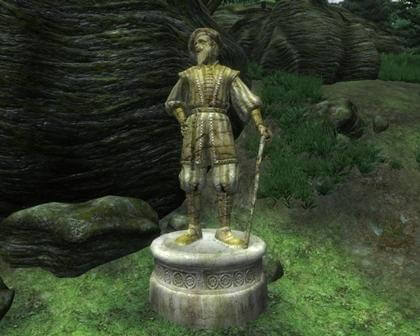
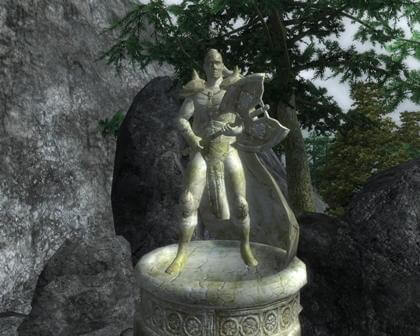
How to find Azura's Shrine.
Azura's Cyrodiil Shrine is located far north of Cheydinhal, north and slightly east of Lake Arrius, high in the Jerrol Mountains. You can go to the sanctuary along an unmarked road.
But a mark on your map can also appear due to one of the following actions:
Read the book – Modern Heretics.
Talk to Trayvon Redguard at the Cheydinhal Mages Guild about "Daedric Cults".
Talk to Ulenu Hlervu, the female court mage of Cheydinhal Castle, about “Cheydinhal”, and then about “Daedric Cults”.
Or talk to Borba Gra-Uzkash in her shop about the “Daedric Sanctuaries”, but after talking to Ulen Hlervu.
Then go to Azura's shrine and talk to one of her followers - Mels Marion, although you need to raise his attitude towards you to 50. Then he will say that you need to bring glowing dust to summon Azura, at dawn or dusk. This ingredient can be obtained from destroyed will-o'-the-wisps or purchased from one of the alchemy shops in the Imperial City Trade District.
If you complete the quest – Blood of the Daedra, then three will-o’-the-wisps will appear near Azura’s sanctuary (they are located to the south and east of the sanctuary). They are auto-leveling and not aggressive until you attack them, and they are also much easier to deal with than all the other will-o-the-wisps.
When you take out the glow dust and place it on the altar at dawn or dusk, Azura will respond:
“I saw your name, traveler, and heard whispers about it in the twilight. I ask for a favor that will bring you reward and glory. Many years ago, five of my followers killed the vampire Drathik and his relatives, but they were all infected with a disgusting creature. Knowing your fate. They locked themselves in the vampire's cave. Their suffering resonates with pain in my heart. Head to the Devastated Mine. The door will open for you. Bring eternal peace to my followers and earn my gratitude.
Hunting.
Head to the Devastated Mine, which is located very close to the shrine to the northwest. Go there, but beware of traps, look for five vampires, who are called infected relatives. Put them out of their misery. The last two vampires are behind the wall, pull the rope hanging from the ceiling and the stone will move away. You can also find on the body of the defeated Gnol Gro-Muzgol, an old and charred note telling about the sad fate of Azura's followers. Although it hints that you must take the note to Lady Azura, this is not necessary to complete the quest.
If you have problems with how to defeat vampires, then they have a 50 percent weakness to fire, so use fire magic against them.
You can also lure vampires out of the cave to Azura's sanctuary, where her followers will attack them. You can jump onto the pedestal of the statue, thereby not participating in the fight.
Azura's gratitude.
Touch the pedestal to make Azura speak to you.
- Thank you, mortal. Their souls are free and five bright candles will burn forever in memory of their sacrifice. For your service, accept this gift, and your exploits can be included in the Book of Destiny.
Notes.
One of the vampires is a sorceress who relies on the help of summoned creatures. She is also equipped with a good bow and arrows, some of which are enchanted.
You may also need feather potions, as vampires have good but heavy equipment to take with them.
It is almost one hundred percent that your hero will become infected with Crowned Hemophilia or Vampirism, so stock up on potions or a disease healing spell, or quickly head to the temple to pray if you don’t want to turn into a vampire in three days.
Devastated Mine Map.
The red circles indicate vampires, the pink trap marker, the blue one under the F value is the place where you can open the door with a rope, and the green are the treasures that can be obtained in this mine.
Quest DAAzura - Azura
Azura's Star
You can find Azura's shrine by chance by stumbling upon her statue while walking along an unmarked road in the Jerol Mountains far north of Cheydinhal, or by getting a marker on the map in one of the following ways:
- after reading the book Modern Heretics,
- talking to:
- Trayvond the Redguard in GM Cheydinhal about Daedric cults,
- Ulene Hlervu, mage of Cheydinhal Castle, first about Cheydinhal and then about Daedric shrines,
- Borba gra-Uzgash, owner of the Borba Goods store in Cheydinhal, about Daedric shrines after talking with Ulen Hlervu about Cheydinhal.
How to get the quest: approach one of Azura's followers near her statue, Mels Maryon. If necessary, raise his disposition above 50, after which he will say that you need to bring Glow Dust to Azura at dawn or dusk.
The required dust is knocked out from will-o-the-wisps; you can find it ready-made on a table in one of the basement rooms of the Bruma Mages Guild. And if you started the quest Blood of the Daedra, then three special will-o-the-wisps will appear near the Azura statue. They are non-aggressive (unless you attack them), so it will be easier to kill them than ordinary ones, which are found in abundance in the swamps of the Black Forest.
Having somehow obtained glowing dust, return to the statue of Azura and present this gift to her strictly between 5 and 7 o'clock in the morning or evening (at dawn or at dusk). Then you will hear Azura's request to put an end to the torment of her five followers, who many years ago killed the vampire Drathik and his relatives, but themselves became infected with poisoned vampire blood.
Showdown with vampires: You should head to the Gutted Mine, which is a short distance southwest of the shrine. The mine has many traps and five strong leveled vampires, the so-called. infected brothers (Afflicted Brethren). Three will be found close to the entrance, and two will be in a hidden cave behind the descending rock (you need to pull the rope with the stone). On the body of the orc vampire you will find an old faded note, asking you to take it to Lady Azura (optional). Vampires are strong and not easy to kill, but rich loot awaits you - good level armor and weapons. To make the task easier, you can try to lure the vampires into the rays of the scorching sun outside the cave, where they will quickly lose health.
Azura's gratitude: when the job is done, return to Azura to report your success and receive your reward - Azura's Star, an infinitely rechargeable soul stone with maximum capacity. Behind the statue of Azura, you will see five burning candles on the rock, in memory of her five followers.
Notes: fighting vampires, you will almost certainly contract porphyrin hemophilia, which will smoothly flow into vampirism.
Azura's Star is a very useful item, and note that there is absolutely no need to give it to Martin as a Daedric artifact; for the sake of defeating the Daedrics, it is better to sacrifice something else.
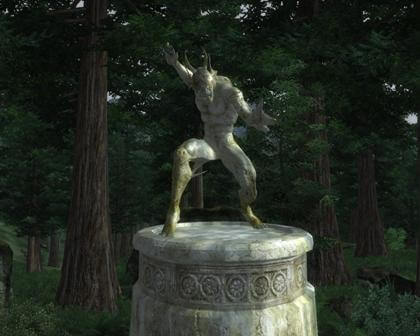
Quest DASheogorath - Sheogorath
Fame +1; Level 2 required.

Prophecy of K'Sharra
The Shrine of Sheogorath is located on the border with Elsweyr, halfway between Bravil and Leyawiin, you will have to find it without anyone's clues. To start the quest, talk to one of the followers of the Prince of Madness, Ferul Ravel, from him you will learn what kind of offering you need: a small soul stone (Lesser Soul Gem, filled or empty, it does not matter), a head of lettuce (Lettuce ) and some yarn (Yarn).
Lettuce is an alchemical ingredient and an everyday food for Cyrodiils, look for it in houses and gardens, yarn can also be found in houses, and soul stones can be found in containers or bought from merchants. Having obtained everything you need, activate the statue and listen to the speech of Sheogorath or Haskill, if you have made great progress in completing the Shivering Isles. You will be told to prank the overly superstitious villagers of Border Watch, bringing two parts of an old prophecy to life.
Once in the village, ask about the "K"sharra Prophecy" to receive a link to the village shaman, Ri"Bassa. Tell him that you are a “wandering scientist” and raise his favor above 60, then he will tell you about the “Three Signs” that should tell the local Khajiit about the end of the world.
As soon as you fulfill the first two parts of the prophecy, Sheogorath (or Haskill) will turn to you, ordering you to flee immediately to the center of the village, where he will personally deal with the latter - a rain of burning dogs will rain down on the village (the “plague of fear”). After this enchanting spectacle, you can return to the statue of Sheogorath for your reward, Wabbajack, a Daedric artifact that turns any creature (not NPCs) into some other creature for 30 seconds.
Notes: Depending on your progress in the Shivering Isles quests, you will hear different lines from Sheogorath or Haskill.
Upon completion of this quest, a special edition of The Raven Courier will be published, "Rain of Burning Dogs!" ("Rain of Burning Dogs!").
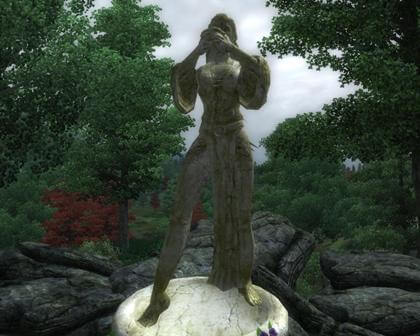
Quest DANamira - Namira
Fame +1; Level 5 required.

"You bring light into the darkness..."
The Namira Sanctuary is located southeast of Bruma, no one will tell you where it is or put marks on the map, you will have to find it yourself. Once you're there, talk to Hjolfrodi the Harrier and you'll almost certainly hear that a cutie like you has no business here. You need to become more disgusting, and then you can return to worship Namira. The idea is to temporarily lower your character's Personality attribute to 20 or less. How to achieve this:
- In the simplest case, when your charisma is 60 units or less - get drunk on cheap wine (Cheap Wine), each bottle taken reduces your charm by 10 units until you sober up (after 120 seconds), four bottles will be enough;
- If you need to reduce charm by more than 40 units, then this operation becomes problematic:
- I've read that you can drink more than four bottles of wine at a time - if you close the inventory after the fourth and open it again - but this has never happened to me;
- If your hero is an alchemist specialist (the 3rd effect of the ingredient is visible), then you can brew a potion that affects yourself with an additional negative effect of Damage Personality, for example, from Flour and Pumpkin. At the same time, do not forget to throw out the alembic cube from your inventory, which reduces the magnitude of negative effects and the duration of their action in potions, which is not required in this case. There are also other options for similar potions, the filter table is at your service. Attribute damage effects are permanent and stack, so after all this you will have to work on increasing the attribute to its normal value;
- A rich hero can afford to purchase one of two unique scrolls that reduce charm by 50 units, the Document of Purile Banter and the Chronicle of Sacrifice, and in addition get drunk on cheap wine;
- If you know the attribute reduction effect, then you can create a homemade charm reduction spell at the Magic University.
So, one way or another, you achieved your goal and have now become disgusting. Without wasting time, talk to Hjolfrodi the Hound, who is delighted with your appearance and allows you to contact Namira. After this, quickly activate the statue (this also requires reduced Charisma) and listen to Namira's speech. She asks you to travel to the Ayleid ruins of Anga, south of the sanctuary, and there rescue a group of her fanatical worshipers living in the darkness of the Forgotten from the priests of Arkay who want to bring them light. To do this, you receive the spell Namira's Shroud, which must be cast on the priests in order for the Forgotten to defeat them.
As it turns out, it is very dark in Ang, and the Forgotten are afraid of light, so it would be a good idea to use things, potions or spells with the Night-Eye effect. The ruins contain several chests and a hidden room with a leveled undead boss. Your task is to cast Namira's spell on each of the four priests roaming Anga, causing their torches to go out and the Forgotten to kill them without hindrance. Remember that you cannot attack priests and the Forgotten, otherwise you will lose your reward and will not receive the Hermaeus Mora quest in the future. When all four priests are dead, you will see a message that you need to return to the sanctuary, and there you will receive a reward - the Ring of Namira.
- Ring of Namira, Form ID: 0001C10A
- Effects: Reflect Damage - 12%, Reflect. Reflect Spell - 10%
Quest DAMeridia - Meridia

The sanctuary of Meridia, Lady of Infinite Energies and hater of the undead, is located west of the city of Skingrad, you will have to find her sanctuary without anyone's clues. To start the quest, talk to Basil Ernarde near the statue, from him you will learn that Meridia accepts tribute in the form of the remains of her enemies, the undead. This means that you should bring one of the following ingredients to the statue - Ectoplasm, Bonemeal or Mort Flesh (by the way, a puddle of ectoplasm spread on the ground right behind one of the benches of Meridia’s admirers, so you don’t you have to walk far, but this puddle is very hard to see!).
After the offering, Meridia will tell you about the necromancers entrenched behind a secret door in the depths of the Howling Cave east of Skingrad Castle. The villains are tearing up graves in search of material to create their armies of the undead, Meridia really doesn’t like this, so she demands their destruction. Prepare for a serious battle and go to the cave, where five necromancers with their undead allies are waiting for you behind a descending rock (black soul stones are often found on the bodies of these necromancers). After killing all the wicked, return to the statue of Meridia for your reward - Ring of Khajiiti, enchanted with a +10 increase in speed (Fortify Speed) and a 35% chameleon (the ring is extremely useful, it’s not worth giving it to Martin).
Note: If you have previously entered the Howling Cave and dealt with the necromancers, then the task will complete after talking with Meridia.
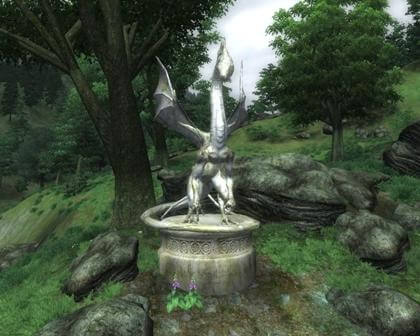
Quest DANocturnal - Nocturnal
Fame +1; Level 10 required.

The sanctuary is located near the road that runs along the right bank of the Niben from Leyawiin to the Imperial City. If you wish, you can get a mark on the map by asking Alves Uvenim from the Leyawiin Mages Guild about the "Daedra Shrines" (however before talking to her you should read Modern Heretics or talk to Ulene Hlervu about Cheydinhal).
To obtain an audience with Nocturnal, no offering will be required; you will be asked to find the Eye of Nocturnal, stolen by two Argonians from Leyawiin.
Search for thieves. Ask the Leyawiin guards (choose the Leyawiin tops rather than the Eye of Nocturnal) and you'll hear that Bejeen and Weebam-Na were recently chatting about a jewel they found that would make them rich. However, if you ask the Argonians themselves about the same (you will find them in Vibam-Na's house), it turns out that they know nothing. So, the option of eavesdropping remains. You may have to leave Vibam-Na's house and slowly return (stealth!), in any case, be very quiet, and the Argonians will begin to whisper about the matter (at the slightest rustle/knock/clanging they will fall silent again).
Tidewater Cave. From the whispers of the Argonians, you learn that the eye is hidden underwater in a cave on the shore of Topal Bay southeast of Leyawiin. In that cave live special trolls - Kalperklan and even one Azhklan, leveled and difficult to defeat (perhaps it will be easier to sneak past them). The eye itself is quite easy to find: turn left all the time, then dive under the water, and there you will not miss, because the Nocturnal eye is so large and shining that it is difficult not to notice it.
Then return to the sanctuary where Nocturnal will reward you Skeleton Key, an eternal master key that does not break and increases your character’s hacking skill by 40 units. (while it is in inventory).
Note: If you simultaneously complete the Nocturnal and Mazoga quests, then when visiting Vibam-Na's house, do not tell him that Mazoga would like to see him, because then he will leave the house and you will not have the opportunity to overhear the conversation of the Argonians and find out about the location of the Tidal Wave Cave. However, it will be possible to go to this cave and find Nocturnal's Eye there without eavesdropping on the conversation between Vibam-Na and Bejin.
To be continued...
To complete this task, your character must be at least level two. Azura's Sanctuary is located far north of Cheydenhal, north of Lake Arrius, approximately at the same latitude as Bruma, but far east of it.
To find out what kind of offering Azura requires, talk to her priest Mels Marion. He will tell you that this requires one portion of “luminous dust”, and the offering itself must be made at dawn or sunset. "Glow dust" can be obtained from will-o'-the-wisps, which can be found quite often in the southern regions of the province; they are especially visible at night.
Dawn and sunset are considered to be approximately between 5-7 pm and morning. After the offering, Azura will give the task of freeing her followers from torment. Once upon a time, while clearing a mine of vampires, they themselves became infected with vampirism, and in order not to inadvertently infect one of the random travelers, they decided to wall themselves up in the mine and to this day cannot find peace.
You need to go and simply kill them, freeing them from their torment. The "empty mine" in which the vampires are walled up is located in the southwest of the sanctuary. Azura will open the entrance there specifically for you to complete your mission. There are five Vampires in total in the mine, three in the first half of the mine, and a couple more in the far part, which is hidden by a stone.
To remove it, you need to pull the cord hanging from the ceiling of the shaft. After killing all five, head back to Azura's Shrine. The goddess will thank you by handing over a very useful artifact “Star of Azura” (hello to Morrowind!), which is actually an infinite soul stone, that is, it does not disappear after charging the item, but simply discharges.

Vaermina's Shrine is located southwest of Cheydinhall and east of the Imperial City, on the shores of Lake Poppad. Your character must be at least level 5 in order to receive a task from Vaermina. You can find out what kind of offering Vermina requires for herself by talking to her priest Aimar Duar. He will tell you that in order for Vaermina to give you a task, she needs to bring the Black Soul Stone. You can find this stone in caves where necromancers live, or you can make them yourself in places where necromancer altars are located. After you give her the offering, she will give you the next task. You need to return to her the “Ball of Vaermina,” which was stolen from her by several magicians led by the magician Arkved. Now cYou have to go to Arkved's Tower and pick up the "Vermina Ball" from him. The tower is located south of Vaermina's sanctuary. In the tower itself you will encounter quite a lot of unusual things, but in principle the paradigm will be the same, go forward destroying the monsters in front of you. Although the path branches, as a result you will still come to the Halls of Death of the Tower of Arkved, where you will find Arkved himself in an unconscious state and the “Ball of Verimina”, which the goddess is looking for. A surprise awaits you here; it turns out that you could avoid long wanderings through the labyrinths of the tower; the hatch (camouflaged by bushes) through which you exit the tower is located a few steps from the doors through which you got inside the tower. Now return to Vaermina and give her the ball. In gratitude, Vaermina will give you the "Skull of Corruption" staff. The spell that the staff casts on the attacker is that its double is called to help you for 30 seconds. At this point, the task is considered completed.
To receive a task at the Sheogorath sanctuary, your character only needs to be level two. The sanctuary itself is located between Llavin and Bravil, west of the Niben River, and also further west of the road that leads along it; in fact, the sanctuary is located right on the border with the neighboring province of Elsweyr. Don’t be surprised by the public that wanders around the sanctuary, because Sheogorath is the god of madness and, accordingly, his audience is not entirely normal. One of these comrades, who will be in a white robe, named Ferun Ravel, will tell you, albeit rather incoherently, about the offering that needs to be made to Sheogorath. The offering will consist of three components at once: yarn, a small soul stone (empty) and lettuce. All three ingredients are fairly easy to obtain. You can get yarn by rummaging through any unattended boxes, barrels or chests, and the remaining two can be bought in shops or taverns. After Sheogorath accepts your gift, he will set you a task that is somewhat more vague than it might seem at first. You have to make the residents of one village called “Border Post” (it is indeed located right on the border with Elsweyr) believe that the time for the fulfillment of their ancient prophecy has already come. Sheogorath will explain to you that the inhabitants of this village firmly believe that when certain prophecies come true, the end of the world will come. Accordingly, you are tasked with making them believe in the end of the world. Sheogorath justifies the need for this action by the fact that the inhabitants of this village live too boringly and believe in superstitions too sacredly. First of all, he advises to talk with their shaman Ri" Bassa, and after talking with him, you will then build a subsequent plan of action yourself. Go to this village, it is located south of the sanctuary, you just need to go along the border with Elsweyr to don’t miss it. It’s quite easy to find a shaman among them; he’ll be wearing a black cape. Ri Bassa will tell you about three prophecies that must come true for the end of the world to come, or rather, he’ll tell you in detail only about two of them. The first is an invasion of evil spirits (by evil spirits he means something like an invasion of rodents). The second prophecy is the sudden death of livestock for no reason (in his concept, livestock are several sheep grazing in a paddock nearby). But he won’t tell you about the third, he will only hint that it is associated with strong fear. After this, he will strongly recommend that you stop at the Border Post tavern, and in the evening come and listen to their stories around the fire, near the tavern. In reality, they don’t give you one normal hint, which makes completing this task more interesting. Go to the tavern and talk to its owner S "Tasa. She will tell you that she knows how to make excellent cheese, and it is so fragrant that you even have to put it in a box so that it does not stink too much. Also, if you talk a little more about local affairs, then you will hear one small but important detail, the smell of food cooking on a fire spreads for many hundreds of meters around. Now, having compared this information, the plan of action becomes obvious. Steal "olroy cheese" from a box not far from the bar counter (where only one piece is lying) and throw it into the pot, which is warming up on the fire. Soon you will see a flock of rats running into the village and the locals, of course, will take this phenomenon as the first prophecy coming true. Let's be consistent, so we smoothly move on to the second prophecy .Here, too, nothing clear is said, it is only clear that the sheep will have to throw back their hooves, and at first glance, without any obvious reason for this. Accordingly, simple cutting of this cattle will not work. I would like to draw your attention to the fact that after the invasion of rats, several piles of a strange substance will remain, this is rat poison. You need to carefully collect this substance and, using logical reasoning, drag it to the sheep in the barnyard. In the yard you will see their feeding trough, so sprinkle the poison there. After a while the sheep will die, and after that you will be told to go to the center of the village. The “center” refers to the area between the first and second flights of the widest staircase in the village. In the “center” you will be sharply paralyzed, and here you will see what the third prophecy should be, the fulfillment of which Sheogorath himself took upon himself. The sky will gradually turn red, and then dead dogs will begin to fall from above, or rather, while they are falling, they will still be alive, they will die when they hit the ground. Although crazy, it is quite a beautiful sight. After this, you can return to Sheogorath for your reward. He will give you an incomprehensible thing called "Wabbajak". Its effect is that it turns your opponent (non-humanoid) into a random creature for 30 seconds.

His sanctuary is located south of Chorrol and north of Skingrad, west of the Island ruins of "Elenglynn", and also not far from the sanctuary is "Fort Dirich". To complete the task, your character must be at least level 2. To find out what kind of offering Sanguine requires, talk to his priest Engorm. He will tell you that Sanguine should be presented with a bottle of Cyrodiil Brandy. Cyrodilic brandy can be purchased at a store that sells alchemical goods. Return with the bottle to Sanguine, and he will give you a rather interesting task. I will begin to explain the essence of the task from afar. Sanguine believes that Countess Llavina leads a too correct and boring lifestyle, which he doesn’t really like, so he wants you to play a little joke on the Countess and her guests at the upcoming dinner party, namely, cast a spell on the Countess and all her guests spell of "frozen reality". There is no need to look for this spell. Sanguine will give it to you himself. Go to Llavin's castle and in the throne room you will see a guard standing at the side door, if he is not there, then wait a little, he should appear there after a while. You will need to talk to him, and in the process of communication you will need to convince him to let you into the dining room with the guests; how you are dressed can significantly help; the richer the clothes, the faster he will agree to let you into the dinner party. By the way, it’s better to persuade him from 6 pm to 12 am, otherwise he may refuse to talk to you altogether. 4 guests and Countess Alessia Caro herself must gather in the hall, only then can you use the spell. A glitch may occur here, the Countess simply will not appear at the dinner party, then the problem will have to be solved using the console. In general, it is better to use the spell from a far corner, in hidden mode, wearing a Gray Fox mask, because as soon as you use the spell, you will automatically become guilty of attacking the guests. Although in fact there will be no attack, just after using the spell from all guests' clothes will disappear (including yours). As soon as all the guests and the countess are undressed, you can immediately go back to the Sanguine sanctuary for your well-deserved reward. In gratitude for organizing the draw, Sanguine will give you the “Rose of Sanguine” staff, which summons a Daedra when a spell hits an enemy. You can pick up your things that disappeared from you when you cast the “frozen reality” spell during a dinner party in a chest nearby. At this point the quest is considered completed.

Your character must be at least level 5 to receive a quest from Namira. Her sanctuary is located east of Bruma and north of the Imperial City, slightly east of the Silver Road. From the priest of Namira, Hyolfrod the Hound, you will learn that you are too pretty for a follower of Namira, after which further questioning will be useless. What is hidden under the words “too beautiful” is that you must by any means reduce your attractiveness (charm) to 20 points or less, only after that Namira will give you a task. A good way to reduce attractiveness is cheap wine, which is sold in many taverns in any city. Namira will tell you that the priests of Arkay are trying to enlighten a group of her followers called “The Forgotten,” which, of course, Namira does not want. Therefore, your task is to go to the place where the “Forgotten Ones” live, that is, to the Island ruins of Ange, find the priests of Arkay there and cast the “Shroud of Namira” spell on them so that the “Forgotten Ones” can deal with these priests. The Anges are located south of Namira's sanctuary. When you enter Ange, you can walk calmly, you will not meet any enemies here. When you see some priest in a green robe, simply cast the spell given to you by Namira on him and watch the reprisal against the priest. There are five priests in total, they walk around the ruins quite separately, so completing the task will not be difficult. Return to Namira and receive from her the “Ring of Namira” as a reward, which helps repel physical and magical attacks. At this point, the quest is considered completed.

The sanctuary of Malacath is located far north of Anvil, closer to the border with the province of Hammerfell. To find out what kind of offering Malacat requires, you will have to show remarkable eloquence when talking with the priest of Malacat Shoboba gro-Ragdush, however, if you are an orc by race, then you will not have to persuade him. The offering Malacath requires is quite easy to obtain, it is just “troll fat”. To complete Malacath's quests, your character must be at least level 10. After you bring an offering to Malacath, he will give you the following task. You need to free the ogres from the captivity of Lord Drad, who uses them as free labor in his mines. Lord Drad's estate is located a short distance southeast of the sanctuary. You can complete the task sequentially, that is, go first to the lord’s estate, and there, having again practiced your eloquence, try to talk with Lord Drad, and then with his wife about the captive ogres, with the end result of recognizing the place where the ogres are kept. But if you use elementary logic, you will easily understand where to look for ogres, especially since Malacath actually told you everything himself. A little east of Lord Drad's estate is the "Sad Cave", where the ogres work under the supervision of overseers. The cave is locked, which, however, is not very difficult to open. In the cave, at first you will meet a bunch of guards and not a single ogres, but at the far end of the cave you will find a chamber in which the ogres are kept, in another nook of the cave there is another similar one, from these two chambers you will need to release the ogres. Both cells are locked, but it is quite possible to break the locks on the cells or even steal the cell keys from the guards. As soon as you release the ogres, a fight will begin between them and the guards, which you can ignore. The main thing for you is to release all the ogres as quickly as possible, because if this matter is delayed, the guards can kill them separately, and if two groups are released almost together, then the guards will have no chance. In general, once you free the ogres, you can return to the statue of Malacath and ask for a reward. In gratitude for saving the ogres, he will give you a powerful hammer "Volendrung". The hammer is quite heavy, but its killing characteristics are quite impressive. This will complete Malacath's task.

An offering to Nocturnal's shrine is not required, but your character must be at least level 10 to receive the quest from her. The Sanctuary of Nocturnal is located almost on the road that runs along the eastern side of the Niben River from Llavin to the north, approximately midway between Llavin and Bravil. Nocturnal will tell you that two Argonians from Lyavin stole her eye. You accordingly need to find this eye and return it to Nocturnal. Ask people in Llavin about the “eye of Nocturenal” and they will tell you that they heard two Argonians Bejin and Viban-Na having some conversations about a large jewel. Go to Viban-Na's house, it is located near the inner city small lake, not far from the Zenithar Chapel. Go to the house and talk to Viban-Na, of course he will deny everything, but do not despair, leave his house and enter again, but in hidden mode. After some time, you will hear his conversation with Bejin, in which he will tell you the place where they hid the “eye of Nocturnal”. This cave is called "Tidal Wave", it is located in the extreme south, on the seashore. There is nothing special in the cave, even the opponents there are the most ordinary animals. The cave, although small, is quite branched, so you may not immediately find the “Eye of Nocturnal”. It is located underwater in one of the branches of the cave, take it and return to Nocturnal. In return, she will give you a simply irreplaceable artifact, the “Eternal Master Key.” Just keep in mind that the “security” skill when using this master key increases much more slowly.
The Shrine of Meridia is located west of Skingrad, north of the golden road. To receive the task from Meridia you need to be at least level 10. You can find out what kind of offering you need to make to Meridia so that she will give you the task from her priest Basal Hernand. He will tell you that the offering can be a piece of decomposed flesh. After the appropriate offering, Meridia will give you the next task. You will need to destroy the necromancer cult in the Howling Cave. This cave is located east of Skingrad and south of the golden tract. The first part of the cave is a mine in which you will not see anything special, but when you approach one of the rubble at the far end of the cave, the stone will move to the side, opening up the entrance to the lower tunnels of the Howling Cave. Before you go there, it’s better to prepare properly, since there you will immediately be met by a crowd of necromancers and a bunch of all sorts of undead, so the battle will not be easy. As soon as you kill all the necromancers, you will be informed that the task is completed, and you can return to the statue of Meridia for a reward. In gratitude for eliminating the necromancers, Meridia will reward you with the “Khajiit Ring”, which has quite good camouflage properties.
Your character must be at least level 10 to receive a quest from Peryite. It is difficult to determine the gender of this deity, so we will assume that he is male. His sanctuary is located east of Bravil on the banks of the Silver Fish River. When you approach the sanctuary, you will immediately notice (or your attention will be drawn to it) that Peryite’s flock is standing in a circle, but is not showing signs of life. Turn to the statue of the deity, and Peryite will tell you that when his followers tried to summon him, their souls were captured in the plane of Oblivion and are now there, unable to return. Your task is to find their souls in Oblivion and bring them back. Therefore, as soon as you are ready, Peryite will immediately send you there. For those who have not completed the main story quest, Oblivion's plan will be a wonder, although there will be nothing difficult in the task itself. Your landing site will actually be the central point among the surrounding lands. Sleeves will spread out from this place like tentacles, at the end of each of which will be the soul of a lost follower of Peryite. You can rescue them in any order, although I would recommend starting with some prominent offshoot of the island so as not to get lost and lose count when freeing the followers. Quite a large number of Daedra will patrol the entire territory of the Oblivion plane. At the end of each branch you will meet a spirit with whom you just need to try to talk to in order to return his soul. After you free all five souls, you will be informed that the gate has opened in the place where you began your journey in Oblivion and accordingly will be offered to return to the normal world. Go there and you will see a gate there, glowing in blue, which will return you back. Upon your return, talk to Perith and receive from him a "Spell Breaking" shield, which has the effect of reflecting magic quite well. At this point the task is considered completed.

The Shrine of Mephala is located northeast of the Imperial City, off the Red Road, slightly northeast of Roxy's Tavern. To complete this task, your character must be at least level 15. Talk to Mephala's priest Dredena Hlavel and you will learn that Mephala will accept a Nightshade flower from you as an offering, but only from midnight to dawn (about 5-6 in the morning). Nightshade can be found growing wild, or bought in a tavern or alchemy shop, in general, it is not that difficult to get. Come to the statue at the specified time, and the goddess will give you the next task. In one of the nearby settlements called “The Path of Sadness” you need to kill the heads of two families, but this murder must be arranged in such a way that one family suspects the murder of the other. The Path of Bleakness is located west of the sanctuary beyond the Silver Road. There you can go to the tavern to find out more detailed information about these families. They will tell you that one of the families belongs to the Nordlings, and the other to the Dunmer, and the heads of these families jointly rule the entire settlement. The head of the Nord family is called Hrol Ulfgar and he is considered an excellent warrior, excellent with an ax. The head of the Dunmer is called Nivan Dalvil, he is a good magician. Go to Hrol Ulfgar's house (although if you want, you can first go to Nivan Dalvil's house, it doesn't matter who you start with) and steal evidence that will indicate that it was he who committed the murder of Naveen Dalvil. This evidence will be the “Ring of Ulfgar”, which will lie on the table on the second floor, along with the blacksmith tools. Therefore, go to Naveen Dalvil’s house and kill him. Place the “Ring of Ulfgar” on his corpse (or rather, in the corpse) to direct suspicion towards the head of the Nordling family. Next, accordingly, look for evidence that would indicate that Navin Dalvil killed Ulfgar, this evidence is the “Dalvil Ceremonial Dagger” lying on the table not far from Dalvil’s bed. Take it and return to Ulfgar’s house, kill Ulfgar and place the “Ceremonial Dagger of Dalvil” you obtained on his corpse (in the corpse itself). After all these machinations, you now need to spread the corresponding rumor that the heads of the families killed each other. That is, just go to the tavern and ask Kirsten, the tavern owner, about one of the heads of the families, she will immediately pull out a dagger and run into the street, where an aggressive crowd has already gathered. Soon they will begin the battle, and you can safely return to the Mephala statue. Mephala, in gratitude for completing the task, will give you an “Ebony Blade”. At this point the task is considered completed.

The Khersin Sanctuary is located south of the Imperial City near the Upper Niben River, just west of it. To receive a task from Hersin, you need to be at least level 17, and also present one bear or wolf skin to his statue, his priest Vazhhira will tell you about this. Hersin's task is quite simple, you need to bring him the Unicorn horn. The unicorn lives not far southeast of the Khersin sanctuary in the Harkan Grove. The unicorn is guarded by several minotaurs; it is better to kill them one by one, since even for an experienced player they are quite strong opponents. After you eliminate them, you have the option of one ride on the Unicorn (you can only ride it once), so I advise you to immediately take screenshots for long-term memory or make a special save. Obviously, you won’t be able to peacefully get his horn; you will have to kill this noble animal by taking the horn from him. Return to Hersin with the horn and in exchange for it you will receive a “Breastplate from the Skin of the Savior” with good protection against magic.
The sanctuary of Molag Bal is located to the west of the Imperial City, to the south of Chorrol, to the north of Skingrad, next to the sanctuary to the west of it are the Snake Hole and Redguard Valley caves, to the southeast of the sanctuary is the Wooden Hand fort ". To complete this task you must reach level 17. If you find yourself at the sanctuary by chance, then you will need to talk with the priest of Molag Bal, whose name is Amir. He will tell you that first you need to make an offering to Molag Bal in the form of the skin of a Puma (Lion). Molag Bal wants you to lead the true former warrior Melus Petilius astray and gives you a weapon that will help you in this matter, the “Cursed Mace”. To begin with, he sends you to Brindle’s house so that you can scout out the situation. The house is located near the sanctuary to the southwest. You don't need to go to the house itself, just find one of the local residents who lives nearby; there are only three of them, and they usually hang out together all the time, just north of Brindle's house. Ask them about Melus Petilius and they will tell you that he is a true righteous man, and also that his wife recently died and he is very sad for her. Melus Petilius's house is next to Brindle's house, a little further to the southwest. If you watch Melus Petilius, you will notice that he goes to his wife's grave every day at about 10 o'clock. The following algorithm of actions is far from obvious, but quite logical. You need to take advantage of Melus's moral and psychological state to do your dirty deed. Place the “Cursed Mace” next to the grave and wait for Melus to come to the grave. When he approaches the grave, it’s better to save because a glitch may occur here. Now you need to hit Melus Petilius with your fist, then he should pick up the “Cursed Mace” you left from the ground and start hitting you. If this does not happen or he starts attacking you with something else, then reboot and try to somehow adjust the location of the mace or try to repeat the operation the next game day. When he starts hitting you with the “Cursed Mace”, do not resist, wait until you die, and you will find yourself at the sanctuary of Molag Bal safe and sound. Talk to the statue and receive a reward from him, this is the "Mace of Molag Bal". The mace is enchanted to drain 5 units of strength and 5 units of magic upon impact.
To complete her task, your character must be at least level 20. The Shrine of Boethiah is located far east of the Imperial City and far southeast of Cheydinhal in the Valus Mountains, east of the River Reed, near the border of Morrowind. Talk to Boethiah's priest, Haekwon, and you will learn that the offering to Boethiah requires a "Daedra Heart". The easiest way to acquire a Daedra heart is by purchasing it at an alchemy store. Return to the statue of Boethiah and give her a gift. She will then invite you to take part in her “Tournament of Ten Bloods”, where representatives of the 10 races of Tamriel meet in battle with each other. Having received your consent to participate in the tournament, Boethiah will open a portal to the plane of Oblivion, where the tournament will take place. In Oblivion you will immediately find yourself in a cage, get out of there and go to the large gate to the right. I personally don’t know how unified the tournament is, it was held by Breton, and accordingly I will describe the sequence of opponents for him. The first was a Dark Elf, whose weapon was a bow, and he had a fairly large number of all kinds of arrows in stock. The second opponent was the High Elf - a magician who fell from the bridge into the lava, so I couldn’t even find out how strong he was, it only turned out that he summons all sorts of evil spirits to help him. The third opponent was the Imperial, who also summoned some kind of evil spirits to help him, but attacked with weapons and being clad in heavy armor. The fourth was Khajiit in light armor; he did not call anyone to help him, but immediately rushed into the attack. The fifth was a Nordling in heavy armor, then an Orc in the same configuration. Next is a Redguard in light armor. The eighth was the Wood Elf, equipped in the same way as his dark brother. The last ninth was the Argonian, also attacking with a bow. Almost all of the attackers had bottles of life restoration potion with them, so don’t hesitate to search the corpses. After killing all nine, you will describe a circle and return back to the place where you started, where you will see a portal back to the world of Tamriel. Before departure, you will be specifically asked if you would like to stay longer in order to pick up the belongings of the warriors you killed. The choice is yours, when you return, go to the statue of Boethiah for your well-deserved reward. For your victory in the tournament, she will give you the “Golden Brand” sword, which has an impressive fire attack. At this point, Boeth's task is considered completed.
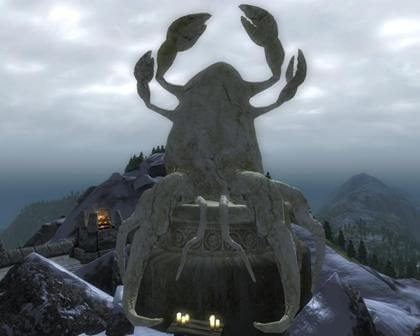
This deity is a little special and stands out from the rest in many ways. You can go to Hermous Mora only after you have completed the tasks of all the other Daedra Lords. In addition, you must be at least level 21 to receive this quest and you must have completed the Blood of the Daedra quest in the main storyline. If all these conditions are met, an imperial named Casta Flavus should appear to you in a dream and inform you that Hermous Mora is calling you. And accordingly you will need to appear at his sanctuary. His sanctuary is located high in the Jerol Mountains, far east of Bruma and about the same distance northwest of Chorrol. The best way to get there is to start from the northern gate of Bruma and immediately turn onto an inconspicuous path leading to the east, the main thing is to ensure that your path runs approximately northeast all the time. If approximately halfway along the path you begin to come across mountain bridges and various stairs, then you are on the right road. The sanctuary of Hermous Mora is located almost at the very peak of one of the mountains, right on the border with an area that can no longer be passed. The statue of Hermous Mora is represented as a body with many claws. The task Hermous Mora will give you is quite unique. He needs you to collect for him ten souls of representatives of different races of Tamriel, one from each race. That is, Bretons, Imperials, High Elves (Altmer), Dark Elves (Dunmer), Wood Elves (Bosmer), Nordlings, Redguards, Orcs, Argonians and Khajiit. To do this, he will give you a special spell “Trap of the Souls of Mora” and a special “Stone of the Souls of Hermous Mora”. You can collect the appropriate collection of souls by walking along the roads of the province and various abandoned caves, killing various robbers. The effect of the Mora Soul Trap spell is quite long, 120 seconds. This time is quite enough to deal with a random robber or marauder. I will point out one of the places where you can immediately recruit a wide range of souls of different races, this is Fort Homestead. There are a lot of robbers of different races there, so you will at least complete the plan halfway. It is located south of the Imperial City, just north of the village of Pell's Gate, familiar to you on the instructions of Clavicus Vile. After you have collected all ten souls, a corresponding entry will appear in your diary, telling you that you can return to Hermous Mora to report on the completed task. For completing this task, he will give you a book called "Ogma Infinium". The main thing is not to rush to read it, first listen to what bonuses the book gives. When you open it, you will be offered to upgrade in one of three directions: “Path of Steel”, “Path of Shadow” and “Path of the Spirit”, or, simply put, sets of bonuses for the Warrior, Thief and Mage, respectively. "Path of War" will give you an increase in the attributes of Strength and Speed +10, as well as an increase in the characteristics of Swords, Blunt Weapons and Heavy Armor +10. “Path of the Shadow” will give you +10 in Dexterity and Speed, as well as +10 in Hacking, Light Armor and Stealth. For some reason, the “Path of the Spirit” raises only one attribute by +10, which is Intelligence (but I think, for equality with other paths, it wouldn’t hurt to raise Willpower) and three characteristics Destruction, Summoning and Restoration +10. There is one more positive point in all this. Even if some of these skills have already reached 100, then the increase will be awarded +10 to 100, and if one of the characteristics is in your basic skills and also reached 100, then points that take you to the next level , will still be accrued. Therefore, it is best to read this book when all of the characteristics that you wanted to increase have already reached their limit, and your level growth has also reached the limit. Hermous Mor's quest is the final quest of the Deadr Lords.

To receive this quest, your character must be at least level 20. The statue of Clavicus Vile is located southwest of the Waterfront, one of the districts of the Imperial City, and south of the Golden Road at its very beginning. To find out about the offering that needs to be presented to Clavicus Vile, talk to his Khajiit priest Ma "Raska. The offering will be the simplest - it is only 500 septims. Immediately pay attention to the statue of Clavicus Vile, it depicts not only the god himself, but also the dog. Now , if you have the required amount of money, you can start communicating. Clavicus Vile will make a deal with you, this is how he will interpret your dialogue with him. He needs you to find for him the legendary "Umbra Sword" (hello Morrowind), and in exchange he will give you the "mask of Clavicus Vile" (again, let's be nostalgic for Morrowind). The first orientation he gives you is the settlement "Pell's Gate", which is located east of the sanctuary and almost due south of the Waterfront. As soon as you set off on the road , then you will be taken by surprise by one surprise, someone will talk to you. It turns out that this is Clavicus Vile’s hound named Barbas (just like Barbos, sorry, I couldn’t resist). If you haven’t already run too far, then, looking back, you will see that Clavicus Vile now stands alone on the pedestal. Barbas will begin to dissuade you from searching for the sword, because he believes that its owner is making a fatal mistake, without realizing it, since this sword only brings misfortune. You yourself understand that there is no way to abandon the task, because this is just a game and simply curiosity will not allow you not to find out what will happen if you do bring the sword to Clavicus Vile. Therefore, from now on, you forget about all subsequent breedings of the dog (and there will be plenty of them later), and stomp further into the “Pell Gate”. In the settlement you need to find a man named Irrok the Wide. He will tell you a sad story about his student Lenvin, who changed beyond recognition when this sword fell into her hands. He will also try to warn you against further searches for Umbra, but this, of course, will only give you energy. Irrok will also say that the last time Lenvin, that is, according to the new Umbra, seemed to be seen in the Island ruins of Vindacel, which are located west of the “Gate of Pell”, that is, actually in the middle between the “Gate of Pell” and the sanctuary of Clavicus Vile, perhaps you are even on them bumped into them along the way. Head to Vindacel to find Umbra, the ruins themselves are fairly linear so don't get lost. Umbra, in a “peaceful” way, of course, will not give you the sword, but will give you time to think, so that you go to hell, otherwise she will not vouch for herself. You obviously won’t think for a long time, take the “Umbra Sword” from the corpse and return back to Clavicus Vile (if the dog Barbas has not yet tricked you into keeping the sword for yourself). Clavicus Vile will thank you for bringing the “Umbra Sword” and will give you the promised “Clavicus Vile Mask” in exchange for it. At this point the task is considered completed. For those who do not understand the plot with Barbas’s persuasion, I can offer my version. It’s just that the dog knew about his master’s intentions, which were to replace him as a hound with a new one, and accordingly decided to change the course of events. If you do listen to Barbas, then don’t expect any reward from him, all you can do is rejoice at a good sword.
Modern Heretics: A Study of Daedra Worship in the Empire
Haderus of Gottlesfont
Daedra worship is not prohibited by the laws of Cyrodiil. This is the result of an Imperial Charter that allows mages in the Guild to summon Daedra. However, the church and society are strongly opposed to Daedric cults, and therefore those who practice Daedric rituals prefer not to do so openly.
Attitudes towards Daedra cults in other provinces may differ significantly. Even in Cyrodiil, traditional views on the subject have changed over time, and some communities continue to worship the Daedra. Everyone’s motives are different, some are inclined to worship the Daedra at the call of their souls, some are driven by a thirst for secret knowledge and power. In particular, famed Daedra artifacts are sought out by adventurers of all stripes for the benefits they bestow upon their owners.
I personally managed to discover a community of admirers of the Daedra Lord Azura, Queen of Dawn and Dusk. Those who wish to understand the basis of Daedric worship can turn to books, can go in search of Daedric shrines, can ask knowledgeable people or ask Daedric worshipers themselves. To discover Azura's Shrine, I had to use all of these methods.
I started with books. In various works there are references that give some idea about this or that cult. Thus, written sources suggest that in Cyrodiil, Daedra shrines are mostly statues of Daedra lords and are located in the wilderness, far from settlements. Each sanctuary has its own community of worshipers, often called a "coven", and rituals are performed at specific times, usually on one day of the week suitable for praying to the Daedra Lord. Daedra lords often do not deign to answer unless they consider the petitioner to be exceptionally brave or possessing sufficient strength, and the Daedra will answer only if they receive an appropriate offering [which one is usually known only to members of the sect]. In exchange for completing a certain task or providing a service, Daedra lords sometimes offer the performer artifacts of significant power.
Having found out where the statue was, I went to it and found three believers near it. Due to the prevailing prejudice in society against Daedra worshipers, they initially did not admit who they were or what they did. However, when I managed to gain their trust, they shared their secrets with me. It turned out that Azura listens to prayers at sunset or dawn, and the gift that pleases Azura is the luminous dust of a will-o'-the-wisp.
Since I am just a religious researcher and scientist, it is not in my power to find the will-o'-the-wisp and obtain its glow dust. Besides, I'm sure Azura would be unlikely to find me worthy even if I brought her such a gift. But I also have no doubt that if I could do this and if my sacrifice were accepted, Azura would give me some task, after completing which I could be awarded Azura's Star, a legendary Daedric artifact with amazing magical powers.
Since then, I have often heard that there are shrines to other Daedra in Cyrodiil, about the Daedra Lords to whom they are dedicated, and about the artifacts that an enterprising hero can receive as a reward. The legend of Hersin the Hunter mentions a powerful enchanted armor called the Hide of the Savior. The hammer called Volendrung is often associated with Malacath, the Lord of Monsters, and the Mace of Molag Bal, named after its owner, is even considered an object of worship by the Daedra themselves. Serious and persistent researchers have yet to discover the shrines and cults of other Daedra Lords in Cyrodiil.
| Blood of Daedra | |
| Job source | Martin |
| Previous | Spies |
| Next | Gateway to Broome |
| Location | Temple of the Lord of the Clouds, Shrine of Azura, Empty Mine |
| Complexity | Lightweight |
| ID | MQ08 |
Brief walkthrough
- Ask Martin about new assignments.
- Find the Shrine of Azura and take on a new quest.
- Complete Azura's instructions and receive an artifact as gratitude.
- Return to the Temple and give the artifact.
Detailed walkthrough
After talking with Martin, take the book Modern Heretics that is on the table. The book contains a description of the Azura Shrine. There you can learn how to obtain Daedric artifacts, which you then need to bring to Martin. In Cyrodiil, there are also 15 of these Daedric artifacts belonging to 15 Daederic princes and any of them will do, but remember that if you give it away, it will be lost forever. The sanctuary is located north of Lake Arrius, in the lands of the Shire of Cheydinhal. Pilgrims gathered around the statue, talking with one of them, for example with Mels Marion, you can find out Azura and how to call Azura. You may also have to raise his affection towards you. Otherwise, Mels will refuse to talk about Azura.Destroy the glowing light near the Sanctuary and bring the dust to the statue, this must be done at dawn.
Having called Azura, you will hear a new task - to go to the Desolate Mine, which is west of the Sanctuary and destroy the vampires who were once pilgrims and worshiped Azura. After completing the task, return to the statue, which will thank you by giving you the artifact. Once you receive it, return to the temple, where you will give it to the surprised Martin.
Modern heretics
id=619, picsize=1, title=Modern Heretics, type=1, winheight=, winwidth=- A book that contains a description of Azura's sanctuary.")


- Dietary standards for inflammation of the pancreas What diet for inflammation of pancreatitis
- Sugarcane, its production and use Is sugarcane cross-pollinated or not?
- Quick Walkthrough
- What is a hellish wart in minecraft for? Supplies hellish mushrooms and growths
- Unexplored secrets of the use of a wild thistle in the treatment of diseases
- How can you get rid of coal dust?
- Muscles of the foot Tissues of the dorsum of the foot
- What are hepatoprotectors and which of them have been proven effective: classification, list of the best drugs What does hepatoprotective action mean?
- Contraction of skeletal muscles
- Knee joint - anatomy and detailed structure Anatomical structure of the knee joint in children
- With an excess of somatotropin in adults there is
- Serum creatinine (with GFR determination)
- Nutrition for hepatitis C - healthy and prohibited foods
- Diet after gallbladder removal - what can and cannot be eaten?
- What does an encephalogram of the brain show?
- Amg hormone, what is it?
- What is Botkin's disease and what are its symptoms?
- What is Botkin's disease and what are its symptoms?
- Pyelonephritis: symptoms and diet treatment
- What symptoms indicate fatty liver disease, what treatment is necessary and how to treat it correctly?