Reflection of turnover in the accounting model. Reflection of turnover in the accounting model How to find the movement of goods in 1C
In the simplest and most common cases, when goods are moved, the accounting account does not change. In accounting, only subcontos are changed that reflect the location - warehouse. In this article we will look at how to move goods between warehouses, to a retail warehouse, as well as work with consignment goods.
You can find this document in the “Warehouse” section.
From warehouse to warehouse
In principle, filling out a relocation document is very simple. In the header, indicate the warehouses of the sender and recipient. It is also possible to move goods between departments.

Below, on the “Products” tab, list all moving goods and materials and their quantity. We will use the “Selection” button, although you can add products here manually.

A product selection form opened in front of us. It is very simple and convenient to work in it. The directory groups are displayed on the left side, and the items themselves with the balance in the sending warehouse are displayed on the right. In the settings on this form, we can choose to display only products with a non-zero balance. When you double-click on the line with the desired product, a window appears for entering the quantity to be moved.

All positions with their quantity that you have selected are displayed in the lower table. Once you are done with your selection, click on the “Move to Document” button.

The tabular part is filled in and the invoices are entered automatically. We will not change them. All that remains is to hold the document and see what movements it makes.

As you can see, in fact, we only changed the subaccount with the warehouse.
When adding products, we used the selection button because it is very difficult to keep in mind the exact balances of goods in warehouses. If you manually specify in the tabular section a quantity that exceeds the balance, then when you try to post such a document, the program will generate an error. Of course, you will not be able to carry it out.

See also video:
To retail warehouse
Filling out a movement document if it is carried out to or from a retail warehouse is no different from the example described above. In this case, when creating such a warehouse, you need to correctly indicate its type - “Retail store”.
The price type at our warehouse is “Retail price”, and the prices themselves are indicated in documents.

Moving consignment goods
In order to move consignment goods from warehouse to warehouse, including retail ones, use the “Goods on consignment” tab of the “Movement of Goods” document. Filling out the document is no different from the previous examples except for the tab used.

Document movements will be made according to off-balance sheet accounts. In this case - according to account 004.1.

Goods in an organization can move between any warehouses: from wholesale to retail, from wholesale to wholesale, from retail to wholesale, and so on. In 1C, movements of goods must be recorded in order to have up-to-date information about warehouse balances and conduct analytics. Let's consider how to register the movement of goods, and what nuances exist when moving goods between warehouses. To reflect the movement of goods in 1C 8.3, there is a document “Movement of goods”, which is located in the “Warehouse” menu in the section of the same name:
When you go to the section, a list of goods movements opens. To create a new move, you need to use the “Create” button:
A new movement document opens, where by default the date, document number and organization within which the goods are moved are already filled in. If you work with several organizations, then you need to choose the right one. Next, the sending warehouse and receiving warehouse are indicated in the header of the document:
This is the easiest way to move. For example, between wholesale warehouses. In this case, the account remains unchanged, only the analytics for this account change. For this operation, the sending wholesale warehouse and the receiving wholesale warehouse are indicated in the header of the document. Next, in the tabular part, the product is selected (by clicking the “Add” button), and its quantity is indicated. But the accounts of the sender and recipient remain the same:
The created document is recorded, checked and posted. In 1C, transactions for the movement of goods look like this:
As you can see, the accounting account has not changed, only the warehouse has changed.
Before moving the goods, you must check its availability at the sending warehouse. If you carry out the transfer even a second before the goods arrive at the sending warehouse, 1C will not be able to fill in the transfer amount.
This is also true when an organization uses 1C in the cloud and several people can simultaneously carry out the operation of moving the same product. When carrying out a transfer from a warehouse where there are insufficient balances of this item, this position will be reflected in accounting with a negative quantity.
Moving goods with changes in accounting accounts and prices
For example, goods are sent from a wholesale warehouse to a retail warehouse for subsequent sale to end customers. In this situation, the price of the product changes - since there is usually a markup in retail sales. You can also turn a product into a material; to do this, in the tabular part of the document you need to change the accounting account at the recipient warehouse. Let's continue with the example of sending goods to retail.
To move goods in this case, the same document “Movement of goods” is used, its header is filled out in the same way as described above. The required retail warehouse is indicated as the recipient.
But the type of prices for this warehouse is specified by the document “Setting item prices”. Thus, for each warehouse that is used in the organization, you can specify its own price type.
As a result, the goods will arrive at the retail warehouse with prices at which retail sales will be conducted in the future.
The planning and performance of not only the purchasing and sales departments, but also production as a whole depends on promptly obtaining information about the amount of inventory assets a company has. Maintaining warehouse accounting in 1C will allow you to receive up-to-date data using the necessary filters.
If a company has several warehouses, setting up warehouse accounting must begin with the introduction of two or more accounting locations. To do this, you need to find the “Warehouses” section in the “Directories” - “Goods and Services” menu.
Fig.1
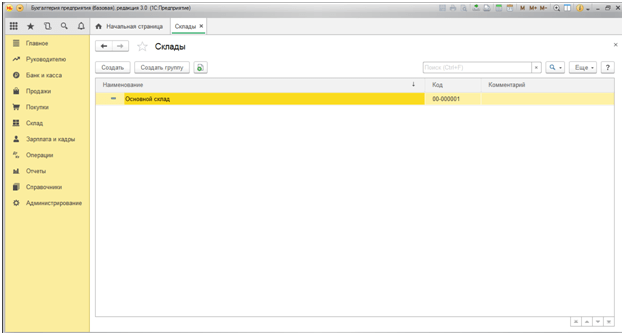
Fig.2

Fig.3
We sequentially fill in the fields of group, name, and responsible person. Similarly, we create Warehouse No. 2 indicating the name as “Retail”.

Fig.4
Thus, we formed two warehouses: No. 1 and No. 2.
For correct accounting, you must enter balances at the beginning of the year. To do this, in the “Main” menu we find the “Balance Entry Assistant” tab.

Fig.5
The balance entry assistant window opens, in which we select the balances for which account we want to enter. In our case, this is account 41 “Goods”.
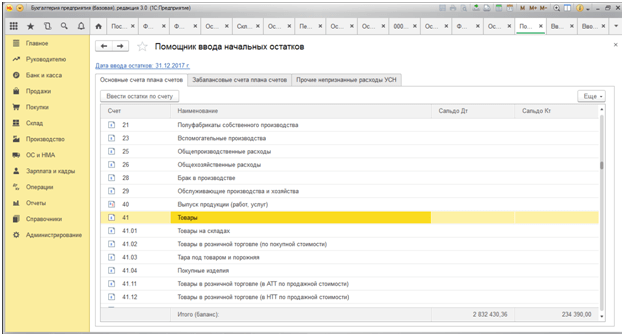
Fig.6
The document date of 12/31/2017 is set automatically, since in our settings it is set that the balances were visible on 01/01/2018 (if the document date is January 1, the amount of the balances falls into the turnover of the current year).

Fig.7
Remaining goods can be checked in the menu “Warehouse” - “Reports” - “Remaining goods”.

Fig.8
In the window that opens, set the date on which we want to check the balance and click on the “Generate” button.

Fig.9
The receipt of goods into the organization is documented in the “Purchases” section with the document “Receipts (acts, invoices)”, which is registered with the line “Warehouse”.

Fig.10
Hovering the cursor over the line “Warehouse” leads to the possibility of choosing which warehouse to receive the goods arriving on the invoice.

Fig.11
We choose Warehouse No. 1 “Wholesale”. For example, let’s fill in the name and quantity of the delivered product – “Computer included” in the amount of 80 pieces.
The most common type of movement of goods is movement from a Wholesale warehouse to a Retail warehouse (transfer from a warehouse to a store, for example). To do this, go to the “Warehouse” section and go to the “Movement of Goods” subsection. A journal for registering transferred goods opens, in which it is necessary to generate an electronic document “Movement of goods”.

Fig.12
After filling in the date of movement of the goods, fill in the “Sender” column, selecting the Wholesale warehouse, and then the “Recipient” column - in our case, this is the Retail warehouse. In the “Nomenclature” line, using the “Add” or “Selection” buttons, we will transfer 50 pieces of “Computers included” from the “Wholesale” warehouse to the “Retail” warehouse.
After completing this document, we again generate the “Remaining goods” report.
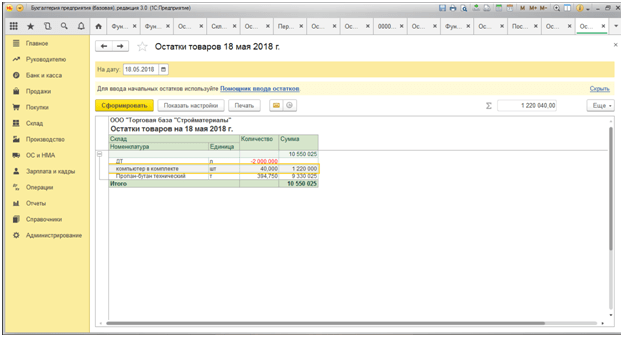
Fig.13
The 1C program for warehouse accounting simplifies as much as possible the procedure for disposing of materials and goods from the warehouse. Next, let's look at an example of writing off materials for production. The write-off of material for production is documented in the “Demand-invoice” document.
To register it, you need to go to the “Warehouse” section, then the “Warehouse” subsection, then find the line “Invoice requirements”.

Fig.14
In the window that opens, you can immediately select the warehouse from which you are going to write off materials for production. This function is active until you click the “Create” button.

Fig.15

Fig.16
When filling out the necessary details, there is a “Warehouse” line on the right, which allows you to select from which warehouse the materials are written off for production. In our example, Warehouse No. 1 is Wholesale.

Fig.17

Fig.18
Note! We specifically placed the quantity of materials in excess of the actual availability in the warehouse. The system allows you to write off materials in excess, since in the menu “Administration” - “Post documents” (Fig. 19) we have checked the box in the line “Allow write-off of inventories if there are no balances according to accounting data.”

Fig.19

Fig.20
If you uncheck this box, the program will prohibit posting a document for writing off materials. Below we will describe how the system controls negative balances.
Inventory of goods
Automation of warehouse accounting also implies electronic registration of inventory results. For this purpose, the following documents are provided in the “Inventory” section:
- Inventory of goods;
Let's take a closer look at all three documents.
We will conduct an inventory of goods in Warehouse No. 1. To do this, select the document “Inventory of goods”.

Fig.21
By clicking the “Fill” button, the document displays information on balances based on accounting data. Let us remind you that after moving the goods, we still had 40 “Computers included” in our warehouse. Let's assume that there are actually 39 computers in the warehouse. To do this, edit the “Actual quantity” column. The program automatically calculates the amount of deviation with a minus sign and highlighted in red.


Fig.23
To further reflect the inventory results in accounting, you need to post a document “Write-off of goods”.

Fig.24
In the “Inventory” line, the program allows you to select the document that served as the basis for writing off the missing item. After selecting this document, click the “Fill” button. 1C Enterprise provides for automatic transfer of data from the selected document without re-entering.

Fig.25
Here it is worth paying attention to the column “Expenses (OU)”. In accordance with the accounting policy, when carrying out this document, damage should be written off directly as expenses or not taken into tax accounting.

Fig.26
The report shows that there are 39 computers in stock.
Let’s assume that, based on the results of the inventory, we have, on the contrary, a surplus of 2 computers.

Fig.27
As when writing off goods, in the “Posting of goods” you need to select the basis document “Inventory of goods”, information from which is also automatically pulled into the new document.

Fig.28

Fig.29
In the pictures presented above, please note that according to the product range DT (Diesel fuel) there is a negative balance of 2000 liters, that is, we shipped a product that we actually did not have in stock. From this we conclude that the program did not reflect the supply of diesel fuel from our suppliers. To eliminate such moments, automated warehouse accounting is supplemented with the document “Control of negative balances,” which can be found in the “Warehouse” - “Reports” menu.


Fig.31
When control of negative balances is disabled, this report allows you to effectively and timely track the receipt and reflection in accounting of material reports of responsible persons, and also eliminates misgrading in the product range. Otherwise, the program does not allow you to post the corresponding document.
Within the “Inventory Management” interface, you can find out the balances in warehouses, as well as receipts and expenses for a certain period, as follows: select the “Warehouse” tab in the top panel, then “Goods in warehouses” in the drop-down menu. Exactly the same version of the report in the “Purchasing Management” interface, “Inventory” tab - “Goods in warehouses”. Then you need to click the “Settings” button and specify the period. To get balances at the beginning of the year in 1C, you need to enter the date the first of January in the date cell.
The shape of the table will depend on the Row Grouping options. If you select the word “hierarchy” in the “Nomenclature” line, the positions will be arranged in order: for example, first sheets, then pipes, then hardware, etc. To get a general report on balances in 1C, you should select the word “hierarchy only” - only amounts will be shown without decryption. Grouping by warehouses is done in the same way.
To obtain information only on specific warehouses or groups of inventory items, you should pay attention to “Selections”. If you select “In the list” as the comparison type, then in the “Values” column you can specify the required warehouses and item groups.
The table that the program displays within the “Goods in warehouses” contains data only on the quantity of materials. If you need to get information on costs and prices, you need to switch the interface to “accounting and tax accounting”. Here select the “Accounting” tab, “Turnover balance sheet” and in the settings specify account 10. The period, grouping parameters (details), and selections are selected in the same way. This 1C report on balances looks different; it indicates the total cost of inventory items and quantity.
Another way to view balances in 1C is to turn to ready-made program templates. They are available in any interface; to find them, you need to select the “Service”, “Additional reports and processing”, or “Custom reports” tab. There are also templates created specifically for specific tasks by the enterprise IT service or 1C specialists. For example, sometimes a report indicating the date of the last receipt of goods and materials or the warehouse number is useful.
Video on the topic
When starting to maintain accounting using the 1C: Enterprise software, you must complete the initial settings of the application and enter account balances. In this case, the working chart of accounts adopted by the accounting policy of the enterprise is compared with the chart of accounts used by 1C, after which data is entered through auxiliary account 00.
Instructions
Determine the start date for computer accounting. This may be the beginning of a month, quarter or reporting year, depending on the adopted accounting policy of the enterprise. Set a working date, i.e. date of entry of balances. It must be earlier than the accounting start date. For example, the last day of the previous reporting period.
Set the accounting results period. To do this, go to the “Service” menu, the “Options” section and select the “Accounting results” tab. The period must be selected relative to the date of entry of account balances so that they are analyzed either at the end of the period or at the beginning. Perform a full recalculation by selecting the “Manage Accounting Totals” section in the “Operations” menu.
Enter your account balances. Postings on analytical accounting objects and balance sheet accounts, as well as sub-accounts must be entered in correspondence with account 00 “Auxiliary”, and balances on off-balance sheet accounts are reflected in a simple entry indicating one account. Be careful when defining accounts in the 1C: Enterprise program, as they are slightly different in numbering from accounting accounts.
Check that account balances have been entered correctly using a standard report. To do this, go to the “Reports” menu and select “Turnover balance sheet”. You can also click the corresponding button on the toolbar. Balances have been entered correctly if the debit amount equals the credit amount. If a non-zero balance was formed in the reporting on account 00, then errors were made during entry.
These need to be corrected by running the Drill Down command, which reveals detailed information about the report parameters. To edit, click the “Open Document” button, make corrections, then close all windows except the desired report, and double-click the “Refresh” button.
Video on the topic
Before entering incoming and outgoing invoices into the database, you need to reflect in your accounting the balances in the warehouse at the beginning of its maintenance. Inventory balances must be entered on the date preceding the beginning of the period. The most convenient way for accountants to keep track of goods is in the “1C: Trade + Warehouse” program, the configuration of which allows you to fill out the “Inventory of Inventory and Materials” table using the “Remaining Inventory and Materials” report.

Instructions
Start setting up the “Inventory balances” report and call processing of the “Inventory of inventories” tabular part from the dialog. This can be done in any of two ways: using the “Inventory” button or the “Fill” button in the “Inventory of Inventory and Materials” document, selecting the “Fill from report” tab in the menu. After this, you need to fill out the table from the inventory document, which contains the “Inventory balances” report for the group of goods you need.
Select the warehouse where , and indicate a specific group of goods for which balances are checked. Keep in mind that you can select products based on their properties. In addition, using a multiple filter, it is possible to create a custom list of products.
In the “Remainings” filter, set the “All non-zero” option in the “Including reserve” attribute. This is done so that the inventory takes into account real balances and not reserved goods. Use the convenient switch in the “Prices” tab - “Average cost excluding VAT”. This will make your task easier. However, if the inventory is carried out in a retail warehouse, the position should be set as “Selling price (only)”, because in such a warehouse it is carried out at the same retail prices at which the goods are recorded in the retail warehouse.
Click the "Inventory" button when you have completed all the required settings. The “Inventory of Inventory and Materials” document you need will be automatically generated. If you have selected a wholesale warehouse, the generated document will be set to the “Inventory (by warehouse)” type. If you specified a retail warehouse, then the type will be indicated “Inventory (by )”. The table in the document will contain the balances of goods in accordance with the settings that you set in the “Inventory balances” report.
Enter into “Inventory” all the actual data on the goods in the warehouse. Next, fill out the documents “Write-off of goods and materials” or “Capitalization of goods and materials”, depending on whether you need to reflect the shortage or enter a surplus of goods.
Video on the topic
Sources:
- remaining stock in 2019
1C today is a popular program in an enterprise, commercial organization or company. This is a comprehensive, convenient solution for organizing personnel, financial, accounting and material records. “1C: Trade Management” makes it possible to control and record absolutely all purchase and sale transactions in an enterprise. However, not all accountants initially know how to transfer balances to 1C at the beginning of the year.

You will need
- - PC;
- - “1C: Trade Management.”
Instructions
Purchase and install the “1C: Trade Management” program and enter all your data into it. If “1C: Trade Management” is already available and in use, just launch it on your computer. To do this, just click on the corresponding shortcut on the desktop.
Open the desired database in 1C: Trade Management. Go to the “Documents” menu to enter balances. Then go to “Sales” by selecting the appropriate tab. Select the "Debt Adjustment" option.
In addition to the above method, you can open a document to enter balances using the following transition: “Documents” - item “Purchases” - “Debt adjustment”.
Look at the document log that appears in front of you. Click on the “Add” button in the window and wait until a new document is created. Select the counterparty you need in the “Counterparty” field.
Enter the required number of contracts in the tabular part of the document, as well as the currency and debt amount in the corresponding field. Click on the “Add” button. Such actions will allow you to add this row to your tabular section.
Find the column “Increase in debt” and enter in it the amount of the counterparty’s debt to the company. Click the "OK" button and enter the product balances as of the beginning of the year. To do this, set the working date in 1C before starting to enter balances for the last month that precedes the start of the accounting period. In our case it is December.
Select “Tools” – “Options” from the menu. Enter the desired date and save the information by clicking “OK”.
Create a “Goods Receipt” document to enter all remaining goods in warehouses. To do this, you must perform the following steps.
Go to the “Documents” menu, select “Inventory (warehouse)”. Go to the item “Positioning of goods”. Click the Add button.
Select the “Base” field and enter “Enter initial balances”, then the “Prices and currency” item and in it select the “Purchase” price type. Click on the “Selection” button and check the boxes next to the “Quantity”, “Price”, “Characteristics” fields.
Select the required element and specify the parameters. Add all products. Exit the item window by clicking the “OK” button.
Video on the topic
Sources:
- rent 1C
Before entering expense and receipt invoices into the database, it is necessary to reflect the current balances in the warehouse in accounting. Inventory balances are entered on the date that precedes the start date of the period.

Instructions
Run the report in the 1C: Trade + Warehouse program, called “Inventory balances”. Having started its construction, you will use dialog boxes to call up the processing of the “Inventory of goods and materials” table. You can do this in two ways: by clicking on the “Inventory” button or using the “Fill” button in the document called “Inventory of Inventory”. Select the Fill from Report tab from the menu. Next, fill out the tabular part of the inventory document containing a report called “Inventory balances” for your product group.
Determine the warehouse where the inventory is carried out. In addition, you should indicate the group of goods you need for which you will create balances. Please note that you can select products by their properties, and by using a multiple filter, you can create a list of products at random.
Set the value “All non-zero” in the “Remainings” filter, which is located in the characteristic called “Including reserve”. Then the inventory will take into account all real balances, excluding reserved goods. For your convenience, you can use a special switch, which is located in the “Prices” tab and is called “Average cost without VAT”. This will make it easier for you to complete the task at hand. Keep in mind that if goods are being inventoried in a retail warehouse, you need to set the position “Sales price (only
To display account balances in 1C, you need to create a balance sheet and select the necessary settings. This is the period for which you need to show the turnover, account or subaccount number, and detail parameters. In “selection” you can specify warehouses, product groups or other limiting factors. For example, to generate balances for account 10 “Materials”, in this tab you should select the required warehouses “in the list” or one desired warehouse “equals”.
Sometimes it is convenient to display only general data on an account in 1C; in this case, in the settings you need to select “Hierarchy” or “Hierarchy only”. In the first case, materials grouped by item groups “Black sheet”, “Stainless sheet”, “Circles”, etc. will be displayed, and in the second - only the total amounts for these groups. When transferring the table to Excel or a similar program, it is important to take into account that the sums for the elements add up to the sums for the subgroups, and they are all indicated in one column - therefore, when setting the “Total Amount” formula, the program will simply double the total amount.
The “Purchasing Management” or “Inventory Management” interfaces also allow you to display account balances, but only the quantity will be indicated in the table (the “Goods in Warehouses” report). If you create the actual purchases for a certain period, the number of 10 materials received to the account will be displayed, indicating the price. It is important that here the cost will include VAT, while in the turnover account 10 the total cost is indicated without VAT.
It is convenient to use the “Quick Selection” functions to find the positions you need. For example, by selecting the desired department or warehouse, you can quickly display all balances for a certain period. If you need to find out about the availability of certain items in the warehouse or the movement of certain items, you need to make a selection in the “Nomenclature” cell. To do this, set the parameter “in the list” or “equal to”, then click “…” in the selection field. Here, select the material, sequentially “traveling” through the menu, or write in the “contains” field known information - steel grade, standard size, marking, etc. For the list to be formed, you must click the “hierarchical viewing” button at the top of the window. Having selected the desired element, generate a report on it - balances at the beginning and end of the period, movement.
From an accounting point of view, moving goods between warehouses is only a change in the value of the subconto (analytics). The goods must remain in the same accounting account (for example, 41.01) and at the same price (cost). Let's look at step-by-step instructions on how to move goods in 1C 8.3.
Everything described below is true not only for goods, but also for materials, semi-finished products, finished products and other goods and materials.
The movement can be completed using a document of the same name, which is located in the “Warehouse” menu:
The document header is simply filled out:

In 1C Accounting 8.3, movement of goods is possible in three options:
- between warehouses;
- transfer to retail trade;
- (on off-balance sheet accounts);
- movement of return goods.
Let's look at each of them in more detail.
Between warehouses and retail
The simplest and most common way. To do this, on the “Products” tab, you need to fill in the quantity of goods for transfer and:
Get 267 video lessons on 1C for free:

Please note that if you transfer goods that are not in the warehouse/organization/on the accounting account, then “minuses” will be included in the accounting. It is important to check which account and warehouse the goods are currently in.
Let's look at the postings that generated the document on the movement of goods:

As you can see, in all postings, only the second sub-contact – “warehouse” – has changed.
You can also see that the first two entries have a filled “Amount” (the transfer price was formed at cost), but the third does not. This example clearly shows what will happen if you move a product that is not in stock.
Transfer of goods to retail
In order to make a transfer to a retail store or NTT, just select the desired retail warehouse in the “Recipient” field in the document header.
Returns from retail to a wholesale warehouse in 1C occur according to the same scheme; naturally, the warehouses are swapped.
The prices at which the goods will be sold at a retail outlet are indicated using the document ““. The retail price type is set individually for the warehouse:


")


- KUDiR: filling samples
- 1s 8.3 zup personal income tax calculation. Changes in the calculation of personal income tax due to changes in the Russian Tax Code
- Put the sentences in the present continuous tense
- Linear equations. Types of linear equations. Linear equations with one and two variables, linear inequalities How to understand a linear equation with two variables
- The Comprehensive Guide (2019)
- Who discovered the number Pi? History of computing. What is the number “Pi”, or how do mathematicians swear? The meaning of pi in physics
- Part C1 tasks (2 points) What types of environmental factors contribute to the regulation of wolves
- What environmental factors contribute to the regulation of wolf numbers? What is the role of bacteria in the cycle of substances?
- Anania Shirakatsi on a global scale
- Beginning of a commander's career
- Peter II - biography, information, personal life
- Constant change in the value of the same values
- Reflection of turnover in the accounting model How to find the movement of goods in 1C
- reasons and stages of transition from batch accounting system
- Deductions from employee salaries in 1C
- Reflection of turnover in the 1s 8 accounting model
- 1s 8.3 personal income tax payment register. Setting up payroll accounting
- Adjustment entry (reversal)
- 1s unitary unit complete set of nomenclature
- Register of personal income tax payment in 1s 8