The personal income tax payment register in 1s 8.3 is empty. Setting up payroll accounting
Transfer of personal income tax to the budget in 1C ZUP
In this article we will consider the issue of accounting for personal income tax, as well as the execution of transactions for transferring this tax to the budget in the configuration Salary and personnel management 3.1. According to the law, the current amount of this tax is 13% of the total accrual amount minus deductions. The most common are deductions for children, property deductions and others. Deductions are applied as follows - they are deducted from the tax base of an employee of the organization before personal income tax is calculated and withheld. Personal income tax individuals are withheld from almost all income, such as wages, vacation pay, financial assistance and others.
Let's move on to processing operations in the program. Select the “Salary” section and then the “Salary and contributions calculation” item. We create a document, select the month for which the accrual will occur, and select the organization. Next, fill in the data on the “Accruals” tab. For convenience, this can be done by clicking the “Fill” button, but you can also select employees one by one. After which the tabular part will be filled out and the personal income tax will be calculated for each employee on the “personal income tax” tab.
If there are deductions for any employees, the tax amounts will be determined taking into account these deductions. After that, all that remains is to post the accrual document, as a result of which tax will be withheld and the data will be included in the tax accounting register.
Next, the salary slip is registered. This can be a statement to the cashier or bank, if the organization uses, for example, a payroll project, or statements to accounts. As a rule, the deduction and transfer of personal income tax occurs at the same time. There is a corresponding setting in the document for this purpose.
Let’s go to the “Payments” section and select the “Statements to the cashier” item. Let's create a new document and fill it out. To see whether personal income tax is transferred along with your salary or not, you need to click on the link “Payment of wages and personal income tax transfer”.

If necessary, click the “Print” button to generate a printed form “Register of transferred personal income tax amounts.” If personal income tax is not transferred in full or the date of transfer does not coincide with the date of salary payment, you must uncheck the “Tax is transferred along with salary” checkbox.
After which the link “Enter personal income tax transfer data” will appear. Click and you will be taken to the document list form “Transfer of personal income tax to the budget.” Here it is necessary to reflect a new document on the transfer of personal income tax to the budget, as a result of which it will be reflected in the accounting registers. In addition, the document will create a register of tax amounts that were paid by employees of the organization. This will allow you to assess whether personal income tax amounts have been calculated and distributed correctly.
The completed document will look like this:

All that remains is to carry it out and also, if necessary, create a “Register of transferred personal income tax amounts.”

If an exchange with accounting is configured, then this document can be reloaded and after that the corresponding transactions will be created in it. There are also various external processing that allow you to transfer personal income tax with the distribution of amounts among employees.
If you still have questions about working with printing price tags and labels in 1C 8.3 Trade Management, we will be happy to answer them as part of a free consultation.
Error: 1C:Accounting 8.3 (edition 3.0) does not see personal income tax transferred to the budget
2015-07-13T13:42:11+00:00For many who have switched to 1C:Accounting 8.3 (edition 3.0) since 2014, the program does not see the personal income tax paid. The accrued one sees it, but the paid one does not. What's the matter?
The whole point is that the entries in the register “Calculations of tax agents with the budget for personal income tax” have not been created.
Additions to this register (document payment of wages) mean personal income tax withheld.
And subtraction from this register (by a bank statement document, for example) means that we have transferred the withheld personal income tax to the budget.
Thus, we need to open all the bank statements with which we paid personal income tax and make sure that, along with the postings, there are entries in this register. If there are no entries, re-post the statements, having previously unchecked the “Manual adjustment” checkbox in the transactions. This checkbox may be automatically checked by the program when transferring from 8.2 to 8.3 and interfere with filling the register we need.
Sincerely, (teacher and developer).
We propose to consider the nuances of calculating and withholding personal income tax in the 1C 8.3 program. And how to properly prepare for reporting on forms 2-NDFL and 6-NDFL.
An important point is the setting in 1C “Registration with the tax authority”, which is responsible for submitting reports to the tax service. Go to the “Main” menu tab and select “Organizations”.
We go to our organization, click “More” and in the drop-down list select the item “Registration with the tax authority”:
The next important setting is “Salary Settings” in the “Salaries and Personnel” section.
Go to the “General Settings” section and indicate in the item “Payroll and personnel records are kept” - “In this program” so that the corresponding sections are available.
Here we go to the “Personal Income Tax” tab, in which we indicate the procedure for applying standard deductions “On a cumulative basis during the tax period”:
Tariff of insurance premiums - “Organizations using SOS, except agricultural producers.”
Accident contribution rate – indicate the rate as a percentage.
All accruals made are based on the income code for individuals, which can be viewed in the built-in directory “Types of personal income tax”.
This reference book can be adjusted; to do this, return to “Salary Settings”, expand the “Classifiers” section and follow the “Personal Income Tax” link:
Then the “Personal Income Tax Calculation Parameters” window opens and go to the desired tab “Types of Personal Income Tax”:
To set up personal income tax taxation based on accruals and deductions, in the “Salary Settings” window, expand the “Salary Calculation” section:
To start accounting for wages and personal income tax, the established parameters are sufficient. But do not forget to update the configuration to the current one.
Personal income tax is accrued and calculated for each actual income received monthly at the end of the reporting period (month) according to the documents “Payroll”, “Vacation”, “Sick Leave” and others. Let's look at the document “Payroll”.
The tax amounts for each employee will be reflected on the “Personal Income Tax” tab:
The same information can be viewed in transactions:
Based on the document, an entry is created in the register “Accounting for income for calculating personal income tax” and reporting forms are filled out:
Expenditure cash order for the issuance of cash DS;
The document posting date will be the tax withholding date.
Let us pay attention to the document “Personal Tax Accounting Operation”. It is used to calculate personal income tax on dividends, vacation pay and other material benefits. To create a document, you need to go to the “Salaries and Personnel” tab, the “Personal Income Tax” section and click the “All documents on personal income tax” link.
We get into the magazine. To create a new document, click “Create” and select the desired option from the drop-down list:
An entry in the register “Settlements of taxpayers with the budget for personal income tax” forms almost every document that affects personal income tax.
Let's look at the example of the document “Write-off from a current account.” Let’s go to the “Salaries and Personnel” tab and open the “Bank Statements” item:
Let's create this document. And based on this we will write off from the account:
As well as movements across registers.
Answering questions from our users and clients, today we will look at the process of correctly filling out and generating such a fairly common document as a certificate.
We will consider the process in the 1C Enterprise Accounting configuration version 8.3. Exactly the same steps to generate a 2-NDFL certificate must be performed in Salary and Personnel Management 3.0.
The procedure for generating a 2-NDFL certificate for the tax office and separately the procedure for generating a 2-NDFL certificate for employees will be shown. We assume that the database of our enterprise is filled with data both in it and in it.
Filling out a 2-NDFL certificate for the tax office (IFNS)
To create a 2-NDFL certificate for the tax office, you need to be on the main page and go to the “Salaries and Personnel” menu.

This is where the choice of options for generating a 2-NDFL certificate becomes available. Those. for the tax office or for employees.

We select “2-NDFL for transfer to the Federal Tax Service” and get into the document log, where previously generated 2-NDFL certificates are stored for transfer to the tax authority. In our demo database, the log is empty. It is worth noting that if we had several organizations and had 2-NDFL certificates generated for them, then the selection could be performed by selecting the organization from the drop-down list and checking the selection activation box. The journal interface also allows you to search through documents and print certificates.

Let's generate a new document by clicking on the "Create" button.


Fill in the required details. Select the year and indicate the organization. The program will set up some mandatory details on its own based on these data. This is possible if you correctly fill out the directory of organizations and the card of the selected organization.

We indicate the option that determines the type of certificate. The program will insert the date and number automatically; they can be edited if necessary.

We determine and indicate how our new certificate will be recorded in the tax office, select the type - “Initial”, “Correcting”, “Cancelling”. If the document is corrective, then we will also add the correction number. Let's assume that we are doing the original one, i.e. initial certificate.
We check the completed details and click the “Fill” button.

If accounting is configured and maintained correctly, then as a result, a list will be generated in the tabular section. This register of employees is needed to be sent to the tax authority. If you try to generate a report for an organization or a period for which there was no source data, the program will display a warning.

Now the reference document can be recorded and/or posted. After checking the correctness of the generated data, you can download the help in *.xml format for subsequent sending. By clicking on the “Upload” button, we can save the xml file with the desired name into a folder for subsequent processing by the program for sending it to the Federal Tax Service.

Also, if you are connected to the appropriate services, you can use the opportunity to check and send the register of 2-NDFL certificates to the Federal Tax Service via the Internet.

And finally, you can print the generated data. To do this, click the interface button of the same name.

Let's select the type of printing form we need and the program will generate a printed document. In our case, if you choose to print a certificate, the system will generate certificates for each employee from the list.

Filling out the 2-NDFL certificate
Similar to the case discussed above, go from the form of the main page of the program to the “Salaries and Personnel” menu button and then select “2-NDFL for employees”.

In the journal that opens, similarly, click the “Create” button to generate a new document “Certificate 2-NDFL for employees.” Selection by organization is similar to the case with a tax certificate.
Now the created new document is opened.

We enter the organization, the OKTMO and IFTS fields will be filled in automatically. This will happen, naturally, provided that the organization’s registration card is completely and correctly filled out. Next, select an employee.

Then we move on to choosing a formation option. You can select a summary formation and a formation broken down by OKATO/KPP and tax rates. If we choose the second option, then we will need to carefully edit the fields “OKTMO” and “IFTS” that were automatically filled in earlier.


After generating the certificate, we perform the verification by clicking on the appropriate button. If there are inaccuracies in the data, the program will report an error. then, if necessary, we print a 2-NDFL certificate for the employee.

We print the document. It is worth noting that if the certificate is generated for previous periods, then its printed form will correspond to the form that was in force at the time specified in the period of formation.


This is how 2-NDFL certificates are generated in the 1C Enterprise Accounting 8.3 and 1C Salaries and Personnel Management 3.0 8.3 programs.
In the 1C Enterprise program 8.3 Salaries and personnel management, ed. 3, this can be done through the menu for transfer to the Federal Tax Service:
Click the Create button to generate the information:
- Select the type of certificate: Annual reporting with code 1; About the impossibility of withholding personal income tax with code 2;
- When choosing an organization (in our case, it is Kron-Ts) the Federal Tax Service and OKTMO/KPP will be filled in:

By clicking on the Open button opposite OKTMO/KPP, you can see and edit information about registration with the tax authority:

It is the choice of OKTMO/KPP in 1C 8.3 that regulates the possibility of submitting individual information 2 personal income tax for a separate division.
We will create the tabular part by clicking on the Fill button:

In this case, the Transferred column will be filled in if the document journal entries Transfer of personal income tax to the budget (menu Taxes and contributions) in 1C 8.3 ZUP rev. 3 have been generated:

The entry Transfer of personal income tax to the budget can be generated directly from the Statement to the cashier or the Statement to the bank if the Tax transferred along with the salary checkbox is checked on the hyperlink Payment of wages and transfer of personal income tax:

For more details on how personal income tax withheld in 1C 8.3 ZUP is taken into account, watch our video:
But let’s return to the formation of Information in Form 2 of Personal Income Tax. By clicking the Print button we can create a Register from 2014 or an additional Register:

Sample of filling out the register of information on income for certificates 2-NDFL in 1C 8.3 ZUP
Since 2014, the register contains the following information in the tabular section: certificate number, full name of the individual, date of birth. This is the form provided for by regulatory documents:

But sometimes tax inspectors ask for expanded information. To submit such information, you can use the Additional Register form from 2014, where the table has 4 more columns with the amounts of income calculated, withheld and transferred tax:

If in the Register the total is the number of certificates, then in the Additional Register the total amounts of income and taxes are also considered.
How to create a register of income information for 2-NDFL in 1C 8.3 Accounting
We use the section Salaries and personnel - 2 personal income tax for transfer to the Federal Tax Service. The rest of the procedure for creating the Personal Income Tax Register in 1C 8.3 is similar to that discussed above:

Filling out the register of information on income 2-NDFL for separate divisions in 1C 8.3 Accounting 3.0 (Professional and basic)
Note that for separate divisions it is possible to automatically fill out 2 personal income taxes only in the 1C 8.3 version of CORP Accounting, where for separate divisions we can indicate our OKTMO/KPP. For this:
- We will hire employees to these separate divisions;
- Then we will calculate wages and withhold taxes in the context of these OKTMO/KPP.
In standard configurations of 1C 8.3 Accounting Basic and PROF there is no such option. But let's look at how to “outwit” the program and still get certificates 2 personal income tax and the Register in 1C 8.3 Basic and PROF accounting.
Method 1. For separate departments with a small number of employees
We fill out 2 personal income taxes according to the main set of OKTMO/KPP, retain only the employees of the separate division, record data on employees, change the OKTMO/KPP set in the header to the required one, restore (manually) the data and create the Register.
This option is acceptable for separate departments with a small number of employees. We proceed from the fact that it is small companies that calculate salaries in accounting.
Step 1
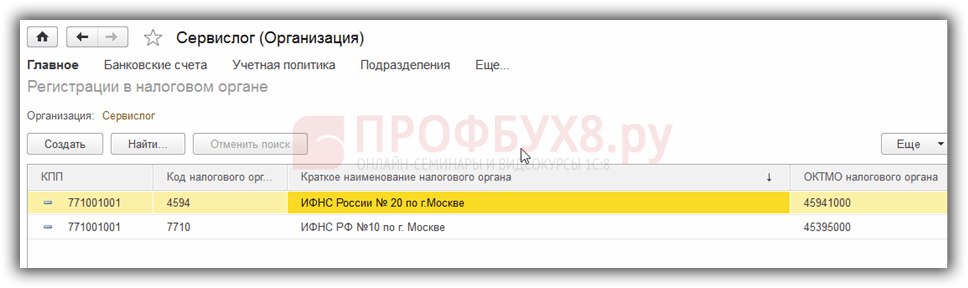
From the Salaries and Personnel menu, we create a new set of personal income tax information for transfer to the Federal Tax Service. When choosing an organization (in our example - Servicelog), OKTMO/KPP 45395000/771001001 were filled in:

It was according to this OKTMO/KPP that the personal income tax was taken into account in the 1C 8.3 program for all employees. But, for example, you need to provide information on Pushkin to Alexander Sergeevich, who worked in a separate unit with another OKTMO/KPP.
Step 2
Click on the Fill button. We fill out the form for all working employees. In this case, all information about them is filled in:

Step 3
We are removing all employees, except for employees of a separate division. Following the example, we leave only A.S. Pushkin in the table. We may need to correct the reference number. You can do the opposite - use the Selection button and immediately select employees for a separate department.
Step 4
We record the data. For example, using a screenshot we will record data on A.S. Pushkin:

Step 5
We change the OKTMO/KPP set in the header of the document to the OKTMO/KPP set of a separate unit:

Step 6
You can ask the programmer to add a checkmark Do not change table data when selecting other OKTMO/KPP and register this option in the 1C Accounting 3.0 configurator. Then you wouldn’t have to fill in the data manually. But so far there is no such daw. The data is reset, but using previously taken screenshots, we restore it manually for the employee.
Step 7
We record the document and create a Register and certificates. The result was a set of information for a separate unit. We create another set of information for all other employees according to the main set of OKTMO/KPP, while removing A.S. Pushkin from the tabular part.
So, despite recording data for one set of OKTMO/KPP, in 1C 8.3 a personal income tax register was formed for another set. But you should always check manually entered data. Of course, this solution is not very beautiful, since it is not done automatically and requires a lot of work.
How to enter OKTMO/KPP of a separate division in 1C Accounting rev. 3
You can enter additional information about registration (another set of OKTMO/KPP) in 1C Accounting edition 3 by clicking on the link More in the organization card:

We enter additional information about registration - another set of OKTMO/KPP:
Method 2
Let's use the trick. The essence of this trick is that we count all employees except employees of a separate department. At the same time, we have installed the main tax inspectorate of the organization. Then we establish the Federal Tax Service Inspectorate of the separate division as the main one for the organization and carry out the calculation, payment and transfer of salaries of the employees of the separate division:
- An undeniable plus: the required OKTMO/KPP are recorded in registers. And we will not only form 2 personal income tax certificates with the Register correctly for a separate division, but also, for example, the Tax Accounting Register for personal income tax;
- Minus This option - do not forget when recalculating, paying wages and when transferring personal income tax, to correctly set the main Federal Tax Service.
So, let's look at how to do this step by step using an example.
Step 1
Our organization Servicelog has IRS 7710 selected in its card:

Step 2
We calculate the salaries of Abdulov and Larionova’s employees, except for employees of a separate division (following the example of Pushkin). We can view movements by register using the DtKt button or using the menu View - Settings of the form navigation panel.
When the Payroll document is open, you can display the required register in the document form for ease of viewing. So, we display the Income Accounting register for calculating personal income tax in the form:

In the register we see that the entry was recorded according to the main inspection selected in the organization’s card:

We pay salaries and transfer personal income tax. Let's look at filling out the Registration details. We are interested in the registers Calculations of taxpayers with the budget for personal income tax and Calculations of tax agents for personal income tax:

Step 3
We change the Federal Tax Service Inspectorate in the organization’s card to the Federal Tax Service Inspectorate of a separate division:

Step 4
We calculate salaries, make payments and transfer personal income tax to the budget for employees of a separate division. In our case, according to Pushkin A.S.
We will receive the necessary entries in the registers, where the registration will already be marked as IFTS 7720:

It is necessary that all fields of 2-NDFL are filled out correctly: income, personal income tax accrued, withheld, transferred. Therefore, we control the register entries - Accounting for income for calculating personal income tax, Calculations of taxpayers with the budget for personal income tax, Calculations of tax agents for personal income tax.
Step 5
Now that records in the registers for employees of a separate division contain correct information about registration with the Federal Tax Service, you can automatically fill out the personal income tax register for a separate division.
Select the required OKTMO and click the Fill button:

Thus, we completed the task of creating a Register of information on income 2-NDFL for a separate division in 1C 8.3 Professional and Basic Accounting.
However, it is more convenient to take into account salaries and prepare reports for organizations with separate divisions in 1C 8.3 ZUP rev.3.
The procedure for submitting 2-NDFL and the accompanying register
When preparing certificates in Form 2 of Personal Income Tax and the Register, you must follow the Procedure for submitting information on the income of individuals and messages about the impossibility of withholding tax and the amount of tax on personal income (approved by Order of the Federal Tax Service of Russia dated September 16, 2011 No. ММВ-7-3/576).
The register usually accompanies 2-NDFL certificates submitted to tax agents on paper or floppy disks and flash cards.


")

- KUDiR: filling samples
- 1s 8.3 zup personal income tax calculation. Changes in the calculation of personal income tax due to changes in the Russian Tax Code
- Put the sentences in the present continuous tense
- Linear equations. Types of linear equations. Linear equations with one and two variables, linear inequalities How to understand a linear equation with two variables
- The Comprehensive Guide (2019)
- Who discovered the number Pi? History of computing. What is the number “Pi”, or how do mathematicians swear? The meaning of pi in physics
- Part C1 tasks (2 points) What types of environmental factors contribute to the regulation of wolves
- What environmental factors contribute to the regulation of wolf numbers? What is the role of bacteria in the cycle of substances?
- Anania Shirakatsi on a global scale
- Beginning of a commander's career
- Peter II - biography, information, personal life
- Constant change in the value of the same values
- Reflection of turnover in the accounting model How to find the movement of goods in 1C
- reasons and stages of transition from batch accounting system
- Deductions from employee salaries in 1C
- Reflection of turnover in the 1s 8 accounting model
- 1s 8.3 personal income tax payment register. Setting up payroll accounting
- Adjustment entry (reversal)
- 1s unitary unit complete set of nomenclature
- Register of personal income tax payment in 1s 8