Installation of taps for connecting the washing machine to the water supply. How to connect a faucet in the bathroom: tips for choosing and installing Connecting and installing a faucet for
Add site to bookmarks
- Kinds
- Choice
- Mounting
- Finishing
- Repair
- Installation
- Device
- Cleaning
Ball valve: replacement of an old product and installation of a new one
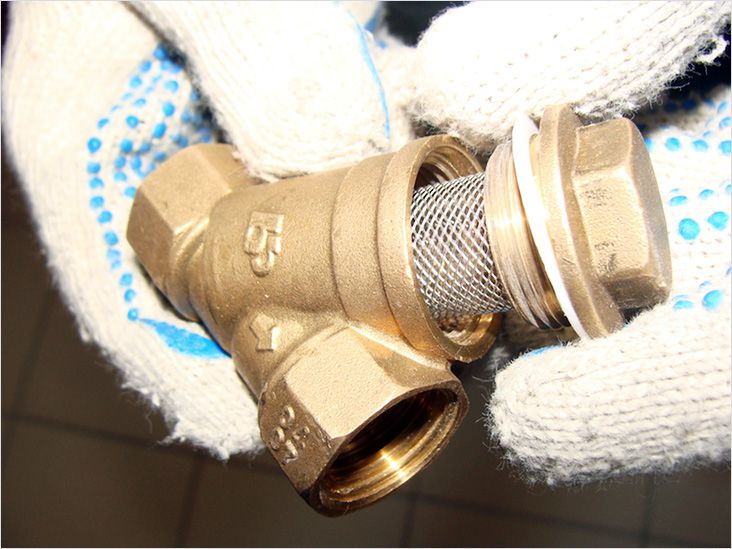
Ball valves are modern products that have replaced conventional rod valves, at the bottom of which a thick rubber band was screwed to stop water. The stem of such a tap pressed the rubber, as a result of which the water stopped flowing. Modern ball valves are more convenient and attractive in appearance, they have only one drawback: if the water contains a large amount of various salts, then the ball-sphere quickly slags and the product stops working.
When installing a ball valve on a thread, it is necessary to wind fum-tape, flax or liquid fum.
To prevent this from happening, you need to open and close the tap at least once every 2 months to knock down salt deposits. Installing a ball valve is a fairly simple event, and you can do it yourself. However, in order to correctly and efficiently perform the installation of a ball valve, you need to prepare for its installation and clearly follow the instructions.
Preparing to install a ball valve
In order for the installation of a ball valve to be easy and without any difficulties, it is necessary to properly prepare for it. It is very convenient in that it allows you to turn off the water immediately after the need arises. For this, as a rule, a ball valve is used, which is installed on a common water riser.
The installation of ball valves makes the use of water supply and various maintenance and repair work easier and more convenient.

In order to install a ball valve, it is necessary to shut off the water supply in the entire riser. In view of this, you need to worry in advance about obtaining permission to turn off the water supply from the relevant companies. You should prepare all the tools and materials that are necessary in order to properly install the ball valve on the riser with your own hands. The set of tools for installation is minimal:
- gas or adjustable wrench;
- fum tape (yellow or white tape for winding threads).
Back to index
To properly install the ball valve on the riser with your own hands, adhere to the following recommendations. When replacing an installed element, you must begin by draining the existing piping system. If the installation is carried out in an apartment or a private house, then in the place where the old fittings will be dismantled, it is necessary to prepare several rags or some suitable container for draining water from the system. This will allow you to work in more comfortable conditions in the future.

It is necessary to determine the future installation site so that the valve is installed with the possibility of normal access to it and the freedom to turn the valve handle to the open and closed positions is ensured.
Do-it-yourself high-quality installation of a crane requires, first of all, right choice products. The ball valve must be selected in such a way that its diameter corresponds to the diameter of the riser on which it will be installed. Please note that the valve flanges may have different types of threads. Before you buy a product and start installing it yourself, you need to decide on the appropriate type of element.
The type of product will depend on the location of its installation on the existing pipeline. Before proceeding with the installation of a ball valve with your own hands, pay attention to the arrow on the marking. The direction of the arrow must correspond to the direction of motion of the medium. This condition is very important to observe for the normal functioning of the system. You need to choose a model with a suitable thread. Ball valves are of several types:

When screwing a ball valve onto a pipe, it must have at least 4 threads.
- with external thread on both sides;
- with internal thread on both sides;
- on the one hand external, and on the other - internal;
- American on one side and domestic on the other.
The installation of the product is carried out only after the fum-tape or flax with sealing paste is pre-wound on the thread, which will ensure the sealing of the connection. Instead of fum tape and linen, you can use liquid fum (suitable for connections no larger than 2 ′).
When winding tape and linen, make sure that the direction of winding coincides with the direction of winding the element onto the pipe. After the installation is completed, you must once again make sure that nothing prevents the normal rotation of the handle of the product.
If, when winding the ball valve onto the pipe, it rotates too easily (by hand), then more fum-tape or flax should be wound until the product is twisted with a certain effort. Try not to apply too much effort, as in this case installation can end in failure: the product will simply burst.
After acquisition washing machine it must be connected to the water supply and sewerage. For this, the use of a number of additional elements is provided, one of which is a faucet for a washing machine. In connecting the unit to the water pipe, this is an extremely important fitting.
We will tell you how to choose and install a tap that allows you to open / shut off the water supply to the washing machine. We will tell you what type of device to choose and how to install it correctly. Our recommendations will help home craftsmen cope with the work on their own.
The tap that is used when connecting the washing machine to the water supply plays an important role. With it, you can instantly turn off the water in case of unforeseen circumstances, for example, when the machine fails, which can lead to leaks.
It poses an even greater danger in water pipes: it can violate the integrity of the elastic hose of the washing unit, resulting in a large-scale flood that will cause justified indignation of the neighbors.
To ensure the complete safety of using the automatic machine, it is recommended to close the tap connecting the unit to the water pipe immediately after washing is completed.
To prevent this from happening, it is necessary to connect the machine through a tap. This part is recommended to be placed in a conspicuous place in order to always have quick access. In an extreme situation, such a decision will allow you to win a few minutes, which can be decisive in preventing flooding.
Types of cutting devices
A wide range of taps is available in specialized stores. Let's take a closer look at the most commonly used types.
Among them, one can note multi-turn ones that block the flow of water due to the movement of the plate, as well as, which are turned on and off by moving a small ball installed inside the structure.

To connect automatic machines, various types of cranes are used, differing in configuration, size, shape and design.
Ball valves have a number of advantages:
- high tightness;
- quick response, allowing you to quickly block the flow of water;
- simplicity of design, contributing to the prolongation of the operational period.
It is also worth noting the small size of this variety of cutting devices, which allows them to be used even in the most cramped circumstances.
Types of ball valves
There are several types of ball cutters. Consider the main ones used to complete the process of connecting a washing machine at home.
Option #1 - through
Such a mechanism has outlets on both sides, which allows you to shut off the water, dividing the branch into two parts. Devices belonging to this category can be installed on a separate pipe that extends from a common riser to any plumbing item, or used for tapping.

Straight-through ball valves are often used to connect washing units, but they are also suitable for other plumbing devices, for example, they are often used to connect toilet bowls
Option #2 - tee (three way)
As the name implies, such a device is equipped with three inputs and outputs. One of the holes is directly responsible for blocking the water flow, the other two serve to combine all the water supply outlets into a single system.

A three-way tap is often used to connect dishwashers or washing machines to the water supply network. The use of this element allows you to provide autonomous water supply for several devices at the same time
These components, which can be of various sizes, shapes and configurations, are typically used for applications where they are often combined with other fixtures such as a faucet. This function is not available to a conventional flow faucet due to its design.
Option #3 - Angular
The design of this element corresponds to the features of the through fitting. With this tap, you can divide the outlet pipe into two independent branches located at right angles.
A similar element is most often used when installing toilets, but it is also well suited for connecting non-standardly located washing machines.

An angle type ball shut-off valve can be used if it is necessary to connect the unit to a water pipe laid against a wall. In this case, it is extremely difficult to perform a direct retraction
The complete set of taps of all categories includes sealing rings, fixing nuts, as well as rotary handles, with the help of which water is shut off and accessed. The last element is attached to the part body with a lock nut.
What kind of faucet do you prefer?
In the process of choosing a faucet model, you must first of all proceed from the place where you plan to install the washing machine. In smaller rooms, it is better to use corner elements, with which you can reduce the connection space.
If it is necessary to connect two or more plumbing fixtures at the same time, it is better to use a three-way valve, and if there is an outlet for the washing unit, a ball valve through.

An important factor when choosing cranes is the material from which the products are made. Although silumin elements are more expensive, you need to pay attention to the material from which the crane is made. Silumin products are cheaper than brass, but the latter are durable and able to withstand heavy loads.
It is also necessary to pay attention to the diameter of the device, which must match the dimensions of the water pipes. And also take into account the features of the thread - its size, location with an external or inside. The last parameter can be omitted if self-threading is expected during the installation of the crane.
No less important is the angle of rotation of the device: it is not very convenient to use the device, the valve of which closes towards the wall, touching it.
Choosing a faucet for the kitchen, it is necessary to follow not only aesthetic considerations, but also its practicality. At the same time, not only in terms of ease of use, but also ease of installation, as well as opportunities for ongoing repairs. Therefore, before going to the store, it makes sense to study the features of models of various designs and the nuances of their connection.
When choosing the optimal model, the following points are taken into account: 
- dimensions and depth of the sink;
- free space in the sink between the bowl and the wall;
- size and location tap hole.
The following types of kitchen faucets are most widely used:
- crane box;
- single lever;
- electronic.
Kinds
- Traditional axle box cranes are simple in design and reliable. The main working element in them is a crane box, which, if necessary, is easy to replace or repair. Accordingly, this does not raise the problem of how to change the faucet in the kitchen as a whole. Crane boxes are of two types: ceramic and worm. In the first, locking and adjusting the flow of water is carried out by rotating ceramic plates with a hole relative to each other. Secondly, by raising and lowering a rod rotating along the thread.
- Single lever kitchen faucet is more convenient to operate, because it has one single control. The main element in it is a cartridge, very similar in design to a faucet box, but controlling two streams of water at once. Cases of single-lever models can be either fixed or rotating relative to the installation axis. There are also ball tanks in which water is blocked by a rotating ball with holes.
- Electronic options allow you to supply water at a constant temperature. Some models are able to turn on water from a non-contact sensor. However, they are structurally very complex devices, which inevitably increases their cost. The power supply can be from the mains or from batteries.
The height of the spout is selected taking into account the features of the sink bowl. For shallow models, models with a low spout that reduce splashing are better suited.
In the kitchen, installation is most often done either directly on the sink bowl or on the countertop.
Preparation of materials and tools
Before changing the crane, it is necessary to prepare a complete set of tools and consumables.
 Of the tools you will need the following:
- wrench or wrench by 10-12 mm;
- tubular wrench for screwing hard-to-reach nuts;
- pliers; screwdriver;
- rag;
- basin or suitable sized bucket,
- flashlight.
From the materials it will be necessary:
- mounting kit attached to the device (stud, o-rings, nut and half washers);
- fum sealing tape or flax with special impregnation (the English sealant Tangit is especially well suited);
- silicone sealant;
- flexible eyeliner.
The length of the inlets is chosen so that the hose does not break at an acute angle, but does not stretch.
Before you replace the faucet in the kitchen, it is advisable to purchase new supply hoses (often included with a new faucet).
As an eyeliner, bellows or reinforced hoses can be used.
- Bellows connections made of stainless steel, they are distinguished by high reliability and high cost.
- Reinforced hoses more common due to low price and sufficient reliability.
You can indirectly determine which kitchen faucet is better by the quality of the connections.
Reliable products have the following features:
- stainless steel or aluminum braid;
- ethylene propylene rubber (EPDM) hose.
- tips and fittings made of stainless steel or brass.
Dismantling the old faucet and hoses
To replace the crane with a new one, you must first dismantle the old equipment.
This requires a number of operations. 
- Overlapping water on the way to the sink.
- Taps open so that the remaining water in the pipes can freely pour into the sink.
- If the sink is an overhead type, then it is detached from the cabinet.
- Disconnecting the water line from the water pipe. At this stage, it is advisable to use a basin where the remaining water will merge.
- The siphon is unscrewed.
- The sink is lifted and installed on the pedestal in such a way as to provide free access to the place where the device is attached.
- Disconnect flexible hoses.
- If there is a watering can, then it is also disconnected.
- Fastener unscrews.
Then you should hold the spout with one hand, and unscrew the threaded fastening pin with the other and remove the old faucet.
Kitchen faucet installation
Assembly

First of all, you should assemble the device itself. those. screw on the spout, aerator, install handles, etc. The sequence of operations may be different for different models and for different manufacturers. For more details and features, please refer to the instructions that come with each device. When choosing a faucet for the kitchen, it is advisable to make sure that this document is clear.
Assembling the crane, you should not make significant efforts. As a rule, all nodes are freely screwed on by hand. If the use of keys is required, then they must be used with the utmost care. Otherwise, there is a risk of damage to the chrome finish of the device.
At the same time, fabric slips will be an excellent solution for how to install a faucet in the kitchen and not ruin it.
The length of the fittings can be either the same for both connections, or different. The second option is used by many manufacturers to facilitate installation work. The procedure for further actions will depend on where the faucet is attached: directly to the sink or to the countertop.
Installation on the sink
There are two ways to fix a two-valve faucet on a sink:
- on a hairpin
- on the nut
With stud attachment
 In the first case, a threaded rod should be screwed into the valve body before installation. It is threaded along its entire length, however, before screwing in, you must make sure that the slotted notch remains on the outside and does not go into the valve body. This is necessary to simplify the repair or dismantling in the future.
In some models for overhead sinks, there may be two such studs. Next, an annular gasket is put on the base of the crane.
It is necessary to make sure that she lies down on the place intended for her.
In some cases, the gasket may have a complex shape and must be properly oriented during installation.
At the next stage, flexible hoses are inserted into the sink hole and the kitchen mixer tap is installed in place. When performing this operation, it will be convenient if you turn the sink so that you can work with both hands both from above the bowl and from below.
Then a rubber seal is put on, sealing the installation site on the underside of the bowl. The shape of this seal coincides with the shape of the pressure plate.
Now you can put on the pressure plate and screw the nut onto the threaded rod. When the tap is fixed, proceed to fix the sink on the cabinet.
With nut fastening
 Installation on the nut is done in a slightly different way. Cranes of this design have at the base a wide cylindrical part with a thread, on which a fixing nut is screwed. Connecting the eyeliner to such a base is much easier than in the case of fasteners on a hairpin. Therefore, the supply hoses will be connected after the installation of the faucet on the sink. This moment will not be superfluous to take into account when deciding which mixer to choose.
Installation consists of several operations:
- Gasket installation into the groove under the base of the device;
- The threaded part is inserted into the mounting hole of the sink. When performing this action, it is necessary to control the position of the elastic pad;
- Another rubber gasket from the delivery set is put on from the bottom of the sink. It differs from the top gasket in shape. If the top one looks like a thin rubber O-ring, then the bottom one is flat and wide. At the same time, the arrangement of the faucet in the kitchen may be different, and the shapes of the gaskets may also differ;
- The fixing nut is screwed on. In this case, it is necessary to control the position of the mixer base. The front of it should be facing the front edge of the sink. If the design of the tap is such that it is difficult to visually determine its position, then the alignment is checked by turning the spout. In both directions, it should deviate by the same angle. If the tap is located in the corner of the sink, then it should be oriented along the diagonal of the sink;
- Connecting hoses. First of all, a hose with a short fitting is installed, then with a long one (disassembling the kitchen faucet in the reverse order). Additional sealing of the eyeliners is not required, since rubber o-rings are already present on their fittings. Their existence should not be forgotten when connecting the eyeliner. The tightening force should not be excessive, so as not to damage the rubber seals.
The final stage is the installation of the sink on the cabinet.
Countertop installation
 This installation option is in many ways similar to mounting on a nut. The difference is that in this case the sink usually does not have wide sides with space for a tap. Therefore, the mortise mixer will have to be located on the countertop, in the immediate vicinity of the sink.
The mounting location must be chosen in such a way that it is convenient to reach the crane controls. In this case, it is necessary to check that in the working position the spout is above the sink.
Having decided on the fastening point, proceed to drilling a hole in the countertop. To do this, use a drill and a pen on wood. Pen diameter - 38 mm. The rest of the steps will be:
- supply hoses are threaded into threaded cylindrical fasteners;
- the eyeliner is attached to the base of the mixer;
- cylindrical fasteners are screwed there;
- the upper rubber gasket is put on;
- the whole structure is inserted into the hole in the countertop. It will not be possible to thread the eyeliner nuts into the hole at the same time, so they are threaded sequentially one at a time;
- from below, a rubber gasket, washer and nut are put on the fasteners.
Then the position of the mixer is checked and the whole structure is tightened with a key.
The built-in mixer is mounted in almost the same way.
Installation of coarse filters
 Tap water often brings with it a lot of garbage:
- sand,
- pieces of rust, etc.
To save the aerator and mixer cartridge from contamination, it is necessary to use coarse filters.
It is best to install the filter on the outlet from the riser, where it will be easy to maintain. In this case, it is necessary to control the position of the oblique pipe with a filter mesh. It should always be tilted downwards, which makes it easier to clean the mesh.
In addition, the arrow on the filter housing must match the direction of water flow.
Hose connection
The choice of a faucet for the kitchen also depends on the availability of high-quality hoses in the kit. On one end they have a fitting for connecting to a mixer, on the other - a union nut for connecting to a water supply. One or two O-rings and rubber are put on the fitting. They are quite enough to ensure tightness when connected to a new mixer.

After completing the installation of the mixer, you need to make sure that it is working and that all connections are tight. To do this, open the tap on the riser and the mixer in the kitchen. After the air escapes, the mixer is closed and leaks are monitored for half an hour.
Most often, leaks occur due to improper assembly of the faucet and poor sealing at the connection points.
- In the first case it is necessary to disassemble the valve and reassemble it, making sure that the gaskets and the cartridge are correctly positioned. You can find information in the instructions on how to disassemble the mixer.
- In the second case- use fum-tape or flax for a tighter connection of the fitting or union nut.
a little more problems can bring a pull-out kitchen faucet in which the hose to the watering can is damaged. It is better to replace such a part as a whole.
Is it necessary to install ball valves in front of the mixer
The ball valve has only two working positions:
- open,
- closed.
Installing such a faucet allows you to cut off the faucet from the water supply for repair or replacement. However, in practice this does not always make sense.
As plumbers recommend, first you need to study the water distribution scheme for the apartment. If immediately after the tap from the riser there is already a ball valve, then there is no need to duplicate it. If desired, you can put a valve or gearbox that will help limit the water pressure in the tap.
How much does it cost to change a kitchen faucet
The total replacement cost will be the sum of the cost of the crane itself, consumables and installation work. At the end of 2018:
- The minimum price of a kitchen faucet is 400 rubles. Maximum - from several thousand.
- Which mixer is better is up to the owner to decide, but more expensive models will always be more reliable. The coarse filter costs from 120 rubles.
- In most cases, you won't have to spend money on eyeliner., since it is usually included in the kit. If it is not there or there is not enough length, then for the hoses you will have to pay from 150 rubles.
- Calling a plumber will cost from 400 rubles. At self installation work will be free.
So that the problem of “how to choose a kitchen faucet” does not bother too often, it is enough to replace worn-out gaskets, cartridges and aerators in a timely manner. In addition, it is periodically necessary to clean the coarse filter and monitor the condition of the mesh inside it.
When connecting household equipment and faucets to the water supply, it is necessary to strictly follow all the stages of work that will help to avoid leaks. Such a connection is made in different ways, it all depends on what kind of equipment needs to be installed. Consider three main situations when it may be necessary to install plumbing equipment to a common water supply. Let's find out how to connect a sink with a tap, a conventional washing machine and a complex installation for a wall-hung toilet at home. Will any permission be required?
When installing the sink, you need to be guided by the fact that it should be at a height of 850 mm. from the floor and be as close as possible to the water supply point.
Connecting the sink to the water supply
Before you connect the sink and faucet to a common water supply system, you need to consider a few points:
- a general shutdown of water for the entire riser of the house will be required. This requires prior contact with the relevant service authorities, agreements with your neighbors. You may need permission from the Housing Office (the work itself must be planned at a convenient time for everyone);
- when connected to the water supply, a situation may arise when at the same time it is required to install water meters for cold and hot water. Installation permission is unlikely to be required, but for sealing you will have to contact the relevant organizations;
- next, you should determine the place for installing the sink, usually a height of 850 mm above floor level is optimal for this. The installation site must be as close as possible to the water supply point. Otherwise, you will have to install additional pipes not only for water supply, but also for sewage.
The connection begins with marking the place for installing the sink, mounting the support or frame for the bowl. The sink fixture itself is mounted in this way:

Diagram of the sink with dimensions.
- holes are drilled according to the markings made, dowels are hammered into them;
- after that, special mounting studs are screwed in.
When fastening, it is necessary to ensure that all elements not only withstand the weight of the equipment, but also do not loosen when supported.
After the sink is installed, you can start connecting to the water supply. First, a mixer of the selected type is installed, which is attached to the surface of the sink with studs (if any), after which the water supply hoses are mounted. It should be borne in mind that after the installation is completed, nothing can be redone, just disassemble the system and start all over again. Hoses for the water supply of the house are passed through special holes in the sink, then nuts are put on the studs, which are tightened using a clamping element with sealing rubber.
When connecting to the water supply, it is worth making sure that the faucet spout is in the right direction, the faucet itself is installed at an angle of 90 ° relative to the wall. Be sure to check the tightness of all fasteners and connections to make sure there are no leaks, how firmly each unit is installed to connect to the water supply. Next, you need to put a gasket between the tap and the nut, you can’t tighten the nut tightly to avoid leaks. If everything is normal, then the connection to the water supply is correct.
Connecting the washing machine to the water supply

Scheme of connecting a washing machine to a water supply /
Connecting a washing machine to the water supply is both a very simple and painstaking task that requires compliance with certain rules. It is important to purchase all the required adapters and assemblies in advance, do not forget to turn off the water. Connect washing machine to supply cold water possible as follows.
Using a three-way valve or a regular tee with a tap. To perform the work, it is necessary to take a rigid pipe, a passage valve, a special flexible liner. The pipe for connecting to the water supply at home is plastic, the eyeliner must be flexible. The connection itself is carried out in this way: first, the flexible hose is unscrewed, after that the seal is wound up, the tee is mounted in place.
If necessary, the metal-plastic pipe for water supply is extended if the washing machine is at some distance from the connection to the water supply.

Wiring diagram for plumbing fixtures.
Connection using a repair clip (drainage). Such a connection is made using ¾ or ½ inch steel pipes; polypropylene pipes are allowed, which are more convenient to install and are more reliable. The connection process is carried out in this way: the pipe is crimped with four bolts for drainage, while the rubber gasket should be located without distortions. Next, we drill a hole with a diameter of 8 mm or more, wind the seal, screw the pipe 3-4 turns. For a ¾ inch tap with an external thread, a nut is screwed on, a gasket is required. The nut is hand-tight. After that, it is necessary to check how correctly the tap was connected to the water supply.
Direct connection to the faucet spout. This method of connecting a washing machine to the water supply at home is considered one of the most inconvenient. Today it is used extremely rarely, only if there is simply no other option to connect. In this case, for the first time before washing, it is necessary to connect the faucet spout, often unscrewing the shower hose. During washing, it is no longer possible to use water, since switching the mode leads to the machine stopping, disrupting its operation. Such a connection can only be called temporary, until it is possible to make a normal connection of hoses to the water supply for cold water supply.
When connecting a washing machine to the water supply, one must not forget about the observance of all safety measures. If an extension of the hose is required, then you must either initially take a whole piece, or use Aquastop, which will help to avoid such troubles as leaks. When choosing a faucet for connection, preference is given to such models that do not contain silumin material; you cannot choose nodes with too thick walls.
Connecting the wall-hung toilet installation to the water supply
Scheme of a hanging toilet bowl with dimensions.
To connect the toilet installation to the water supply, you do not need to have many years of experience. It is enough to follow a few simple tips that will help you do this work with your own hands quickly and efficiently. Today, hanging toilets are becoming increasingly popular, as they take up little space in the bathroom, and this is so important for a city apartment. In addition, all the required elements for connecting to the water supply and sewerage are hidden in the wall; external massive structures are completely invisible. There is only one minus - unlike a conventional toilet, it takes more time to install a wall-hung toilet.
Before starting the installation of the installation, an appropriate location for the equipment is selected. It is advisable to do this in a niche where it is possible to locate all pipes and connection points. If there is no such niche, then it must be made artificially. An opening with dimensions of 150x700 mm is enough; such a niche is closed after installation with drywall.
Scheme of installation of a hanging toilet bowl.
- a toilet bowl is installed, pipes are mounted, only after that you can connect to the water supply;
- during the installation of the installation, using the building level, the correct installation of the frame must be checked without fail. Only after that it is already possible to carry out the final fastening.
The connection of a suspended installation must be carried out with full responsibility, since all nodes will be closed by a wall, which means that during a leak it will be very difficult to get to the desired element of the system. Therefore, experts recommend using pipes only from polypropylene or copper, the quality of which has been tested by time. Other types of pipes cannot be mounted in the wall, as they cannot guarantee leakage protection. To seal threaded connections during installation, it is best to use tow with a special Unipak paste. Flexible hoses are not recommended. If you absolutely cannot do without them, you need to take stainless steel products.
But what about sewerage?
When connecting the installation to the sewerage, it is necessary to use a branch, which will be located at an inclination of 45 °. Connections are recommended to be coated with special sealants. Before closing the wall, once again check all connections, their tightness. If it is necessary to install counters in a niche behind a wall-hung toilet, then you must first obtain permission to seal it.
A rubber gasket is placed between the tile and the installation so that the tile does not crack. Typically, manufacturers offer such gaskets complete with a toilet bowl. Do not forget that connecting the toilet to the general water supply system of the house may require turning off the water in the riser, and this requires permission from the service organization of the house and from the neighbors. Therefore, before installing the toilet, consider this in advance, agree with all services in order to obtain permission.
http://bezsantexnika.ru/youtu.be/GBTSd2KgQJk" width="640" height="425" style="max-width: 100%">
Connecting various systems to the water supply at home is a complex, responsible process that can be easily done with your own hands. The sequence of work on connecting a conventional faucet or a complex installation of a wall-hung toilet is completely different. Therefore, be extremely careful and responsible.


- Succubus - who is it and how to protect yourself from a succubus?
- How to distinguish love from infatuation?
- When was Stalin taken out of the Mausoleum?
- Is valerian harmful for cats The cat was afraid how much to give valerian
- Moldy Foods: To Eat or Not to Eat?
- An operator-cashier is a wonderful profession in the banking sector. What does an operator do in a bank
- What does a biologist profession description
- What does a biologist do
- Why do fish need a swim bladder?
- What does the ring on the thumb mean?
- What does it mean to wear a ring on your fingers
- In what year did Zhirinovsky first run for office
- Who is a pedant? What is pedantry? Pedantry equals scrupulousness? Positive traits of a pedant
- Meaning of esthete Examples of using esthete in context
- what is haiku what is haiku
- Lily is a Tatar name. What does the name lily mean. Short and diminutive address
- Golden, red and black bananas
- Rule for adding square roots
- What is a can of Coca Cola made of?
- What should you remember before cloning yourself?